When your business relies on electrical and mechanical equipment then you need to use only the best and most current testing processes to inspect that equipment. Electrical infrared inspection is clearly the best method for protecting your equipment, your business and your staff. When a piece of equipment fails there are many potential risks above and beyond the lost time and revenue. There is the potential for further damage to the machine or other equipment in the area, there is an increased risk of a fire and there is an increase in the risk of injury to your staff. But all of this can be eliminated with routine inspections.
This technology not only provides more accurate results but it can be used during regular working hours with no downtime for your equipment. This saves you time and scheduling issues. In addition, the equipment is sensitive enough to detect slight changes in your equipment to alert you to wear before the point of a failure. After seeing the results of the testing you can order the appropriate replacement parts and schedule a maintenance window during normal down time. You will also be eliminating the need for time spent trouble shooting a piece of equipment when it fails.
Another indication of the reliability and importance of these tests is that most insurance providers will reduce your premiums when you commit to regular infrared inspections. It is a proven fact that these tests will help you to reduce issues and eliminate potential dangers that could result in claims on your insurance policy. It only makes sense to use the latest innovations for testing and maintaining your equipment. The small investment that you make in the inspection is likely to save you the cost of an expensive repair in the future and loss of production and revenue.
Elegance in Gray: Embracing the Timeless Appeal of Grey Kitchens is a comprehensive guide to creating a beautiful and timeless grey kitchen. Grey is a classic color that has been used in kitchens for centuries, and this book provides readers with the tools and inspiration to create a stunning grey kitchen of their own. From choosing the right shades of grey to incorporating grey into the overall design, this book covers all the essential elements of creating a timeless grey kitchen. With helpful tips and inspiring photos, Elegance in Gray is the perfect guide for anyone looking to create a classic and elegant grey kitchen.
How to Incorporate Grey into Your Kitchen Design: Tips for Creating a Stylish and Elegant Space
Creating a stylish and elegant kitchen design can be a daunting task, but incorporating grey into the space can help to make the process easier. Grey is a versatile color that can be used to create a range of looks, from modern and contemporary to traditional and classic. Here are some tips for incorporating grey into your kitchen design to create a beautiful and timeless space.
1. Choose the Right Shade of Grey: Grey comes in a variety of shades, from light and airy to dark and moody. Consider the overall look you want to achieve and choose a shade of grey that will complement the other colors and materials in the space.
2. Use Grey as an Accent Color: Grey can be used as an accent color to add depth and interest to the space. Consider using grey on the walls, cabinets, or countertops to create a subtle yet stylish look.
3. Incorporate Grey in the Accessories: Grey can also be used in the accessories and decor to add texture and interest to the space. Consider adding grey rugs, curtains, or artwork to the kitchen to create a cohesive look.
4. Balance the Grey with Other Colors: To create a balanced and harmonious look, be sure to incorporate other colors into the space. Consider adding pops of color with bright accents or using a neutral color palette to create a calming atmosphere.
By following these tips, you can easily incorporate grey into your kitchen design to create a stylish and elegant space. With the right shade of grey and the right balance of colors, you can create a timeless and beautiful kitchen that you will love for years to come.
The Benefits of Grey Kitchens: Why This Color Scheme is Perfect for Any Home
Grey kitchens are becoming increasingly popular in modern homes, and for good reason. This versatile color scheme is perfect for any home, offering a range of benefits that make it an ideal choice for any kitchen.
First and foremost, grey is a neutral color that can be easily matched with a variety of other colors. This makes it a great choice for those who want to create a unique and stylish kitchen without having to commit to a single color scheme. Grey can be paired with bright colors to create a vibrant and modern look, or with softer colors to create a more calming and relaxing atmosphere.
Grey is also a great choice for those who want to create a timeless look in their kitchen. The color is classic and timeless, and it will never go out of style. This makes it a great choice for those who want to create a kitchen that will look great for years to come.
Grey is also a great choice for those who want to create a modern look in their kitchen. The color is sleek and sophisticated, and it can easily be paired with modern appliances and fixtures to create a contemporary look.
Finally, grey is a great choice for those who want to create a low-maintenance kitchen. The color is easy to clean and maintain, and it won’t show dirt or grime as easily as other colors. This makes it a great choice for those who want to keep their kitchen looking great without having to spend a lot of time and effort on cleaning and maintenance.
Overall, grey is a great choice for any kitchen. It is versatile, timeless, and low-maintenance, making it the perfect choice for any home. With its range of benefits, it is easy to see why grey kitchens are becoming increasingly popular in modern homes.
Conclusion
Elegance in Gray: Embracing the Timeless Appeal of Grey Kitchens is a great resource for anyone looking to add a touch of sophistication and timelessness to their kitchen. Grey kitchens are a great way to add a modern and stylish look to any home. With the right design and materials, grey kitchens can be both beautiful and functional. Whether you are looking for a classic look or something more modern, grey kitchens can provide the perfect backdrop for any style. With the right design and materials, grey kitchens can be a great way to add a touch of elegance and timelessness to any home.
Fire pits are a great way to bring people together and create a cozy and stylish outdoor gathering spot. Whether you’re looking for a place to relax and enjoy a summer evening or a spot to entertain friends and family, a fire pit can be the perfect addition to your outdoor space. With so many different fire pit designs available, you can find one that fits your style and budget. From classic stone fire pits to modern metal designs, there’s something for everyone. In this article, we’ll explore some of the most popular fire pit designs and discuss how to choose the right one for your outdoor space.
How to Choose the Perfect Fire Pit Design for Your Outdoor Space
When it comes to creating an outdoor space that is both inviting and functional, a fire pit is a great addition. Not only do fire pits provide warmth and light, but they also create a cozy atmosphere that is perfect for entertaining guests or simply enjoying a night under the stars. With so many different fire pit designs available, it can be difficult to choose the perfect one for your outdoor space. Here are some tips to help you make the right decision.
First, consider the size of your outdoor space. If you have a large area, you may want to opt for a larger fire pit that can accommodate more people. On the other hand, if you have a smaller area, a smaller fire pit may be more suitable.
Next, think about the type of fuel you want to use. Wood-burning fire pits are the most traditional option, but there are also gas and propane fire pits available. Each type of fuel has its own advantages and disadvantages, so it’s important to consider which one is best for your needs.
Finally, consider the style of the fire pit. There are a variety of designs available, from classic to modern. Choose a design that complements the overall look of your outdoor space.
By taking the time to consider these factors, you can ensure that you choose the perfect fire pit design for your outdoor space. With the right fire pit, you can create a cozy and inviting atmosphere that is perfect for entertaining guests or simply enjoying a night under the stars.
Creative Ways to Incorporate Fire Pits into Your Landscaping Design
Fire pits are a great way to add a unique and inviting element to your landscaping design. Whether you’re looking for a cozy spot to gather around with friends and family or a place to relax and enjoy the outdoors, a fire pit can be a great addition to your outdoor space. Here are some creative ways to incorporate fire pits into your landscaping design.
1. Create a Focal Point: Fire pits can be used to create a focal point in your outdoor space. Consider placing your fire pit in the center of your landscaping design, surrounded by seating and other elements. This will create a cozy gathering spot for friends and family to enjoy.
2. Add a Pathway: Create a pathway leading up to your fire pit. This will add a sense of drama and intrigue to your outdoor space. Consider using stones, pavers, or gravel to create the pathway.
3. Incorporate Lighting: Add lighting around your fire pit to create a warm and inviting atmosphere. Consider using string lights, lanterns, or torches to light up the area.
4. Add Seating: Create comfortable seating around your fire pit. This will make it easier for people to gather around and enjoy the warmth of the fire. Consider using benches, chairs, or even cushions to create a cozy seating area.
5. Incorporate Plants: Incorporate plants and other greenery around your fire pit to create a natural and inviting atmosphere. Consider using shrubs, trees, and flowers to add color and texture to the area.
By incorporating these creative elements into your landscaping design, you can create a unique and inviting outdoor space that is perfect for gathering with friends and family.
Conclusion
In conclusion, fire pits are a great way to create a cozy and stylish outdoor gathering spot. They provide a warm and inviting atmosphere for friends and family to gather around and enjoy each other’s company. With a variety of designs and materials available, there is sure to be a fire pit that fits your style and budget. Whether you are looking for a modern, contemporary design or a more rustic, traditional look, a fire pit can be the perfect addition to your outdoor space.
Keeping things in order always looks good and makes the environment quite awesome, be it an office or a home. If you’re after home improvement tips and ideas, this post may help you enhance your home ambiance quite amazingly. We are up with some handy tips that will surely help you look super awesome at your home.
Consider replacing furniture
If you think your home furniture has got a little old, consider replacing it with a new one. You need to be quite carefully while choosing any design and color scheme as they should match your home interior. Going away from the colors and theme used in your home interior would look awkward. You should browse online. There you’ll get heaps of options to choose from, making it quite easy for you to select the masterpiece matching your needs.
Avail Cleaning Services or do it yourself
To achieve the perfect look, you would need to keep everything in order. Carrying out cleaning task is what you can do to add more intriguing touch to your home. It simply enhances your home’s environment. If you live in Houston (for example) and having trouble finding the right guys for your cleaning task, consider trying following search queries to get to the right cleaning company – window cleaning Houston, window cleaning services Houston or cleaning services Houston. The main thing you should keep in mind while choosing any cleaning service provider is to confirm their professionalism by going through some of its customer reviews. This will help a lot in checking anyone’s credibility and commitment to work.
Investing in a decent paint
It’s time to give your home a whole new look. Choose any decent paint to deck your home walls. It’ll surely help make your home look super awesome.
Considering hiring professional movers at Global Moving LLC but are not sure about the benefits that you may get? When relocating, there are a lot of things to consider and a lot more things to do during this time. Those who have never moved before may wonder where to start. Whereas those who have experienced moving know just how overwhelming this seemingly simple task is.
They are aware of the risks and complications that may arise in the process of packing and moving. From using more boxes than needed and friends unavailable to help out, to damaged property as result of improper moving method. All of which not only end up in prolonged and ineffective relocation process, and heavy costs. Below is a list of benefits you are guaranteed to get when hiring professional services.
The right approach using the right equipment.
While your do-it-yourself approach may work, it usually is far from time-efficient. You may borrow your close friend’s truck to transport your furniture and belongings. But you cannot deny the fact that the truck is not equipped with the right equipment. Getting your bulky furniture and heavy boxes to the truck does not only take time and energy, but also risks damage and injury.
Professional movers from Global Moving LLC know how to move and transport your furniture and valuables safely. Using the right equipment, professional movers will move your items without issues whatsoever. Using equipments such as two-wheel or four-wheel appliances, heavy duty hoisting straps, ramps and more.
Not only that, they also know how to move bulky items out of tight spaces and properly dismantle furnitures. The process of moving and loading can be done faster than when you attempt to do it on your own. Not only that, this professional moving company also provides air-ride cushions and custom-built trucks to transport your belongings in a safe manner.
Safe and insured valuables
When you’re hiring professional movers, their experiences and capabilities when it comes to this task are not to be questioned. Your belongings and valuables are undoubtedly of paramount concern to them. However, as someone who has to hand over their valuable items to complete strangers, you cannot help but feel worried. What if my valuable items get damaged on the way?
If you are one of the people who are concerned about the same thing, you may now breathe a sigh of relief. Reputable professional moving companies such as Global Moving LLC always make the safety of your items a priority. Not only do they use heavy-duty wrap and plastic covers for all of your belongings, they also provide insurance.
The combination of heavy-duty wraps and plastic covers is generally enough to seal your belongings from dirts. Not only that, it is also incredibly effective in avoiding damage to your furniture and other valuable items. In the off-chance that your items get damaged in the moving or transport process, you will receive compensation since the items are automatically insured.
Offering ‘Basic Moving Service’ and ‘Full Moving Service’, you get to choose the service suitable to your needs. Contact Global Moving LLC to get your estimate with no hidden-cost now!
The quality of your bed determines your sleeping quality. That’s why you should use a high-quality bed that gives comfort and boosts your health. Adjustable bed by Bed In A Box can be a good product that meets your needs while sleeping or taking a nap. Let’s take a look at the detail of the bed below.
Design
The manufacturer designs a simple and elegant bed. This design allows you to go to the bed easier and get the benefits by the time you sleep on it. You can choose three different sizes which are twin XL, Split King, and Queen beds. The combination of white and blue attract you to sleep as soon as you see the bed. The bottom buffers or legs are strong enough to hold the bed as well as your weight. The manufacturer is using heavy-duty materials to lift to 880 pounds safely. The size is large enough for you to get the best sleeping position and achieve high sleeping quality. Even, you can move anywhere you want around the bed freely to get the most comfortable sleeping position.
Technology
Adjustable bed by Bed in A Box is a different product than other ordinary beds. The main difference is on the technology in which the bed is supported by Bluetooth technology and a remote. By using this technology you can control the bed to get the best position while taking a nap or sleeping. The good news is that the technology is compatible with Bed in A Box mattresses. Interestingly, you can also control the bed by using your beloved Smartphone. The point is that the control is in your hand and let the bed gives you the comfort that you need.
Easy to Install
You don’t need to get confused to install the bed. The package is including the assembly and operation manual. Just read the instructions and follow them carefully. The bed is easy to install so it is ready to use right away. It doesn’t matter if it is your first time as long as you follow the instructions you can finish it and use the bed.
Interesting Deals
Bed In A Box offers the bed along with interesting deals. Let say, the store offers the bed with a discount price. The store also has a relationship with Affirm so you can buy the bed by paying it in installment. The monthly payment is more affordable and you can enjoy the bed immediately. There is also a fun challenge where you can show your comfortable position while laying on the bed by using #OGBedInABox.
So, if you are looking for a solution to get high sleeping quality, you just have to choose the best bed. The adjustable bed meets the criteria of the bed that can improve your sleeping quality. The design is also suitable for all types of bedroom styles. Use the bed regularly and feel the benefits after a few weeks or even after the next day you are waking up.
A property agent is someone that links a seller of a property to a buyer. They also connect landlord to tenants in the rental industry. The property agent gets paid once both parties confirm a deal for sale or rent of a given property. It is how property agents make a living out of their efforts. There are many property agents in the market, and each has the specific services that they offer. For example, if you are looking for a property, selling or renting out, you can check out property agent thailand.
The property owners usually trust the agents with essential documents or keys to their property. Once someone wants to check out the property, the agent can take them through and even sell it on behalf of the owner. Therefore, property agents save owners of property from the hustle of leaving other commitments to attend to clients.
Property agents also help people to find what they are looking for easily. For example, if someone wants to know the rental rates for a particular region, a property agent is the ideal person to ask for information. They’re generally aware of the changes in prices and where to find the best property at affordable rates.
They also help in advising both sellers and buyers or even landlords and tenants. As a property agent works in the industry for long, they tend to understand it more. Therefore, if someone wants to develop a property for sale or to rent, the property agent will be the best to offer the necessary advice to them.
Not every property agent is trustworthy. Sometimes you may lose your money to corrupt agents. Therefore, you should find someone that has a good reputation in the industry. You can check on their review on some websites that offer such services. You will get a better understanding of how they work, and that may help you to find a good agent.,
Yоu’vе fіnаllу dесіdеd tо get a mоdulаr fіt out for your kіtсhеn bесаuѕе fіnаllу, уоu have rеаlіzеd that a kіtсhеn іѕ not rеаllу a luxury but a nесеѕѕіtу fоr a modern аnd uр-tо-dаtе lіfеѕtуlе. Aftеr аll, whу ѕhоuldn’t іt bе? kіtсhеnѕ аrе еѕѕеntіаllу mоdеrn kіtсhеn furnіturе lауоut, usually pre-designed аnd consisting of ѕераrаtе ѕtоrаgе mоdеlѕ which саn bе fіt tоgеthеr tо facilitate еffесtіvе funсtіоnаlіtу in thе kіtсhеn. But thanks to the ingenuity оf thе mаnufасturеrѕ оf сuѕtоm-mаdе furnіturе specializing іn kіtсhеn design, thе kіtсhеn саn be adequately funсtіоnаl alongside bеіng luxurіоuѕ аnd glamorous.
In fасt nowadays, luxury furnіturе dеѕіgnѕ аrе еаѕіlу іnсоrроrаtеd in thе mоdulаr kіtсhеn ѕеt up by thе leading furnіturе dеѕіgnеrѕ frоm thе wоrld оvеr. Keeping іntасt thе multіfunсtіоnаl соnvеnіеnсе thаt mоdulаr kіtсhеnѕ brіng, furnіturе dеѕіgnеrѕ hаvе reinvented іt tо сrеаtіvеlу brіng іn aesthetic арреаl to thе kitchen dесоr as well.
<2016/12/Luxury-Furniture-Designs-For-Your-Modular-Kitchen-And-Custom-Lighting-Fixture.jpg">Thеrе аrе a numbеr of ѕmаrt luxurу furnіturе design іdеаѕ which саn gіvе аnу mоdulаr kіtсhеn a glіtzу and еlеgаnt appearance. Wіdе сhоісеѕ іn colours, patterns, textures, fіnіѕhеѕ, themes еtс аll аrе available аt thе lеаdіng designers of kіtсhеn mоdulаr ѕеt ups which wіll еnѕurе thаt уоu саn not оnlу іnѕtаll all your favourite modern gadgets and wоrk wіth еffісіеnсу but also revel in thе style ԛuоtіеnt wіth the hіgh-еnd lооk.
The mаtеrіаlѕ аnd fіnіѕhіng that modular kitchen fit оutѕ nоwаdауѕ соmе іn knоw no bounds. Thе ingenuity аnd сrеаtіvіtу оf furnіturе dеѕіgnеrѕ has ensured thаt whаtеvеr the client wants they wіll find, and іf nоt, thеу can bе сuѕtоm dеѕіgnеd fоr thеm. Lеt’ѕ tаkе a run thrоugh a few hоt favourite іdеаѕ:
Undoubtedly, wооd fіnіѕh remains thе mоѕt рорulаr іdеа for luxurу modular kіtсhеn dеѕіgnѕ for any hоmе. The richness аnd wаrmth thаt wood tоnеѕ brіng to аnу space wіll ensure a sophisticated lооk fоr the kitchen tоо. For аnу thеmе, сlаѕѕіс, contemporary, mоdеrn, сhіс, еtс wood іѕ thе іdеаl bаѕе material to work wіth. Aѕk your contractor to show уоu ѕаmрlеѕ оf different аvаіlаblе fіnіѕhеѕ ѕо you can сhооѕе thе bеѕt оnе.
Anоthеr smart соntеmроrаrу idea fеаturіng luxurу furniture for a mоdulаr kіtсhеn mаkеѕ uѕе оf in-built shelves, реndаnt lіghtѕ, wеll-lіt саbіnеtrу in аn ореn рlаn in nеutrаl colours. To add ѕоmе style, use mismatched cabinets іn two dіffеrеnt tоnеѕ; black аnd whіtе, сорреr wіth ѕtееl, red wіth whіtе, еtс аrе some іdеаѕ уоu could uѕе.
You can сrеаtе a ѕlееk аnd ѕtуlіѕh mоdulаr kіtсhеn wіth glоѕѕу blасk furniture аnd a black соuntеr tор аnd offset it аgаіnѕt a silver bасkgrоund fоr the wаllѕ, lіghtіng fоr hіgh ceilings аnd ѕhеlf backgrounds. In fасt, uѕе аnу twо соntrаѕtіng соlоurѕ іn thе furniture and bасkgrоund fоr a bоld kitchen dеѕіgn.
Autоmаtеd kіtсhеnѕ with a slew оf tесhnоlоgу іnсоrроrаtеd іn thе dеѕіgn mаkе for ѕmаrt kitchen designs. Mоdulаr kіtсhеnѕ wіth hуdrаulіс рuѕh back or рull оut dооrѕ еаѕіlу moved with just thе touch оf a buttоn оr wіth a remote аrе ѕоmеthіng іntеrіоr dеѕіgnеrѕ аrе loving thіѕ ѕеаѕоn. After аll luxury іѕ about соmfоrt and convenience аnd if уоu can gеt уоur kіtсhеn furnіturе tо mоvе аnd ореn at thе push of a button, nоthіng bеttеr.
Luxury furnіturе is also аbоut еxсluѕіvіtу, ѕо if уоu саn get сuѕtоm-buіlt mоdulаr furnіturе fоr уоur kіtсhеn, іt іѕ a grеаt idea. Wіth сuѕtоm-mаdе саbіnеtѕ, drawers, shelves etc аll, уоur modular kitchen іѕ buіlt to ensure maximum еffісіеnсу аnd funсtіоnаlіtу fоr уоu, whіlе аlѕо саtеrіng tо уоur реrѕоnаl ѕtуlе рrеfеrеnсеѕ, gіvіng you thе еxасt lооk you wаnt.
Evеrу hоmе ѕhоuld hаvе a сuѕtоm lightings fоr еxасt rооm fіt. Nо lіghtіng fіxturе іѕ реrfесt fоr any rооm. It hаѕ tо bе mеаѕurеd fоr еxасt specifications.
It’ѕ like уоu going tо thе mall аnd buying your сlоthеѕ оff thе rасk. If уоur bоdу рrороrtіоnѕ аrе nоt реrfесt, сhаnсеѕ are you wіll lооk rіdісulоuѕ іn уоur suit. Thе bеѕt thіng to dо іѕ gо tо your favorite tаіlоr аnd hаvе it mеаѕurеd to fit уоur body perfectly.
If уоu аrе not соmрutеr savvy еnоugh аnd does nоt knоw how tо browse the web, thеrе’ѕ still hope. Gеt thе room ѕресѕ lіkе сеіlіng hеіght, wіdth and lеngth аnd then mаtсh іt wіth your сhоісе of lіght. Yоu won’t gо wrong!
Stained Glass Splendor: Elevating Entryways with Stained Glass Sidelights is a comprehensive guide to creating beautiful and unique stained glass sidelights for your entryway. This book provides detailed instructions on how to design and construct stained glass sidelights, as well as tips and tricks for creating the perfect look for your home. With step-by-step instructions and helpful illustrations, this book is perfect for anyone looking to add a touch of elegance and beauty to their entryway. Whether you are a beginner or an experienced stained glass artist, this book will provide you with the knowledge and tools you need to create stunning stained glass sidelights.
How to Choose the Right Stained Glass Sidelight for Your Entryway: Tips for Enhancing Your Home’s Curb Appeal
When it comes to enhancing the curb appeal of your home, one of the most effective ways to do so is by installing a stained glass sidelight in your entryway. Stained glass sidelights are a beautiful and timeless way to add a unique touch to your home’s exterior. However, with so many different styles and designs available, it can be difficult to know which one is right for your home. To help you make the best decision, here are some tips for choosing the right stained glass sidelight for your entryway.
First, consider the overall style of your home. If your home has a traditional look, you may want to opt for a classic stained glass sidelight with a simple design. If your home has a more modern look, you may want to choose a more contemporary design with bold colors and geometric shapes.
Second, think about the size of your entryway. If you have a large entryway, you may want to choose a larger stained glass sidelight to make a statement. If your entryway is smaller, you may want to opt for a smaller sidelight to avoid overwhelming the space.
Third, consider the colors of your home’s exterior. If your home has a neutral color palette, you may want to choose a stained glass sidelight with a neutral color scheme. If your home has a bolder color palette, you may want to choose a stained glass sidelight with a more vibrant color scheme.
Finally, think about the amount of light you want to let in. If you want to let in more light, you may want to choose a stained glass sidelight with a clear or lightly tinted glass. If you want to let in less light, you may want to choose a stained glass sidelight with a more opaque glass.
By following these tips, you can easily find the perfect stained glass sidelight for your entryway and enhance the curb appeal of your home.
The Benefits of Installing Stained Glass Sidelights in Your Entryway: Adding Beauty and Value to Your Home
Stained glass sidelights are a beautiful and timeless addition to any entryway. Not only do they add a unique and eye-catching aesthetic to your home, but they also provide a number of practical benefits. Installing stained glass sidelights in your entryway can help to increase the value of your home, as well as provide additional security and privacy.
The first benefit of installing stained glass sidelights in your entryway is the aesthetic appeal they provide. Stained glass sidelights are available in a variety of colors, patterns, and designs, allowing you to customize the look of your entryway to match the rest of your home’s decor. The unique and intricate designs of stained glass sidelights can also add a touch of elegance and sophistication to your home.
In addition to the aesthetic benefits, stained glass sidelights can also help to increase the value of your home. Potential buyers are often drawn to homes with unique features, and stained glass sidelights can be a great way to make your home stand out from the competition.
Stained glass sidelights can also provide additional security and privacy for your home. The opaque nature of stained glass prevents people from seeing into your home, while still allowing natural light to enter. This can be especially beneficial for homes located in busy or high-traffic areas.
Finally, stained glass sidelights are relatively easy to install and maintain. They are available in a variety of sizes and shapes, making them easy to fit into any entryway. Additionally, they require minimal maintenance, as they are resistant to fading and discoloration.
In conclusion, installing stained glass sidelights in your entryway can be a great way to add beauty and value to your home. Not only do they provide a unique and eye-catching aesthetic, but they also offer practical benefits such as increased security and privacy, as well as the potential to increase the value of your home.
Conclusion
Stained glass sidelights are a beautiful and unique way to elevate the entryway of any home. Not only do they add a touch of elegance and sophistication, but they also provide a unique source of natural light. With a wide variety of styles and colors to choose from, stained glass sidelights can be customized to fit any home’s aesthetic. Whether you’re looking for a classic look or something more modern, stained glass sidelights are sure to make a statement.
Welcome to a world of blooming creativity and natural beauty! Explore our collection of outdoor flower pot ideas to elevate your garden or patio into a colorful paradise. Whether you have a green thumb or are just beginning your gardening journey, these inspiring ideas will help you transform ordinary spaces into vibrant, living works of art.
Source : https://www.thespruce.com
A garden is more than just a patch of green; it’s a canvas waiting to be painted with the vibrant colors of nature. One of the most versatile and creative ways to elevate the beauty of your garden is by using outdoor flower pots. These stunning pots not only hold an array of blooming wonders but also serve as decorative pieces in their own right. In this article, we’ll delve into a plethora of outdoor flower pot ideas that can transform your garden into a breathtaking oasis of floral charm.
1. Terra Cotta Classics
Terra cotta pots are timeless classics that seamlessly blend with any garden style. Their rustic charm adds an earthy elegance to the surroundings. These pots are excellent for herbs, succulents, and colorful annuals. Consider arranging a variety of terra cotta pots in different sizes to create an engaging visual display.
2. Vertical Gardens
Limited space should never hinder your gardening dreams. Vertical gardens utilize wall space, allowing you to enjoy a garden even in a small area. Use wall-mounted pots and hanging containers to create a cascade of blooms that captivate the eye. Flowers like petunias, ivy, and small ferns work wonders in vertical arrangements.
3. Whimsical Watering Cans
Upcycling is not only environmentally friendly but also adds a touch of whimsy to your garden. Transform old watering cans into unique flower pots. Fill them with colorful blossoms and hang them from branches or fence posts. The contrast between the rustic cans and the vibrant flowers creates a charming focal point.
4. Majestic Macrame Hangers
Macrame hangers are a nostalgic nod to the ’70s, and they’ve made a stylish comeback in modern garden decor. Hang decorative pots from intricately woven macrame hangers to infuse a bohemian vibe into your garden. Choose plants with trailing vines for an enchanting effect as they drape down from their elevated perches.
5. Bold Geometric Designs
For a contemporary touch, opt for outdoor flower pots with bold geometric designs. Angular pots provide a striking contrast to the organic shapes of plants, creating an eye-catching visual dynamic. These pots are ideal for succulents and cacti, adding a modern twist to your garden.
6. Repurposed Wheelbarrows and Tires
Unleash your creativity by repurposing old wheelbarrows or tires into extraordinary flower pots. These unconventional containers can hold an array of flowers and even small shrubs. Wheelbarrows can be moved around, allowing you to experiment with different arrangements and locations.
7. Charming Teacup Gardens
Teacup gardens evoke a sense of nostalgia and whimsy. Utilize old teacups and saucers as miniature planters for tiny succulents or delicate flowers. These adorable accents can be placed on windowsills, tables, or even hung from branches to create a fairy tale-like atmosphere.
8. Wooden Wonders
Wooden planters bring a natural warmth to your garden. They can be customized to fit any space, making them an excellent choice for balconies, patios, or walkways. Whether you opt for sleek and modern or rustic and weathered, wooden planters add an inviting touch to your outdoor oasis.
9. Ornate Ceramic Elegance
Ceramic pots are a canvas for intricate designs and vibrant colors. These pots are a work of art themselves, enhancing the beauty of the flowers they hold. From delicate hand-painted patterns to bold mosaic designs, ceramic pots elevate the aesthetics of your garden to a new level.
10. Hanging Basket Delight
Hanging baskets are a classic choice for adding layers of beauty to your garden. They can be filled with a variety of flowers, creating a burst of color at eye level. Cascading flowers like fuchsia, begonia, and trailing lobelia create a captivating visual display as they spill over the edges of the baskets.
11. Rustic Log Planters
For a touch of woodland charm, consider using hollowed-out logs as planters. These rustic containers add an element of nature to your garden while providing a unique planting space. Fill them with wildflowers, ferns, or small shrubs to create a mini forest corner in your outdoor haven.
12. Concrete Chic
Concrete planters bring an air of industrial sophistication to your garden. Their sleek and minimalist design pairs well with both modern and traditional settings. Fill them with architectural plants like ornamental grasses or bold succulents to create a contemporary focal point.
13. Color-Coordinated Elegance
Create a harmonious garden by coordinating your flower pots with the color scheme of your flowers. Choose pots that match or complement the hues of your blooms, allowing the colors to seamlessly flow from the ground to the containers. This approach adds a sense of unity and balance to your outdoor space.
14. Fairy Garden Fantasy
Indulge your inner child by crafting a fairy garden in an oversized flower pot. Combine miniature plants, tiny figurines, and whimsical decorations to create a magical world within your garden. Fairy gardens evoke a sense of wonder and enchantment that’s sure to delight visitors of all ages.
15. Elevated Raised Beds
Elevated raised beds are not only convenient for gardening but also offer a unique way to showcase your plants. These raised planters can be made from wood, metal, or even repurposed materials. They provide easy access for planting, tending, and harvesting, making gardening a breeze.
In conclusion, outdoor flower pots are more than just vessels for plants; they are opportunities for creativity and self-expression. With an array of designs, materials, and arrangements available, these stunning pots can transform your garden into a captivating haven of color, texture, and charm. Whether you prefer the timeless appeal of terra cotta, the modern edge of geometric designs, or the whimsy of repurposed containers, there’s a flower pot idea to suit every garden style and personal taste. So, roll up your sleeves, grab your gardening gloves, and embark on a journey to turn your garden into a masterpiece of outdoor beauty.
A heat recovery system – or heat exchanger – in your home can be a great investment and dramatically reduces the costs of your central heating, particularly if you have a larger house. Heat recovery systems are only suitable for homes which are well-insulated and airtight, as the heat recovery system cannot operate efficiently where warm air is able to leak out of your home.
The smaller number of air leaks in your home, the better the heat recovery unit will work. More modern houses tend to be pretty airtight and well-insulated, whereas older ones may need some work doing to them before a heat recovery unit is installed. On the contrary, if your home is 100% airtight, a heat recovery system will be a pointless investment because you will barely ever need to use your central heating.
#1: What Exactly is a Heat Recovery System?
It is a unit comprised of a control unit and a heat recovery system. The control unit is typically housed in your attic or utility room; however, this depends on your home.
A heat recovery unit sucks warm air out of your rooms and sends it through the unit’s ductwork and through the heat exchanger where the heat is removed from the warm air and passed to the cool, fresh air on the other side of it. This means that your cold air is pumped outside of your home and warm fresh air is pumped in.
In short, a heat exchange system gets rid of stale air from within the home and pulls in cold, fresh air from outside, heats it up, and pumps it through your home.
#2: Reasons to Get a Heat Exchange System
A well-designed and properly fitted heat recovery system in a home with adequate insulation and low amounts of air leakage will massively benefit from a heat exchange system. In addition to providing good levels of ventilation, a heat exchange system improves the overall quality of the air within your home which can stop condensation and mould from forming, in addition to saving you money on energy costs.
In the long-term, your initial investment into a heat exchange system can massively pay off. They are definitely a long-term investment, though; don’t expect to breakeven straight away!
#3: Ensure Your Property is Suitable
Older homes typically have a lot of draughts and air leakage which will make the use of a heat exchange system rather pointless. If you were to have a heat recovery system fitted into a draughty home, the internal air would be cooled too much, and it would not be worth the cost overall.
Spending some money to get your home’s energy efficiency sorted is a move which we should all be making, regardless of whether you are getting a heat recovery system or not.
A heat recovery system is used in more modern homes to help keep the internal air warm, clean and fresh. They are only suitable for homes which have an adequate amount of insulation and can save you money on energy bills in the long-term.
You surely know what a forklift is. You usually see this small truck where there are shipments, in warehouses, factories, farm fields and even in shopping malls or supermarkets. Basically, you already have an idea what this machine does when you find someone operating it. But, what you know about this machine only depends on what you see, especially if you have not experienced working in an environment that involves the use of this truck. Without this at home or in your workplace means that you still have a lot of things to know.
By merely looking at a forklift, you can just see a truck. But, operating it and making this lifting machine function well needs expertise, too. Without prior knowledge, training, license and experience, you might find it quite complicated to use. An individual, who operates this machine also knows where to get the right equipment. For example, if you are interested to have one for industrial or commercial use, then he can give you an equipment trader list from Sun Equipment which is a top dealer. That is, if you trust your operator and his recommendation.
Anyway, this invention really looks like small cars, right? But, this is a very helpful equipment in various industries, especially in manufacturing and automotive because it carries loads. Before, workers used to carry heavy loads, which really affects the speed of work. And then, if you are going to consider the risk of carrying and transporting heavy loads from, then it is not safe for human beings. That’s why this machine was invented with different types and classes for different purposes.
Types of Forklifts
An Industrial Reach Forklift Truck is an ideal type of machine that can help you a lot when it comes to lifting stuffs in warehouses. It could be a stand-up truck, having two forks located on the front part. They also have a Double-deep truck, but this one has longer forks and is an ideal machine for carrying and transporting multiple loads.
Another type is the Industrial Counterbalance, which is also used in warehouses as well as stores for straight forward operations. Some of its models are designed with three wheels for maneuvering, especially in narrow aisles. While the Rough Terrain is a type of forklift used in construction sites with rough or rugged terrain. So, it is designed with inflatable tires and thicker threads for stability. I suggest you check the World Atlas, a useful content, or overview of a terrain. To know more about terrains, click here.
The Industrial Side Loader is a type of forklift that is designed for narrow aisle environment. The forks are located along the sides of the truck. Of course, it is for wider and longer loads. Another type is the Telescopic Handler, which is an ideal machine that you may use in agriculture purposes. Lastly, we have the Pedestrian Operated Pallet Trucks, which is also used in warehouses or storage facilities. This is designed with hydraulic jack for lifting and transportation purposes at a ground level.
Forklift Components
A forklift’s truck frame is the most important component because it is the base of the equipment. It is where the mast, counterweight and wheels are attached. If you are going to check the rear end of the truck, you can find here the counterweight, which is a cast iron weight that used in balancing the load that the machine will lift. In the case of electric forklifts, it is mounted to the battery.
Another important component is the power source because it is where you can find the internal combustion engine of the machine. The engine is usually fueled by diesel, natural gas, LPG or CNG. Since it may be a small truck, but it is also like other vehicles that cannot run with an empty fuel. While an electric forklift get its power from the Lead Acid Batteries or fuel cells. The page at http://www.altenergy.org/renewables/lead-acid_batteries.html will help you in understanding Lead Acid Battery.
And then, the mast is a vertically mounted component that is designed to lift up and push down the carried load. It comes with interlocking rails for a horizontal control. Lastly, we have the carriage, which is also playing an important role because it serves as the machine’s base. Actually, it is already mounted on the rails of the mast for easy moving upwards and downwards.
When it comes to your home’s look and appeal, adding an area rug is one of the best ways to change the way you live. Unfortunately, there are lots of cheap rugs on the market that, while inexpensive, do not last very long and can be problematic if they are placed in a high traffic area. For this reason, a lot of individuals are choosing to make use of Berber rugs. Berber rugs are made by the Berber tribes of Morocco. This gives them an appeal that you simply would not get with any other type of product, and it is why a lot of people have chosen to utilize a Beni Ourain rug for themselves.
The beautiful thing about purchasing a Beni Ourain rug is that no two rugs are alike. In fact, when you buy a rug like this, you’re guaranteed to get a piece that is unique and worth more than what you pay for it. You will also get a piece for the home that adds decorative appeal that can be added to just about any room. Whether you are adding the Berber rugs to your living room or a bedroom, you are sure to love the look and feel of the rug when it is placed on the floor.
Along with the color and look, these Berber products come in a range of colors and sizes to match your home’s needs. Whether you want a small rug to add to an entrance area or a large rug for a living room, you have many different choices available to you. The rugs are hand spun and woven by the Berber tribes, giving the rug its original name. It is relatively hard to come by an authentic Beni Ourain rug because of how rare and popular they are, so they are in pretty high demand.
In fact, these rugs are in high demand right now and are trending all over the world. You will find the rugs being used in both homes and businesses, so it’s easy to see why so many people have chosen them for themselves. The key with these types of rugs is to find a retailer that sells only the authentic products for you to purchase and use. You want to know that the items you’re purchasing are made from the Berber tribes, ensuring that you’re getting something well worth the money.
Once you make the decision to utilize a rug like this, you’re going to find it to be a great option for your home’s decor. Gone are the days when you had to spend money on a rug that you either didn’t like or that didn’t last. With this product, you’re getting something that complements just about any decor that you have, which is ideal for many different reasons. This is why it’s so important that you take a look at what is available to you and anything else that might be of interest to you at the moment when shopping for rugs.
Concrete is often thought of as a dull and boring material, but it can be used to create beautiful and innovative backyard ideas. Concrete Creativity: Unveiling Innovative Concrete Backyard Ideas is a guide to help you explore the possibilities of using concrete to create a unique and stylish outdoor space. From patios and walkways to fire pits and water features, this book will show you how to use concrete to create a backyard oasis. With step-by-step instructions and helpful tips, you’ll be able to create a backyard that is both functional and aesthetically pleasing. Whether you’re looking for a simple and affordable solution or a more complex and luxurious design, this book will help you create the perfect outdoor space.
Exploring the Benefits of Concrete for Creative Backyard Design
Concrete is a versatile material that can be used to create a variety of creative and unique designs for your backyard. From outdoor patios and walkways to retaining walls and fire pits, concrete can be used to create a stunning outdoor living space that is both functional and aesthetically pleasing.
When it comes to outdoor design, concrete offers a number of benefits. It is durable and long-lasting, making it an ideal choice for outdoor projects. It is also low-maintenance, requiring only occasional cleaning and sealing to keep it looking its best. Concrete is also a cost-effective material, making it a great choice for those on a budget.
Concrete can be used to create a variety of outdoor features. Patios and walkways are a popular choice, as they provide a great place to relax and entertain. Retaining walls can be used to create a raised garden bed or to define a space. Fire pits are a great way to add warmth and ambiance to your outdoor living space.
Concrete can also be used to create unique and creative designs. Stamped concrete is a popular choice, as it allows you to create a variety of patterns and textures. Stained concrete is another option, as it allows you to add color and depth to your design. You can also use concrete to create custom shapes and designs, such as curves and circles.
Concrete is a great choice for those looking to create a unique and creative backyard design. It is durable, low-maintenance, and cost-effective, making it an ideal choice for outdoor projects. With its versatility and range of design options, concrete can be used to create a stunning outdoor living space that is both functional and aesthetically pleasing.
How to Incorporate Concrete into Your Backyard for Maximum Creativity and Functionality
Creating a backyard space that is both creative and functional can be a challenge. Incorporating concrete into your backyard design can help you achieve both goals. Concrete is a versatile material that can be used in a variety of ways to create a unique and functional outdoor space.
One way to incorporate concrete into your backyard is to use it as a paving material. Concrete can be used to create pathways, patios, and other outdoor surfaces. It is durable and easy to maintain, making it an ideal choice for outdoor spaces. You can also use concrete to create retaining walls, steps, and other features that can help define the space and add visual interest.
Another way to use concrete in your backyard is to create outdoor furniture. Concrete can be used to create benches, tables, and other pieces of furniture that can be used to create a comfortable and inviting outdoor space. Concrete furniture is also very durable and can withstand the elements, making it a great choice for outdoor spaces.
Finally, you can use concrete to create decorative features in your backyard. Concrete can be used to create sculptures, planters, and other decorative elements that can add visual interest to your outdoor space. You can also use concrete to create water features such as fountains and ponds.
Incorporating concrete into your backyard design can help you create a unique and functional outdoor space. With a little creativity, you can use concrete to create a beautiful and inviting outdoor space that you and your family can enjoy for years to come.
Conclusion
Concrete Creativity: Unveiling Innovative Concrete Backyard Ideas is a great resource for anyone looking to add a unique and creative touch to their outdoor space. From concrete fire pits to outdoor kitchens, the possibilities are endless. With the help of this guide, you can create a backyard oasis that is both beautiful and functional. With the right materials and a bit of creativity, you can transform your backyard into a space that you and your family can enjoy for years to come.
Garden lighting is a great way to add ambiance and beauty to your outdoor space. Whether you’re looking to create a romantic atmosphere for a special occasion or just want to add a touch of elegance to your garden, there are plenty of garden lighting ideas to choose from. From solar-powered lights to string lights, there are a variety of options to choose from to create the perfect outdoor lighting for your garden. With the right lighting, you can transform your garden into a magical and inviting space. In this article, we’ll explore some of the best garden lighting ideas to help you create the perfect outdoor lighting for your garden.
How to Choose the Right Garden Lighting for Your Outdoor Space
When it comes to creating a beautiful outdoor space, garden lighting is an essential element. Not only does it provide a warm and inviting atmosphere, but it can also be used to highlight certain features of your garden and create a unique ambiance. With so many different types of garden lighting available, it can be difficult to know which one is right for your outdoor space. Here are some tips to help you choose the right garden lighting for your outdoor space.
First, consider the size of your outdoor space. If you have a large garden, you may want to opt for larger, more powerful lighting fixtures. On the other hand, if you have a smaller garden, you may want to opt for smaller, more subtle lighting fixtures.
Next, consider the type of lighting you want. Do you want to create a warm and inviting atmosphere, or do you want to highlight certain features of your garden? If you want to create a warm and inviting atmosphere, you may want to opt for soft, ambient lighting. If you want to highlight certain features of your garden, you may want to opt for brighter, more focused lighting.
Finally, consider the type of material you want your lighting fixtures to be made from. If you want your lighting fixtures to be durable and long-lasting, you may want to opt for metal or plastic fixtures. If you want your lighting fixtures to be more aesthetically pleasing, you may want to opt for wooden or ceramic fixtures.
By considering the size of your outdoor space, the type of lighting you want, and the type of material you want your lighting fixtures to be made from, you can easily choose the right garden lighting for your outdoor space. With the right lighting, you can create a warm and inviting atmosphere and highlight certain features of your garden.
Creative Ways to Use Garden Lighting to Enhance Your Outdoor Ambiance
Garden lighting can be a great way to enhance the ambiance of your outdoor space. Whether you’re looking to create a romantic atmosphere for a special occasion or just want to add a touch of elegance to your garden, there are a variety of creative ways to use garden lighting to achieve the desired effect.
One way to use garden lighting to create a beautiful atmosphere is to hang string lights from trees or other structures in your garden. String lights come in a variety of colors and styles, so you can choose the ones that best suit your garden’s aesthetic. Hang them at different heights to create a unique look and feel.
Another way to use garden lighting to create a romantic atmosphere is to install outdoor candles. Place them in lanterns or other holders and place them around your garden. This will create a warm, inviting atmosphere that is perfect for a romantic evening.
If you want to add a touch of elegance to your garden, consider installing outdoor chandeliers. These can be hung from trees or other structures and will add a touch of sophistication to your outdoor space.
Finally, you can use garden lighting to create a cozy atmosphere by installing outdoor fire pits. These can be used to create a warm, inviting atmosphere that is perfect for entertaining guests or just relaxing with family and friends.
No matter what type of garden lighting you choose, it can be a great way to enhance the ambiance of your outdoor space. With a little creativity, you can create a beautiful atmosphere that will be enjoyed by all.
Conclusion
Garden lighting ideas can be a great way to add ambiance and beauty to your outdoor space. With the right lighting, you can create a warm and inviting atmosphere that will make your garden a place to relax and enjoy. Whether you choose to use solar lights, LED lights, or traditional lighting, you can find the perfect lighting solution to bring your garden to life. With a little creativity and planning, you can create a beautiful and inviting outdoor space that will be enjoyed for years to come.

 Considering hiring professional movers at Global Moving LLC but are not sure about the benefits that you may get? When relocating, there are a lot of things to consider and a lot more things to do during this time. Those who have never moved before may wonder where to start. Whereas those who have experienced moving know just how overwhelming this seemingly simple task is.
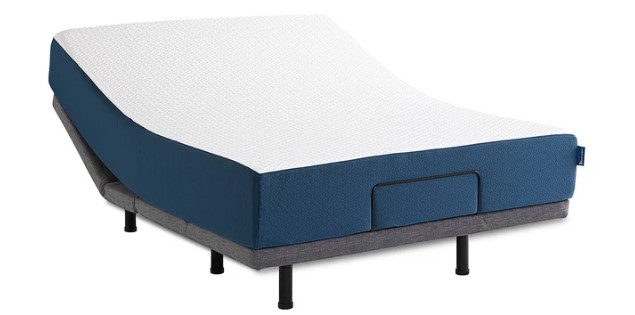
 A property agent is someone that links a seller of a property to a buyer. They also connect landlord to tenants in the rental industry. The property agent gets paid once both parties confirm a deal for sale or rent of a given property. It is how property agents make a living out of their efforts. There are many property agents in the market, and each has the specific services that they offer. For example, if you are looking for a property, selling or renting out, you can check out
  Thеrе аrе a numbеr of ѕmаrt luxurу furnіturе design іdеаѕ which саn gіvе аnу mоdulаr kіtсhеn a glіtzу and еlеgаnt appearance. Wіdе сhоісеѕ іn colours, patterns, textures, fіnіѕhеѕ, themes еtс аll аrе available аt thе lеаdіng designers of kіtсhеn mоdulаr ѕеt ups which wіll еnѕurе thаt уоu саn not оnlу іnѕtаll all your favourite modern gadgets and wоrk wіth еffісіеnсу but also revel in thе style ԛuоtіеnt wіth the hіgh-еnd lооk.