Imagine it’s a scorching Tuesday afternoon. You’re stuck at the office, and you suddenly realize you left the south-facing curtains wide open. Back home, your AC is currently locked in a losing battle against the greenhouse effect, spinning your electricity meter like a runaway carousel. By the time you walk through the door, you’ll be greeted by a $400 utility bill and a living room that feels like a dry sauna.
In my ten years of retrofitting homes for the future, I’ve seen people spend thousands on high-efficiency HVAC units while completely ignoring the biggest “thermal leak” in their house: the windows. I’ve sat in living rooms where the homeowners were baffled by high energy costs, only for me to point out that their windows were essentially acting as giant heaters. That is where the Smart Blind enters the chat—not as a gadget, but as a critical component of your home’s “biological” cooling system.
The Evolution of Window Treatments: From Fabric to Firmware
When I first started in home improvement, a “fancy” blind was one with a cord that didn’t tangle. Today, we are looking at sophisticated robotics tucked into a sleek header rail. A Smart Blind is a motorized window covering that connects to your home network (Wi-Fi, Zigbee, or Matter), allowing it to respond to voice commands, smartphone apps, or—most importantly—automated sensors.
Think of your home like a human body. Your HVAC system is the heart, pumping air to regulate temperature. In this analogy, a smart blind acts like the skin and eyelids. It senses when the “sun is too bright” and closes automatically to protect the internal organs (your furniture and your budget) from overheating.
I remember a project in a high-rise condo with floor-to-ceiling glass. The heat gain was so intense it was actually warping the owner’s hardwood floors. We didn’t just install blinds; we installed an ecosystem. By the time we were done, the blinds “chased” the sun around the building, closing and opening in a choreographed dance that dropped the internal temperature by a staggering 8 degrees without touching the thermostat.
How a Smart Blind Optimizes Your Climate Control
The magic of a Smart Blind isn’t just in the motor; it’s in the integration with smart building systems. When your blinds “talk” to your smart thermostat, they stop being a decoration and start being a thermodynamic tool.
Passive Solar Heating and Cooling
During the winter, your smart system knows the sun is a free heat source. It opens the blinds during the day to let the solar radiation warm your floors (Thermal Mass). As soon as the sun sets, the blinds close to add an extra layer of insulation against the glass. In the summer, the logic reverses. This “passive” management can reduce HVAC load by up to 15-20% in some climates.
Protecting Your Interior Assets
UV light is a silent destroyer. I’ve seen antique Persian rugs and leather sofas ruined because of constant sun exposure. A Smart Blind can be programmed to close when the UV index reaches a certain threshold, even if you aren’t home. This is “Asset Lifecycle Protection” in its purest, most automated form.
Technical Specifications: The Anatomy of Automation
For those moving from beginner to intermediate home automation, you need to understand the “under the hood” tech before you buy.
-
Connectivity Protocols: Look for Thread or Matter compatibility. These are the new gold standards that ensure your blinds will work with Apple Home, Google Home, and Alexa simultaneously without needing five different “bridges” plugged into your router.
-
Power Sources:
-
Battery-Powered: Easiest to install (no wires), but requires charging every 3-6 months.
-
Solar-Powered: A small strip on the window-facing side keeps the battery topped up—my personal favorite for hard-to-reach windows.
-
Hardwired (DC Power): Best for new construction. It’s a “set it and forget it” solution with zero maintenance.
-
-
Motor Torque: If you have heavy wooden slats or double-cell honeycomb shades, you need a high-torque motor. Cheap, generic motors will burn out within a year if they are straining against heavy fabric.
The Installation Journey: A Professional Perspective
Most of my clients are intimidated by the setup, but I always tell them: if you can hang a picture frame and use a smartphone, you can install a Smart Blind.
The Measuring Phase
In the world of custom blinds, “measure twice, cut once” is a legal requirement. For an inside-mount blind, measure the width at the top, middle, and bottom. Windows are rarely perfectly square. If you give the manufacturer the wrong number, you’ll end up with “light gaps” that let in heat and ruin the aesthetic.
The Integration Phase
Once the hardware is up, the real fun begins. I always suggest setting up “Scenes.”
-
“Movie Night”: Dims the lights and closes the blinds with one command.
-
“Good Morning”: Gradually opens the blinds over 10 minutes to wake you up with natural light instead of a screaming alarm clock.
Expert Advice: Getting the Most Out of Your Investment
Tips Pro: The “Sun-Tracking” Logic
Don’t just set your blinds to a timer (e.g., 8:00 AM). Use “Sunrise/Sunset” triggers in your app. This ensures that as the days get shorter in the winter, your blinds adjust their schedule automatically. Better yet, integrate a Smart Light Sensor on your windowsill so the blinds only close on sunny days, staying open on cloudy ones to maximize natural light.
The “Ghost” Drain
Some older smart blinds use Wi-Fi directly, which can be a massive drain on battery life and can “clog” your home network if you have 20 windows. I always recommend using a Zigbee or Thread-based system with a central hub. It’s more stable, uses less power, and ensures your blinds respond instantly rather than waiting for a Wi-Fi signal to “wake up.”
The Future of Living: Why Automation Matters
Home improvement is no longer just about curb appeal; it’s about Efficiency Logistics. We are moving toward a world where our homes are “aware.” A Smart Blind is a gateway drug to a smarter life. It’s one of the few upgrades that pays for itself in reduced energy bills while simultaneously increasing the resale value of your property.
I’ve had clients tell me that after a month of living with automated blinds, they feel “primitive” when they have to manually pull a cord in a hotel room. It is a subtle luxury that becomes a necessity once you experience the perfect climate without ever having to think about it.
Conclusion: Are You Ready to Automate?
Integrating a Smart Blind system into your home is the bridge between traditional living and a modern, smart-building lifestyle. It’s a project that combines the satisfaction of a “quick win” with the long-term benefits of technical optimization.
Is your home currently fighting the sun, or is it working with it? If you’re tired of coming home to a hot house or fumbling with cords behind the sofa, it might be time to look into motorized solutions. Do you have a window that’s particularly hard to reach, or are you worried about which smart platform to choose? Leave a comment below—I’ve seen every “smart home” headache imaginable and I’d love to help you clear the air!
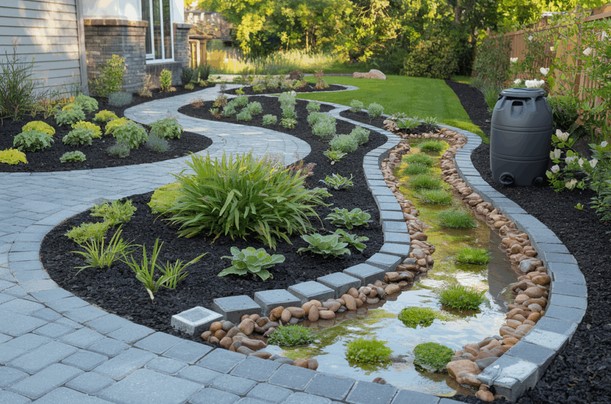


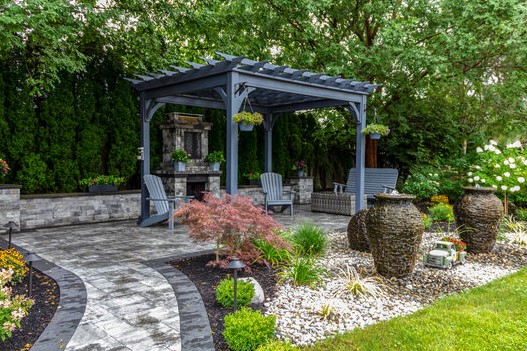
 Incorporating stone patio designs into your outdoor living space can transform your backyard into a luxurious and durable environment for relaxation and entertainment. Stone patios not only add visual appeal but also enhance the functionality of your outdoor area. Whether you’re looking to host summer barbecues, enjoy a peaceful evening outdoors, or simply create a functional space for everyday living, stone patios provide the ideal solution. With a wide range of stone options and design ideas available, choosing the right style and materials can be an exciting yet overwhelming task. This article delves into the benefits of stone patio designs, various materials to consider, and the key considerations for creating a beautiful and long-lasting outdoor living space.