Imagine pulling your car into the garage after a long workday, only to be greeted by a chaotic sea of plastic tubs sagging under their own weight, rusty power tools sitting on damp concrete, and particle-board shelves buckling in the summer humidity.
Over my 10+ years optimizing residential workspaces and executing garage retrofits, I have watched countless homeowners fall into the cheap storage trap. They spend thousands of dollars on high-end tools, lawn equipment, and automotive gear, only to store them on flimsy pressboard or flimsy plastic units that collapse after two seasons.
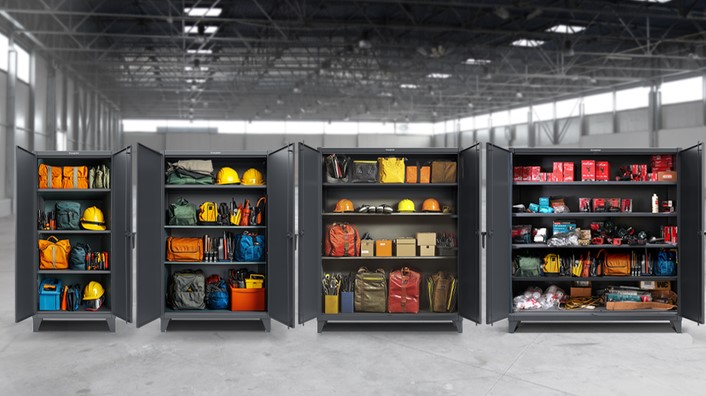
Here is an unvarnished truth straight from the job site: when it comes to long-term asset protection in an unconditioned environment, investing in commercial-grade garage cabinets steel systems is not an aesthetic splurge—it is a structural necessity that secures your gear, maximizes floor space, and withstands harsh environmental wear for decades.
Why Choose Steel Over Wood or Plastic Storage Systems?
Think of your garage as an unheated, high-humidity extension of your house that faces constant thermal swings, road salt, automotive fluids, and structural dust.
If wood framing and particle board act like porous sponges in humid climates, heavy-gauge garage cabinets steel assemblies act like an armored vault. Cold-rolled steel does not warp, absorb moisture, rot, or harbor pest infestations.
During my early years managing custom garage overhauls, I frequently pulled out bloated particle-board cabinets that had absorbed moisture directly from concrete slab floors. Steel cabinetry eliminates that vulnerability entirely, providing a rigid, non-combustible shell that keeps your valuable tools dry and secure.
Technical Performance: Gauge Thickness, Load Ratings, and Powder Coatings
When evaluating professional storage hardware, understanding metal fabrication specs ensures you purchase systems built for actual weight capacities rather than cheap decorative units.
[ Sheet Metal Thickness vs Strength ]
24-Gauge (0.0239") ──► Light Duty (Buckles easily under heavy loads)
20-Gauge (0.0359") ──► Medium Duty (Standard consumer garage grade)
18-Gauge (0.0478") ──► Heavy Duty (Commercial Grade / Professional Standard)
16-Gauge (0.0598") ──► Industrial Grade (Maximum structural rigidity)
To make an informed decision when procuring garage cabinets steel modules, evaluate these core engineering metrics:
Steel Gauge Rating: Lower gauge numbers signify thicker, stronger steel. While budget consumer units use thin 24-gauge sheet metal that oil-cans easily, commercial systems utilize 18-gauge or 16-gauge cold-rolled steel capable of supporting massive static loads.
Shelf Load Capacities: High-grade steel cabinets feature reinforced shelf channels rated for 300 lbs to over 1,000 lbs per shelf, allowing you to store heavy engine parts, paint cans, and hydraulic jacks without deflection.
Powder-Coated Finish: Liquid paint chips and peels easily under impact. Industrial steel cabinets undergo electrostatically applied powder coating baked at high temperatures, creating an ultra-durable barrier resistant to rust, chemical spills, and scratching.
Full-Extension Ball-Bearing Slides: Drawers equipped with heavy-duty ball-bearing slides ensure smooth operation even when fully loaded with heavy hand tools or pneumatic gear.
Modular Cabinet Layouts: Floor-Mounted vs. Wall-Hanging Systems
Not every garage floor plan has the same structural footprint. Understanding configuration options allows you to optimize square footage effectively.
Cabinet System
Mounting Mechanism
Ideal Use Case
Key Advantages
Floor-Mounted (Freestanding)
Heavy-duty adjustable leveling legs
Heavy equipment, power tools, bulky automotive fluids
Maximum weight capacity, easy to relocate during shop reconfigurations
Wall-Mounted (Off-Floor)
Structural wall cleats (Slatwall or french cleats)
Variable floor elevations, flood-prone regions
Clears floor space completely, allows easy hose-down cleaning underneath
Mobile Tool Cabinets
Heavy-duty locking swivel casters
Active workspaces, detail bays
Roll tools directly to the project vehicle, locks in place during use
Step-by-Step Installation: Field-Tested Protocol
Proper installation is critical to ensure your heavy steel cabinets remain plumb, secure, and tip-proof. Follow this professional step-by-step workflow:
Step 1: Map the Slab Slope and Wall Studs
Garage concrete slabs are sloped toward the driveway door for drainage. Use a 4-foot spirit level or laser level to identify floor height variations. Locate and mark all wall studs using a high-grade stud finder.
Step 2: Assemble the Base Frame and Leveling Feet
If using floor-mounted garage cabinets steel units, thread the heavy-duty leveling legs into the cabinet base. Position the cabinet against the wall and adjust the leveling feet until the unit is 100% plumb vertically and level horizontally.
Step 3: Anchor to Structural Wall Framing
Never leave tall steel cabinets freestanding without mechanical anchors! Secure the top rear panel directly into solid wood studs using heavy-duty lag bolts paired with fender washers, or use masonry anchors if mounting against poured concrete foundation walls.
Step 4: Grout or Bolt Multiple Cabinets Together
For continuous modular runs, align adjacent cabinet side walls and bolt them together through factory pre-punched holes. Joining units together creates a unified, rigid monolith that resists racking and shifting.
Expert Advice: Tips Pro & Hidden Warnings from the Field
Expert Insight: In a coastal garage retrofit I led a few years ago, the homeowner bought expensive steel cabinets but mounted them directly to raw concrete floor slabs without adjusting the leveling feet. Salt-laden moisture pooled underneath the bottom edges, rusting out the unpainted base seams within three years. Always elevate your cabinet bases at least 2 to 4 inches off the raw slab!
Hidden Warnings to Keep in Mind:
Beware of Concrete Curb Obstructions: Many garages feature a raised concrete stem wall around the perimeter. Check cabinet depth dimensions to ensure doors can clear floor curbs without interfering with wall mounting cleats.
Mind Overhead Garage Door Tracks: Before purchasing tall 80-inch steel locker cabinets, double-check clearance around ceiling-mounted garage door openers, torsion springs, and track assemblies when doors are fully open.
Verify Door Hinge Quality: Ensure your cabinet doors utilize 3-way adjustable concealed European hinges or full-length piano hinges. Cheap butt hinges sag under the weight of door-mounted tool racks over time.
Conclusion
Transforming your garage into a functional, clean, and secure workspace starts with choosing hardware built for tough environments. Upgrading to heavy-gauge garage cabinets steel storage protects your investment in tools and equipment, maximizes available floor space, and delivers an industrial-grade finish that lasts a lifetime.
Take a hard look at your garage storage layout this weekend. Is your current shelving setup truly securing your assets, or is it time to upgrade to steel?
What storage challenges are you currently dealing with in your garage or workshop? Have you worked with steel modular systems before? Drop your questions and project ideas in the comments below!

I once worked with a client who had just invested over $1,200 into a custom-shaped, carbon-wrapped surfboard. Less than two weeks later, he called me out to his garage to fix a ding. He had leaned the board casually against a wall next to his lawnmower, the tail slipped on the slick concrete floor, and it crashed right into a metal shelving unit. It was a heartbreaking, completely preventable fracture to both his fiberglass and his wallet.
In my over ten years of managing residential spaces and custom interior builds, I have learned that high-performance sports equipment is a serious financial asset. You wouldn’t park a luxury sports car in a driveway where it could get dinged by a rogue bicycle, yet surfers constantly leave their prized quivers vulnerable to gravity and foot traffic.
Transitioning your gear inside using a dedicated surfboard rack indoor setup isn’t just about organizing a room; it’s about controlled environment engineering and structural asset protection. Let’s dive into how to execute this flawlessly without ruining your interior aesthetics or your walls.
The Materials Hazard: Why Proper Indoor Storage Matters
To understand the necessity of specialized storage, you have to look at what a surfboard actually is. Beneath the beautiful gloss coat lies a delicate sandwich of polyurethane (PU) or expanded polystyrene (EPS) foam, wrapped in a thin layer of fiberglass cloth and saturated with polyester or epoxy resin.
The Hidden Threats: Delamination and Creep
When you lean a board vertically against a drywall corner without proper support, all of its dead weight concentrates onto a single point on the tail block. Over time, constant localized pressure can cause structural compression or “creep” in the foam core.
Worse yet, storing boards in a damp garage or exposing them to wild temperature swings can trigger delamination—a catastrophic failure where the fiberglass skin separates completely from the foam core. Moving your quiver into a climate-controlled room using a specialized surfboard rack indoor system eliminates these structural stressors completely, keeping the core stable and bone-dry.
Architectural Configurations: Choosing the Right Rack Matrix
Every home footprint is different, and choosing how to mount your boards depends entirely on your room’s ceiling height, traffic flow, and available wall space.
Vertical Racks: Maximizing Tight Corners
Vertical wall systems are the ultimate space-savers for rooms with standard 8-foot to 10-foot ceilings. They allow you to line up a multi-board quiver shoulder-to-shoulder, much like books on a library shelf.
The secret to a successful vertical setup is the base cushion. You want a rack system that incorporates thick, high-density EVA foam or eco-friendly cork pads on the floor tray. This cradles the fragile tail block and absorbs any micro-vibrations when you set the board down.
Horizontal Racks: The Visual Accent Strategy
If you have longboards, traditional logs, or guns that exceed 9 feet in length, a horizontal wall mount is your safest bet. This configuration distributes the load evenly across two distinct support arms, preventing any bowing or warping over time.
Think of horizontal storage like a high-end art gallery layout. By positioning the board parallel to the ceiling, you utilize the dead space above furniture or doorways, completely clearing your lower living zone while turning your equipment into a stunning design feature.
Step-by-Step Installation: Securing Your Assets Safely
A multi-board quiver can easily weigh 30 to 50 pounds, and the leverage applied to a wall mount is immense. If you don’t anchor the system correctly, gravity will eventually win. Here is the professional installation protocol I use to ensure a rock-solid mount.
1.Locate Structural Framing:Phase 1.
Use a deep-scan stud finder to map out the wood studs behind your drywall. Never use standard plastic drywall anchors for a surfboard rack. Mark the exact center of the 2×4 studs with a pencil; your mounting screws must bite into solid timber.
2.Calculate Fin Clearance and Spacing:Phase 2.
Measure the widest point of your largest board to determine the distance between your rack arms. If you store your boards with the fins in, you must ensure the rack arms project far enough out from the wall (usually 11 to 14 inches) so the fins don’t scratch your paint.
3.Level and Predril the Subframe:Phase 3.
Hold your rack brackets up to your marked studs and use a 2-foot spirit level to ensure perfect horizontal alignment. Pre-drill your pilot holes using a drill bit slightly smaller than your structural screws to prevent the wall studs from splitting.
4.Drive Structural Fasteners and Pad the Arms:Phase 4.
Secure the brackets using 3-inch heavy-duty lag screws or rugged structural fasteners. Once mounted, wrap the dowels or metal prongs in thick closed-cell foam tubing to eliminate any metal-to-fiberglass friction points.
Hidden Warnings and Expert Advice from the Field
After a decade of auditing residential spaces, I’ve seen a few recurring design errors that can silently ruin your gear.
The Thermal Radiation Trap
Just because your boards are indoors doesn’t mean they are completely safe from the elements. Never position your surfboard rack indoor system directly opposite a large, un-tinted south-facing window or right next to an HVAC heating vent. Intense UV rays passing through glass can yellow white resin in months, and localized heat spikes can cause the air inside an EPS foam board to expand rapidly, literally bursting the fiberglass skin from the inside out.
💡 Expert Pro-Tip: The Fin-Out Leash Storage Trick
When packing your boards onto a horizontal wall rack, always store them with the deck facing the wall and the fins pointing outward towards the room. This makes it impossible for the fins to accidentally gouge the drywall when you’re sliding the board out. Additionally, install a small wooden peg right next to the rack base to hang your leashes and surf watches—keeping your entire session kit localized and organized.
Conclusion: Elevate Your Gear, Protect Your Investment
At the end of the day, home improvement is about creating harmony between your lifestyle and your living space. By treating your ocean gear as a premium asset and investing in a high-quality surfboard rack indoor system, you achieve two things at once: you eradicate the stress of accidental garage dings, and you elevate the overall design narrative of your home.
It is a simple afternoon project that pays massive dividends in gear longevity and peace of mind.
How are you currently storing your quiver? Are your boards tucked away in a dark garage corner, or are they proudly integrated into your home’s layout? Let me know your current setup dimensions or drop your mounting questions in the comments below—let’s get your gear safely on the wall!
You can never have enough storage, and shelving is the easiest and most practical way to create storage in your workshop or garage. Before you decide on a shelving system, first think about what you want to store and the size and weight of various items. This will help you decide which is the most functional storage system for you.
A bit of homework before you start installing a shelving solution will help you avoid the common pitfalls associated with failed shelving, like not using strong enough screws or a sufficient number of brackets for the weight you intend to store, or choosing shelving material that bends and buckles.
Individual bracket shelving
This type of shelving can be as functional or as decorative as you like, although for a garage shelving solution, you’ll probably err towards the functional. Follow a few basic rules and this type of shelving is really easy to install, but make sure you use the correct wall plugs and screws for the wall, or fix to wooden battens. This type of shelving is best where you need one or two shelves to keep items close at hand, perhaps over your workbench.
Built in shelving
If you have a recess in your garage, then make the most of it with built in shelving. By fitting supports round the three sides of the alcove, you can create flexible shelving by adjusting the height and depth of the shelves to suit, creating single deep shelves or shelving on 3 sides. You can even arrange the shelves to accommodate a workspace below.
Image Credit
Adjustable shelving systems
If you’re looking for robust, flexible and easy to use garage shelving, then you need to compare different adjustable shelving systems, on a trusted website like https://www.garage-shelving.co.uk/.
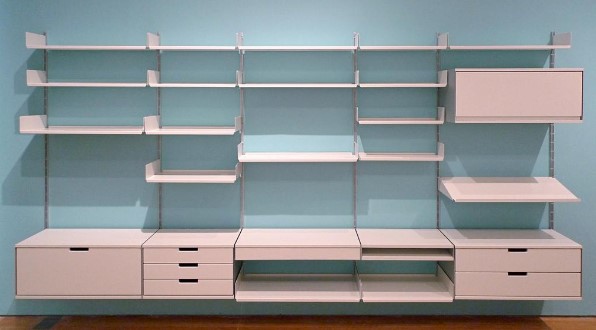
These systems are usually composed of two separate parts – the upright rails that must be secured to the wall, and the brackets which clip or slot into the rails so you can then balance a suitable shelf on top.
These types of systems are usually manufactured from durable materials like steel and aluminium, and they are available in various sizes to suit your available space.
There’s no doubt that an adjustable shelving system that’s specifically designed for your garage will prove cost-effective in the long run, thanks to its ease of use and sheer functionality.