Timeless Charm: Incorporating Arch Molding to Add Elegance to Your Interiors is a comprehensive guide to using arch molding to create a timeless and elegant look in your home. Arch molding is a classic architectural element that has been used for centuries to add a touch of sophistication and beauty to any interior. This guide will provide you with all the information you need to incorporate arch molding into your home, from selecting the right materials and colors to installation tips and tricks. With the help of this guide, you can easily create a timeless and elegant look in your home that will last for years to come.
How to Use Arch Molding to Create Timeless Charm in Your Home
Arch molding is a timeless architectural feature that can add charm and character to any home. It is a type of trim that is used to create an archway or doorway, and it can be used to frame windows, doorways, and other openings. Arch molding can be used to create a classic, timeless look in any home.
When using arch molding, it is important to choose the right type of material. Wood is the most common material used for arch molding, but other materials such as plaster, stone, and metal can also be used. The material should be chosen based on the style of the home and the desired look.
Once the material has been chosen, the next step is to measure the opening for the arch molding. Measure the width and height of the opening and then use a saw to cut the arch molding to the correct size. It is important to make sure that the arch molding is cut to the exact size of the opening, as any gaps or overhangs can detract from the look of the arch.
Once the arch molding has been cut to size, it is time to install it. The arch molding should be attached to the wall using nails or screws. It is important to make sure that the arch molding is securely attached to the wall, as any movement can cause the arch to become misaligned.
Once the arch molding is installed, it is time to finish it. Paint or stain can be used to give the arch molding a finished look. If the arch molding is made of wood, it is important to use a sealer to protect it from moisture and other elements.
Arch molding is a great way to add timeless charm to any home. It is a classic architectural feature that can be used to frame windows, doorways, and other openings. With the right materials and installation techniques, arch molding can create a timeless look that will last for years to come.
The Benefits of Incorporating Arch Molding into Your Home Design for a Classic Look
Arch molding is a timeless and classic design element that can add a touch of elegance to any home. Incorporating arch molding into your home design can provide a variety of benefits, from enhancing the aesthetic appeal of your home to increasing its value.
Arch molding is a type of trim that is used to create an archway or doorway. It is typically made from wood, but can also be made from other materials such as plaster or stone. Arch molding is available in a variety of styles and designs, allowing you to customize the look of your home to suit your personal taste.
One of the primary benefits of incorporating arch molding into your home design is its aesthetic appeal. Arch molding can add a touch of sophistication and elegance to any room, making it look more inviting and luxurious. It can also be used to create a focal point in a room, drawing the eye to a particular area.
In addition to its aesthetic appeal, arch molding can also increase the value of your home. This is because arch molding is considered a classic design element that is timeless and will never go out of style. As such, it can be a great investment for homeowners who are looking to increase the value of their home.
Finally, arch molding is also relatively easy to install and maintain. It is a relatively simple process that can be done by most homeowners with minimal tools and experience. Additionally, arch molding is also relatively low maintenance, requiring only occasional cleaning and polishing to keep it looking its best.
Incorporating arch molding into your home design can provide a variety of benefits, from enhancing the aesthetic appeal of your home to increasing its value. With its timeless and classic design, arch molding is sure to add a touch of elegance and sophistication to any home.
Conclusion
Timeless Charm: Incorporating Arch Molding to Add Elegance to Your Interiors is a great resource for anyone looking to add a touch of elegance to their home. Arch molding is a timeless and classic design element that can be used to create a variety of looks, from traditional to modern. With the right materials and tools, anyone can create a beautiful arch molding feature in their home. Whether you are looking to add a touch of sophistication to your living room or a grand entrance to your home, arch molding is a great way to add timeless charm and elegance to any interior.

 We take a bath each day because we want to stay clean and fresh. Some others also take a bath just to release stress from their body. You will feel that you have a better perspective as soon as you get out of the bathroom. However, there are myths about bathing and items used for bathing that are not helpful in any way. Therefore, you need to know the facts.
 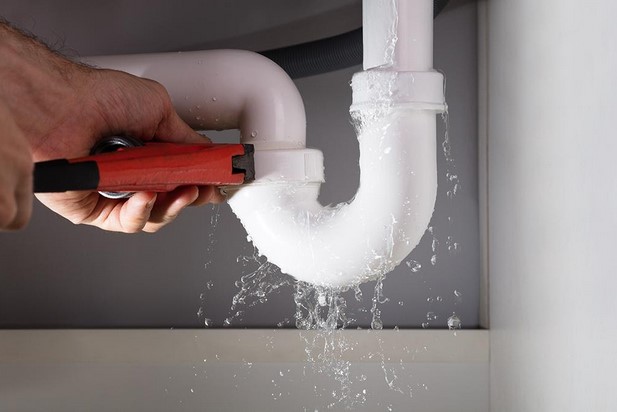 Your commercial plumbing system will get more use than your residential system. To keep a business running, employees’ restrooms and public toilets need a constant water supply. You can be sure of uninterrupted service no matter what business type you have. These are the top signs to call a commercial plumber repair specialist:
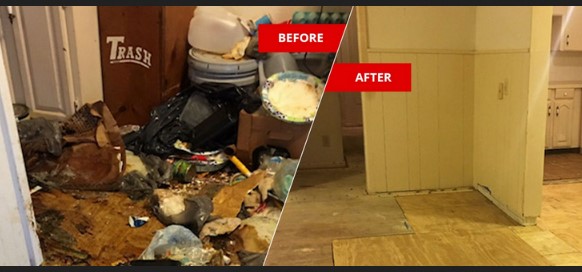 The passing of any person is difficult for those left behind to process. Things are even more difficult when the death takes place on your property. Whether it’s a natural death that remains undiscovered for a time or a violent death associated with a crime, you will eventually have to address the need to clean the site. The most practical solution is to hire professionals who know how to manage a