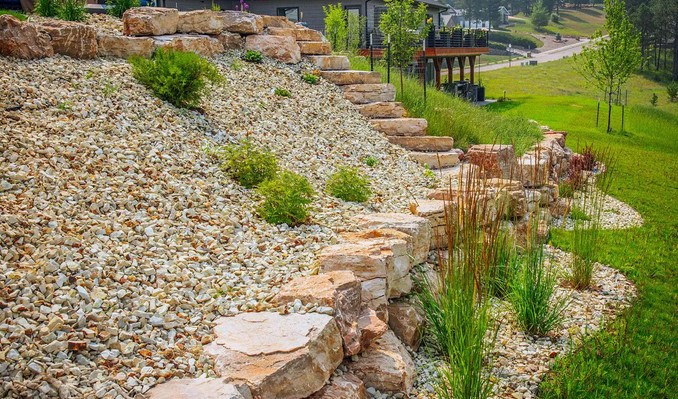
You’ve spent another Saturday morning wrestling with a lawnmower that won’t start, only to look at a patchy, brown lawn that is drinking your monthly budget in water bills. Your back hurts, your water meter is spinning, and yet your curb appeal is stagnant. What if I told you that the most “alive” your yard could look involves using something completely inert?
In my ten years of reconfiguring outdoor living spaces, I have witnessed a massive shift toward “Xeriscaping”—a fancy word for landscaping that reduces or eliminates the need for supplemental water. The undisputed king of this movement is the landscaping rocks DIY project. I remember a specific renovation in a high-drought area where we replaced 60% of a dying lawn with a river-rock dry creek bed. Not only did the homeowner’s water bill drop by 40%, but the property value surged because the maintenance requirement dropped to near zero.
The Strategic Logic of Hardscaping with Stone
When we talk about landscaping rocks DIY, we aren’t just talking about throwing pebbles on the ground. We are talking about environmental logistics. Stones are the “permanent furniture” of your yard. Unlike mulch, which decomposes and needs replacing every year, or grass, which requires a constant chemical and caloric intake, rocks are a one-time investment that pays dividends for decades.
Think of landscaping rocks as the “skeleton” of your property. They provide the structure and form that allow your plants to be the “jewelry.” By strategically placing stone, you are creating a stable ecosystem that manages drainage, prevents soil erosion, and suppresses weeds without the need for toxic herbicides.
Choosing Your Medium: A Technical Breakdown of Rock Types
In the world of stone, size and texture aren’t just aesthetic choices—aka “the look”—they are functional specifications. Throughout my career, I’ve had to fix “DIY disasters” where someone used the wrong stone for the wrong purpose.
1. Pea Gravel and Decomposed Granite (DG)
These are your high-traffic aggregates. They are small (usually 1/4″ to 1/2″) and “crunchy.”
-
Best Use: Pathways, patio bases, and fire pit areas.
-
Pro Insight: Decomposed Granite packs down like a hard surface but remains permeable, meaning water soaks through it rather than pooling on top.
2. River Rocks and Cobblestones
These are smooth, rounded stones polished by water.
-
Best Use: Dry creek beds and drainage swales.
-
Technical Benefit: Their rounded edges allow water to flow around them easily, making them perfect for directing runoff away from your home’s foundation.
3. Lava Rocks and Crushed Slate
These are lightweight and porous.
-
Best Use: Garden beds where you want to retain soil moisture.
-
Warning: Lava rock is very difficult to clean if leaves or pine needles fall into it, as the jagged surface “grabs” organic debris.
The DIY Workflow: How to Execute Like a Pro
The difference between a “professional finish” and a “weekend mess” is 90% preparation. If you just dump rocks on top of grass, within two months, you will have a rock-covered weed patch.
Phase 1: Site Excavation and Grading
You must remove the top 2-3 inches of turf and soil. This creates a “basin” for the rocks to sit in so they don’t spill over onto your sidewalk. More importantly, check your grading. Ensure the soil slopes away from your house at a rate of at least 1 inch per foot.
Phase 2: The Barrier Protocol
Do not use cheap plastic liners. They trap gas and kill the soil biology. Instead, use a heavy-duty non-woven geotextile fabric. This is a professional-grade weed barrier that allows air and water to pass through but prevents the stones from sinking into the mud over time.
Phase 3: Edging and Containment
Rocks have a mind of their own; they want to travel. Use a sturdy edging material—steel, heavy-duty plastic, or even “border stones”—to create a clean perimeter. This is what gives your landscaping rocks DIY project that “architectural” crispness.
The Analogy: Rocks as a “Thermal Blanket”
Think of your garden beds like a person standing in the sun. Soil without cover is like bare skin; it burns, dries out, and cracks. Wood mulch is like a light linen shirt—it helps, but it eventually wears out. Landscaping rocks, however, act like a high-tech thermal blanket.
They shade the soil from direct UV rays during the day, keeping the roots cool. At night, they release the heat they absorbed, protecting sensitive plants from sudden temperature drops. This “thermal regulation” is the secret to growing lush plants in harsh environments.
Expert Advice: Insights from the Field
Tips Pro: The “Calculated Tonnage” Rule
Never buy rocks by the bag at a big-box store for a large project; you’ll pay 400% more than you should. Calculate your square footage, decide on a depth (usually 2-3 inches), and call a local rock yard to order by the “ton” or “cubic yard.” Having a dump truck drop a pile in your driveway is the true mark of a professional DIYer.
The Leaf Blower Trap
If you live under a massive oak or maple tree, avoid small pea gravel. When you try to blow the leaves off your rocks in the fall, you will end up blowing your expensive gravel into the neighbor’s yard. For high-debris areas, always go with a larger 2-inch to 4-inch river rock that stays put under the force of a leaf blower.
Maintenance and Long-Term Value
The “sustainable” part of stone landscaping isn’t just about water; it’s about human energy. Once your stone is down, your maintenance schedule looks like this:
-
Monthly: A quick spray with a hose to knock off dust.
-
Seasonally: A leaf blower to remove organic debris.
-
Annually: A light “top-dress” (adding a few bags of fresh stone) every 3-5 years if any areas have settled.
By reducing the time you spend maintaining your yard, you increase your “Life ROI.” You get your Saturdays back.
Scannable Project Checklist
-
Define the Zone: Mark the area with layout paint or a garden hose.
-
Excavate: Dig down 3 inches and level the “floor.”
-
Lay Fabric: Use landscape staples every 12 inches to secure the geotextile.
-
Install Edging: Ensure the edge sits slightly higher than the final rock level.
-
Spread the Stone: Use a heavy-duty metal rake to distribute the weight evenly.
-
Rinse: Spray the rocks with water to remove the “quarry dust” and reveal their true colors.
Conclusion: Transform Your Property Today
Embarking on a landscaping rocks DIY project is more than just an aesthetic choice; it is a strategic investment in your property’s future. You are trading a high-maintenance, water-hungry lawn for a sophisticated, sustainable landscape that looks better every year.
It’s time to stop fighting nature and start working with it. The weight of the stone provides the peace of mind that your yard is “set it and forget it.”
What part of your yard is currently giving you the most trouble? Is it a muddy slope where grass won’t grow, or a side-yard that feels forgotten? Start small with a single stone-bordered garden bed and see the difference for yourself. If you’re unsure about which rock type fits your local climate or soil type, leave a comment below—I’ve moved enough tons of stone to help you avoid the heavy lifting of guesswork!
