Is Your Home Properly Insulated? What Homeowners Should Know

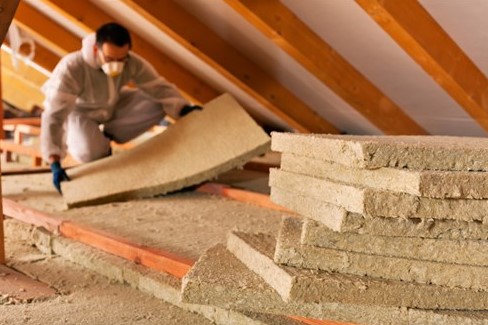
<2017/05/What-Homeowners-Should-Know.jpg">Home insulation has undergone many improvements in the past few years, including the addition of more efficient materials and more effective installation procedures. No longer are homeowners restricted to only batt or blown in types of insulation, although these faithful choices are still very useful in some situations.

In addition, new products, such as spray foam insulation are now able to be easily applied in areas that were once difficult or impossible to properly insulate. But even with these new products, homeowners still need to learn more about insulation basics so they will be able to determine how well their homes are currently insulated and how much they might benefit from increasing the amount.

Understanding the R-Value

Home insulation products are assigned an R-value, based on their individual thermal resistance values. The R-value given to each product is based on its thickness, density and overall insulating effectiveness.

Location matters

Because the weather can be vary greatly in different areas of the country, home insulation experts have created a zone map that can help both homeowners and insulation contractors more easily match the location of the home to the R-value it will require. While this map provides basic information, homeowners may need more or less insulation than the zone map indicates, depending on their home’s exact location, climate, and the type and quality of building materials used to construct it. Newer homes that employ heat reflective roofing panels and pre-insulated siding may require far less insulation to achieve comfort than a smaller home built with less energy efficient materials.

Age and condition are important

Insulation is able to make a home feel more comfortable because it has the ability to trap air and create a barrier that helps to keep conditioned air inside the home. This same air-filled barrier also helps to keep hot or cold conditions outside the home from affecting the temperature inside. Over time, however, insulation can lose some or all of its loftiness, greatly impairing its ability to insulate the home – meaning if your home is new construction, it will likely outperform an older home with older but similar insulation.

In addition to age, insulation that has been wet, or compressed in some manner will no longer be effective and should be considered for replacement or upgrading, depending on the actual cause of its failure. Homes that have had rodent infestations may find that attic and wall insulation has been compressed, damaged, or become so soiled that it must be completely replaced.

Energy audits can help reveal insulation issues

An energy audit can be a helpful tool that homeowners can use to help them learn more about their existing insulation and any problem areas they may have. Some utility companies offer energy audits for free as a service to their customers, but homeowners can also use helpful DIY energy assessment guides to perform their own audit.

Energy audits also help homeowners spot problems such as inefficient heating and cooling equipment and construction issues, materials, or damage that may be making the home less efficient to heat or less comfortable to occupy. 

Getting a professional assessment

Home insulation contractors are another excellent source of information to help homeowners determine the quality and R-value of their current insulation. Reputable insulation contractors will be able to thoroughly examine and assess all existing insulation, including:

  • attic
  • walls
  • sub-floor and crawl space
  • insulation around vents and access points

During this assessment, they will take measurements and use scientific calculations based on the zone, type of insulation, construction quality, and other factors to determine the optimal amount of insulation required for each part of the home.

For even more information about your home’s insulation needs, contact a professional insulation contractor in your area. In most cases, much of the cost of upgrading or replacing your home’s insulation can be offset by lower heating and cooling bills in the years after the work is done.

The Best Artificial Grass Phoenix AZ

Nowadays, artificial turf is the perfect solution in order to save a lot of money and also reduce maintenance cost for you. It is important for you to install artificial grass Phoenix AZ that will enhance the outdoor activities that you have free as you will not have to spend it edging, mowing, watering, and cleaning up debris and dirt, and no more fertilizing lawns that you have to track into your home. You do not have to worry if you have allergies of grass. If install the synthetic turf properly by hiring the contractor, you will get your amazing lawn back without having to do many works. Agape Turf uses products that are affordable, pleasing and has a realistic appearance. The process of installation of artificial turf will enhance the value of the property as well. You will get a warranty from manufacturers if you purchase synthetic turf which is honored by the turf distributor.

Agape Turf is a licensed contractor that will make sure that you have the contractor which has a lot of experience and knowledge in order to get the job done. And you do not have to worry because they are covered by important workers, insurance, and bonding compensation insurance in order to protect you, your business, or your home. The whole installation process of your synthetic grass can be serviced by the Agape Turf from the basic preparation through the installation process of turf. In a lot of cases, Agape Turf is the perfect choice as they can be competitive with contractors which have been licensed or unlicensed.

Maintenance

Maintenance means that you have to keep the turf clean. Organic materials should be removed from the surface. Organic materials will be removed usually by using a lawn sweeper or a leaf blower. It is also required to use rakes in order to remove heavier objects. And also natural and stiff bristle broom can be applied in order to sweep high traffic spots.

The Agape Turf will not do the basic care when it comes to deal with a thing which is spilled. There is household cleaner that will be used such as bleach and a couple of other cleaners. Products from Agape Turf can deal with a couple of most chemicals such as paint thinner or turpentine when it comes to deal with paint that may be spilled on the grass.

The grasses that have been produced by Agape Turf come with built-in UV protection in order to hold its color under a couple of bad conditions such as the harsh sun in Arizona.

The grass is different from natural grass that is very cool, but heat cannot be absorbed and radiated such as brick, rock or pavement. The grass will be the perfect choice even in the summers of Arizona, particularly in the morning and evening hours. If you want to use the turf in the heat of the day, you just have to spray it by using water in order to cool it down in a couple of seconds.

The turf comes with the sheen which is the UV stabilizer. After you install the turf there will be less and less shine when you gets a couple of dirt and dust.

When talking about the real budgets in terms of natural grass lawn which has been well-kept it will be very affordable. But this is not to mentions the time savings and convenience which has been added for not having upkeep. Free quotes will be provided by Agape Turf.

A couple of approvals by HOA or Home Owners Association only can be done for front yard application. The real fact is that the products which have been offered by Agape Turf have been claimed as the only grasses that are allowed for front yard application by HOA. This company will support you in a presentation that you have to get in order to give to your HOA.

The Agape Turf is the perfect option for those of you who want to get your beautiful lawn back by using their products. Synthetic turf is the one that you are looking for. Not only is that maintenance also the most important thing in order to keep your lawn beautiful.

10 of the hottest bathroom trends for 2016

While the bathroom may be the smallest room in the house, creating the perfect bathroom for your needs will not only give you a haven to escape from the hustle and bustle of life, but it will add value to your home. If you’re planning to update or remodel your bathroom, or you’re planning a new bathroom from scratch, take a look at 10 of the hottest bathroom trends for 2016.

  1. Trough Sinks

Although the name may sound like something you’d find in a barn, trough sinks are an elegant addition for any modern bathroom. Often referred to a ‘double sink’, these are extra long sinks that can be used for bathing and hand washing extra large items.

  1. Freestanding bathtubs

Built-in baths are losing their popularity, with some people choosing not to fit baths at all. However, if you can’t imagine life without a bath, stay on trend by fitting a freestanding bath. Freestanding tubs offer more flexibility for placement, plus they come in a range of styles from modern to traditional.

  1. Square shaped showerheads and fixtures

Angular shapes are currently featuring heavily in the world of design. From square showerheads to square fixtures such as soap dishes, their clean lines work well in contemporary bathrooms.

  1. Walk in Showers

Many of the latest showers eliminate trip hazards by offering walk in designs which are flush to the floor. Some showers have removed the traditional cubicle completely, either having the shower fitted in a totally waterproof area with just a glass screen to contain the water, or by going the whole hog and installing a wetroom. One thing to remember if you do decide to fit a walk in shower or wet room is to ensure that it’s fitted by professionals.

  1. Shower Seats

While most of us equate taking a shower with standing up, the trend for 2016 is to install a shower seat. No longer are shower seats merely for those who are not so steady on our feet, or the older generation, but they’re becoming the must have item for the stylish bathroom.

  1. Open shelving

Open shelving and open-shelved vanity units are an increasingly popular way to display bath towels, bath products and well just about anything. However, remember that this may not be a viable option for you if you’re not particularly tidy or you hate dusting, and we do recommend that you do keep some cupboards with doors for those items which you’d rather not have on display.

  1. Water saving taps and showerheads

As our awareness of ecological issues grows, it becomes more important than ever to find ways to save our valuable resources, particularly in light of rising water costs. Fitting aerators to your taps and showerheads will enable you to reduce your water consumption without losing power. You may also want to think about fitting water saving devices on your toilets, so that you use less water when you flush.

  1. Underfloor heating

We all know the feeling of stepping onto cold, tiled floors. This can be avoided by fitting underfloor heating. It’s also helpful for helping to reduce the moisture and humidity in the bathroom.

  1. Anti-fog bathroom mirrors

And speaking of moisture, there’s nothing worse than having your mirror steam up. Anti-fog bathroom mirrors ensure that you’ll be able to see what you’re doing without having to wipe off condensation.

  1. Some color considerations

The top color trends for 2016 bathrooms are white, both for fixtures, tiles and accessories; grey for tiles and accessories, and a combination of black and white. If you do feel the need for some color, purple, mauve, lilac and lavender are proving to be very popular choices as accent colors.

Refinishing Clawfoot Tub: Restoring Elegance to Your Vintage Bath

room

Refinishing a clawfoot tub is a great way to bring a vintage look to your bathroom. It can be a daunting task, but with the right tools and techniques, you can restore the elegance of your clawfoot tub and make it look like new. Refinishing a clawfoot tub requires patience and attention to detail, but the results are worth it. With the right preparation and materials, you can make your clawfoot tub look like it just came out of the factory. This guide will provide you with the information you need to refinish your clawfoot tub and bring back its original beauty.

How to Refinish a Clawfoot Tub: A Step-by-Step Guide

Refinishing a clawfoot tub is a great way to give your bathroom a fresh, new look. With a few simple steps, you can have a beautiful, new tub in no time. Here is a step-by-step guide to help you get started.

Step 1: Prepare the Tub

Before you begin, you will need to prepare the tub for refinishing. Start by removing any hardware, such as faucets and drain covers. Next, use a wire brush to remove any rust or corrosion from the surface of the tub. Finally, use a mild detergent and water to clean the tub thoroughly.

Step 2: Sand the Tub

Once the tub is clean, you will need to sand it. Start with a medium-grit sandpaper and work your way up to a fine-grit sandpaper. This will help to create a smooth surface for the new finish.

Step 3: Apply Primer

Once the tub is sanded, you will need to apply a primer. This will help the new finish adhere to the surface of the tub. Use a brush or roller to apply the primer in even strokes. Allow the primer to dry completely before moving on to the next step.

Step 4: Apply the Finish

Once the primer is dry, you can apply the finish. You can choose from a variety of finishes, such as enamel, epoxy, or acrylic. Use a brush or roller to apply the finish in even strokes. Allow the finish to dry completely before using the tub.

Step 5: Reinstall Hardware

Once the finish is dry, you can reinstall any hardware that you removed. Make sure to use the proper tools and follow the manufacturer’s instructions for installation.

Refinishing a clawfoot tub is a great way to give your bathroom a fresh, new look. With a few simple steps, you can have a beautiful, new tub in no time. Follow this step-by-step guide to help you get started.

The Benefits of Refinishing a Clawfoot Tub: Aesthetic and Practical Advantages

Refinishing a clawfoot tub is a great way to improve the aesthetic and practical value of a bathroom. Refinishing a clawfoot tub can be a cost-effective way to update the look of a bathroom without having to replace the entire tub. It also provides a number of practical benefits that can make the bathroom more comfortable and functional.

One of the most obvious benefits of refinishing a clawfoot tub is the aesthetic improvement. Refinishing a clawfoot tub can give it a fresh, new look that can completely transform the look of a bathroom. It can also be customized to match the existing décor of the bathroom, allowing for a more cohesive look.

In addition to the aesthetic benefits, refinishing a clawfoot tub also provides practical advantages. Refinishing a clawfoot tub can help to protect it from damage caused by water, soap, and other substances. It can also help to prevent the tub from becoming stained or discolored over time. Refinishing a clawfoot tub can also help to make it easier to clean, as the surface will be smoother and more resistant to dirt and grime.

Finally, refinishing a clawfoot tub can also help to improve the overall safety of the bathroom. Refinishing a clawfoot tub can help to make it less slippery, reducing the risk of slips and falls. It can also help to make the tub more durable, allowing it to last longer and withstand more wear and tear.

Overall, refinishing a clawfoot tub can provide both aesthetic and practical benefits. It can help to improve the look of a bathroom while also providing practical advantages that can make the bathroom more comfortable and functional. Refinishing a clawfoot tub is a great way to update the look of a bathroom without having to replace the entire tub.

Conclusion

Refinishing a clawfoot tub is a great way to bring back the elegance and charm of a vintage bath. It is a relatively simple process that can be done in a few hours and will make a huge difference in the look and feel of your bathroom. With the right supplies and a little bit of patience, you can restore your clawfoot tub to its original beauty and enjoy it for years to come.

Large Indoor Artificial Trees

Artificial trees can be a statement in your living space. They often make the environment look more refreshed and inviting and can add harmony not only into your home but in life, as well. If you have always wanted to bring in elegance and beauty inside your home, large indoor artificial trees are an excellent way to achieve that. Real plants may still work but the maintenance that they require in order for them to stay healthy and strong can be way too much for a busy homeowner.

Many of the artificial trees available today are made to look like the real ones as seen in the theplantsproject.com.au website. It is really hard to tell the difference. In fact, people are likely to get the impression that they are not artificial at one glance. Most of the high quality artificial trees are made from reformed barks and are designed to long through the UV coating added into the leaves. Even when directly exposed to sunlight, they do not fade that fast.

Artificial trees for indoor spaces are also ideal for homeowners who have family members suffering from allergy and asthma. Moreover, they are 100 percent maintenance-free, eliminating the daily task of watering them. Occasional dusting can do the work of keeping the artificial trees looking like new and natural. They can be placed anywhere in your home such as the dining area, living room or porch. They are basically versatile and can adapt to the theme of your home.

Choosing Large Indoor Artificial Trees

There is a vast variety of large artificial trees for indoors offered in the market, ranging from three to five feet tall and are excellent for spacious living rooms with high ceiling. From palm trees, flowers trees to topiary trees, there is always something to suit your taste. If you want larger trees as focal point in your living room, varieties like the Phoenix palm can be left standing in one corner or even in the middle of the space, creating a revitalizing vibe.

Flowers trees are superb when you want to add some color into the room. Although artificial, they flowers are constructed to look more realistic and full of life. Because the flowers don’t wither, you never have to worry about the upkeep and no matter what the season, your artificial flower tree is always in bloom.

If you want to bring in more life, dimension and a modern feel into your room but the limited space restricts you from doing so, topiary trees are a beautiful choice. They come in different shapes such as oblong, balls and triangle and are extremely versatile as they work outdoors as well such as on entrances, patios and decking. All in all, they are perfect anywhere in your home.

Large Indoor Artificial Trees as Unique Decorative Objects

Decorating with large indoor artificial trees is relatively easy, as the market offers more and more choices for homeowners and business owners alike. It becomes a fun task too; deciding which type of tree goes into a certain corner or which one could serve as the focal point of the room.

The best thing about them is they do not require to be watered daily so you won’t be obliged to care for them except for quick dusting. Since they are placed indoors, they do not accumulate dust and can be cleaned with feather duster.

If you are re-decorating your space and make it want to look livelier, or if you simply need to boost its feel and appearance, large indoor artificial trees can come handy in your decorating needs and desires. The internet offers a vast range of artificial trees in different sizes, shapes and types. You can look for suppliers online from within your area and get a feel of how it is going to bring in life into your space by checking them out from the owner’s and supplier’s websites.

Got a boiler Problem? Let’s look at what it could be.

We all rely on our boilers don’t we. They sit there in the kitchen coming off and on like their supposed to and we don’t give them a second thought, until they go wrong of course then we have to take notice. One day they are happier providing us with hot water and the warmth of the radiators and then the next thing you know it’s all whirr clunk and then nothing. What could have gone wrong? First of all, a call to a Boiler Repair Gloucester firm like http://www.hprservicesltd.com/gloucester-boilers/boiler-repair-gloucester/ should be you first port of call as boilers contain natural gas and electricity two things that you don’t want to mess about with if unqualified. We still have a quick look at some of the most common issues with boilers right now but don’t try and fix them yourself.

mage credit

  1. Boiler generally not providing heat and hot water. Its very likely that a value or a diaphragm may have gone somewhere in the system and the boiler is refusing to work as it cannot pump water correctly or how it should. The other issue is it that the pump is gone and there is no hot water being pushed around the system or there is an airlock.
  2. Dripping or leaking out water. Do not try and fix this yourself, its highly likely that an internal valve or seal has gone, and the unit will need to be dismantled.
  3. It starts making unhealthily sounding noises. Again, this is an internal issue and can be the water boiling or kettling as it is known. Kettling is very common in hard water areas where it is a build up of yucky sludge and limescale deposits that block up the pipes and restricted the flow of water. The water starts to boil and make banging noises in the boiler.

Image credit

  1. If the radiators are not getting hot, we finally get to a job that you can attempt to fix yourself. You will need a towel and a radiator key. You are now going to bleed the radiators. Each one will need a twist at the valve end. Be ready with the towel as if you turn it too far water will come out. This is a good sign as it means the water is being pumped around the system correctly. If you hear a hissing noise this is also good as it means the air is escaping from the radiator and will soon be replaced with hot water. This is quite a common occurrence but doesn’t mean that there is something more sinister going on. If it persists then an expert will be required.
  2. Thermostat has given up. This is an issue where the thing that regulates the temperature of the water, if its not working properly then the system will not know when to put the heating on.

If you have any doubts do not attempt to fix this yourself. Call a registered engineer such as the chaps in the link above.

Reduce Damages and Losses with Fire Damage Mitigation Plan

There are many factors to consider when considering whether or not to call in a professional for fire and smoke damage restoration jobs or tackle the work on your own. One such factor is the fire damage mitigation plan. Having a perfect understanding of the task and what it entails puts you in a better position to make an informed decision.

What is Fire Damage Mitigation?

A fire damage mitigation plan involves preventive steps targeted at reducing losses and damages, both property and life, after a fire outbreak. Mitigation steps must be taken as quickly as possible to help minimize financial and physical losses. Leaving your property unattended after a disaster such as a major fire can jeopardize your safety and financial security.

Elements of Fire Damage Mitigation

Fire damage mitigation is in four different stages

Identifying Potential Hazards

After a fire outbreak, the affected area has potential hazard risks. These include exposure to soot. Soot can be dangerous to our health especially when inhaled. Smoke from the fire spread even beyond the affected area, so soot contamination could exist in a much wider area. Other sources of potential risks include structural weakness, exposure to new fires, contaminated water, and electrocution. Prior to entering your property, be sure to protect yourself

Assess Vulnerable Areas

Firefighters can’t fight and suppress a raging fire without at least creating holes in the walls or roofs to provide ventilation. After the fire, these holes can affect the structural integrity of the building. Hence, it is important to take extreme caution when approaching your building.

Rooms filled with smoke and blackened surfaces will not only affect your visibility but also limit your ability to recognize vulnerable areas. This is where professional fire and smoke damage restoration experts come in. They will assess and test the structure to check for potentially hazardous areas.

Fire Mitigation Plan

Now that the fire is out, what should you do: shut off electricity or remove excessive water in the surrounding? Professional fire repair experts put many factors into consideration before deciding on the best line of action to take. The mitigation plan will be largely influenced by the number of possible cleanup scenarios

Restoration Work

Fire damage can be a difficult task to accomplish without professional help. These experts can easily tell which items are salvageable and what needs to be replaced. Fire and smoke damage restoration experts will restore your property to its original state. Nothing will be left to chance as the entire property will be overturned to guarantee deep cleaning.

What To Do Before Fire and Smoke Damage Restoration Experts Arrive

While waiting for restoration experts to arrive, there are a couple of things to do

  • Ensure injured persons receive necessary medical attention

  • Keep away from the building to prevent any form of hazards like electrocution

  • Restrict access to the property. No unauthorized personnel should be allowed into the building

  • Keep away from water-logged areas including the pools.

Now isn’t the time to worry about your valuables. Instead, secure the safety and well-being of everyone affected first. Lost valuables can be recovered or replaced.

Barn Door Beauty: Building and Installing Your Own Sliding Barn Door

Barn Door Beauty is a comprehensive guide to building and installing your own sliding barn door. Whether you are a DIY enthusiast or a professional carpenter, this book provides step-by-step instructions on how to build and install a sliding barn door. With detailed illustrations and easy-to-follow instructions, you can create a beautiful and functional sliding barn door that will add a unique touch to any room. From selecting the right materials to installing the door, this book covers all the essential steps to ensure a successful project. With Barn Door Beauty, you can create a stunning and unique sliding barn door that will be the envy of your friends and family.

How to Choose the Right Barn Door Hardware for Your Home

When it comes to choosing the right barn door hardware for your home, there are a few key factors to consider. First, you need to decide on the type of hardware you want. There are several different types of barn door hardware available, including sliding track systems, hangers, and rollers. Each type of hardware has its own advantages and disadvantages, so it’s important to consider which type will best suit your needs.

Next, you need to consider the size of the door. Barn door hardware is available in a variety of sizes, so you need to make sure you choose the right size for your door. If you choose hardware that is too small, it won’t be able to support the weight of the door, and if you choose hardware that is too large, it won’t fit properly.

Finally, you need to consider the material of the hardware. Barn door hardware is typically made from either metal or wood, and each material has its own advantages and disadvantages. Metal hardware is usually more durable and can withstand more wear and tear, while wood hardware is usually more aesthetically pleasing.

Once you’ve considered these factors, you’ll be able to choose the right barn door hardware for your home. With the right hardware, you’ll be able to enjoy the convenience and beauty of a barn door for years to come.

DIY Barn Door Installation: Step-by-Step Guide for Beginners

Installing a barn door is a great way to add a unique and stylish touch to any room. Whether you’re looking to add a rustic charm to your home or just want to create a more open space, a barn door is a great option. With a few simple tools and some basic instructions, you can easily install a barn door in your home.

Before you begin, make sure you have all the necessary tools and materials. You’ll need a drill, screws, a level, a saw, a hammer, a tape measure, and a stud finder. You’ll also need the barn door itself, the track, and the hardware.

Once you have all the necessary materials, you’re ready to begin. Start by measuring the opening where you’ll be installing the barn door. Make sure to measure the width and height of the opening. This will help you determine the size of the door and track you’ll need.

Next, you’ll need to install the track. Start by marking the wall where you’ll be installing the track. Use a level to make sure the track is level. Then, use a stud finder to locate the studs in the wall. Drill pilot holes into the wall and use screws to secure the track.

Once the track is installed, you can begin to hang the door. Start by attaching the door to the track. Make sure the door is level and secure it with screws. Then, attach the hardware to the door. This will help keep the door in place and make it easier to open and close.

Finally, you’ll need to test the door to make sure it’s working properly. Open and close the door several times to make sure it’s working properly. If everything is working correctly, you’re done!

Installing a barn door is a great way to add a unique and stylish touch to any room. With a few simple tools and some basic instructions, you can easily install a barn door in your home. Make sure to measure the opening, install the track, hang the door, and test the door to make sure it’s working properly. With a little bit of effort, you can easily install a barn door in your home.

Conclusion

Barn Door Beauty is an excellent resource for anyone looking to build and install their own sliding barn door. With detailed instructions and helpful tips, it provides a comprehensive guide to the entire process. From selecting the right materials to installing the door, Barn Door Beauty covers all the bases. Whether you’re a beginner or an experienced DIYer, this book is sure to help you create a beautiful and functional sliding barn door.

What Shower Remodel Entails- The Best Way to Execute Your Ideas

A shower should always be in good condition and have the fixtures working properly. However, like any other room in a house, a shower won’t last a lifetime and there comes a time it will need remodeling. You should give your shower all the respect it deserves, by undertaking top-notch remodeling.

There is tremendous work involved, time and care to go into renovating an appealing and effective shower. If you are getting started on the project, there is much to know concerning shower remodel Fort Myers.

Well, shower remodeling has been around for many years, and there are dos and don’ts to keep in mind. It is not rocket science to figure out when it’s time to revamp your shower. Here are a few things to hold at your fingertips:

  • The installed fixtures don’t work as they should
  • The shower is no longer easy to clean
  • You got a damaged shower door
  • Presence of black mold around the base of the shower

Remodeling Your Shower- Everything to Know

A shower remodel shouldn’t be daunting if you know where to start and execute your ideas well. The whole process involves redesigning or replacing a damaged or an older shower. You may also need to undertake tile work, fixture replacement or configuring the layout.

If stunned by the many ideas you have in mind on how to do a shower remodel, stress no more. This guide has you covered and are tips to make use of:

Prioritize What’s Important

Costs adds up quickly when it comes to remodeling. A $1000 project can easily spiral to $5,000 range if you don’t plan well or not careful. Plan early to keep your expenses under control and start what is important.

Decide whether you want to invest in new beautifully customized shower tiles, spend on shower-head, or change the layout. Prioritize early and make budget-friendly choices.

Have a Sense of Your Aesthetics

Decide on aesthetics and settle for what you like. Gather robust information on the best shower aesthetics ideas from inspiration websites. Remember that the shower area is important in your home and should be striking. Consider the color scheme between the flooring and walls to complement the rest of the room and tie the elements together.

Functionality of the Shower

Consider the use of each appliance in the shower against your needs. Figure out what your shower is missing and what you need to add. Go for fixtures that will make the shower more practical and who will use them.

Utilize the Space

It’s rewarding to make the most of your shower space. Even if you don’t have ample space on your shower, try to create an illusion of more space. Ideas to embrace include keeping colors light, use large mirrors, and choose the right shower doors and interesting lighting.

Ideas to Help Revamp Your Shower

Here are remodeling ideas to incorporate in your project:

  1. Add built-ins shelves to your shower walls to create more space for shampoos and soaps.
  2. Construct a glass shower enclosure to add more natural light to the space.
  3. Build a porcelain tile shower as the material is budget-friendly and durable.
  4. Add high-end fixtures to refresh the aesthetic of the room.
  5. Get creative with a rounded corner shower to increase visual space.

To Sum Up 

Remodeling a shower can take a toll on you if you don’t plan extensively and in advance. The project can cost huge sum of money, time and frustrate you in the long run. Let professionals handle the project if you don’t know how to renovate your shower.

Experienced, licensed, and well-trained remodeling experts will do more than create a stylish and functional shower. They will come up with a unique design that stands test of time, meets your budget, and fits all your preferences. Get in touch today and get started with your renovation project.


Personal Retreat: DIY Projects for Bedroom Beautification

Welcome to Personal Retreat: DIY Projects for Bedroom Beautification! This guide is designed to help you create a beautiful and comfortable bedroom retreat that you can enjoy for years to come. We will provide you with step-by-step instructions for a variety of DIY projects that will help you transform your bedroom into a cozy and inviting space. From painting and wallpapering to furniture refinishing and upcycling, we have a project for everyone. With a little bit of creativity and some elbow grease, you can create a bedroom oasis that you will love. So let’s get started!

How to Create a Relaxing Retreat in Your Bedroom: DIY Projects for a Calming Space

Creating a relaxing retreat in your bedroom is a great way to unwind after a long day. With a few simple DIY projects, you can transform your bedroom into a calming space that will help you relax and recharge. Here are some ideas to get you started.

1. Add Soft Lighting: Soft lighting is essential for creating a relaxing atmosphere. Consider adding a dimmer switch to your existing light fixtures or installing a few wall sconces. You can also add a few lamps with low wattage bulbs to create a warm, inviting glow.

2. Create a Cozy Reading Nook: A cozy reading nook is the perfect spot to curl up with a good book. Place a comfortable armchair or chaise lounge in a corner of your bedroom and add a few pillows and a cozy throw blanket. Place a small side table next to the chair for your book and a cup of tea.

3. Hang Calming Artwork: Hang artwork that evokes a sense of calm and relaxation. Look for pieces that feature soothing colors and peaceful scenes.

4. Add a Few Plants: Plants can help purify the air and add a touch of nature to your bedroom. Choose plants that are easy to care for and require minimal maintenance.

5. Invest in Quality Bedding: Quality bedding is essential for a good night’s sleep. Look for sheets and blankets made from natural fibers like cotton or linen. Choose a mattress that is comfortable and supportive.

By following these simple steps, you can create a relaxing retreat in your bedroom. With a few DIY projects and some thoughtful touches, you can transform your bedroom into a calming space that will help you relax and recharge.

Transform Your Bedroom into a Personal Retreat: Tips for Incorporating DIY Projects for a Zen Atmosphere

Creating a personal retreat in your bedroom is a great way to relax and unwind after a long day. With a few simple DIY projects, you can transform your bedroom into a tranquil oasis. Here are some tips for incorporating DIY projects to create a zen atmosphere in your bedroom.

1. Choose calming colors. When selecting paint colors for your bedroom, opt for neutral shades like beige, light gray, or pale blue. These colors will help create a peaceful atmosphere in your bedroom.

2. Add natural elements. Incorporate natural elements into your bedroom to create a calming atmosphere. Try adding a few plants, such as succulents or air plants, to your bedroom. You can also hang a few pieces of driftwood or other natural objects on the walls.

3. Create a cozy reading nook. If you love to read, create a cozy reading nook in your bedroom. Place a comfortable chair or sofa in a corner of the room and add a few pillows and a throw blanket. Place a small side table next to the chair and add a lamp for extra light.

4. Hang a hammock. If you have enough space in your bedroom, hang a hammock for a relaxing spot to unwind. Choose a hammock made of natural materials, such as cotton or hemp, for a more zen-like atmosphere.

5. Add a meditation corner. Create a dedicated space for meditation in your bedroom. Place a comfortable cushion or mat on the floor and add a few candles or incense to create a calming atmosphere.

By incorporating these DIY projects into your bedroom, you can easily transform it into a personal retreat. With a few simple changes, you can create a tranquil oasis that will help you relax and unwind after a long day.

Conclusion

Personal Retreat: DIY Projects for Bedroom Beautification is a great resource for anyone looking to spruce up their bedroom. With easy-to-follow instructions and helpful tips, it provides a variety of creative ideas to make your bedroom a place of relaxation and comfort. Whether you’re looking to add a touch of color, create a cozy atmosphere, or just make your bedroom more inviting, this book has something for everyone. With its simple and straightforward approach, it’s a great way to make your bedroom a place you can truly call your own.

Rolling into Creativity: Crafts Using Toilet Paper Rolls That Impress

Rolling into Creativity is a book that provides a unique and creative way to use toilet paper rolls. It is filled with fun and easy crafts that will impress your friends and family. From wall art to jewelry, this book has something for everyone. Whether you are a beginner or an experienced crafter, Rolling into Creativity will provide you with the tools and inspiration to create beautiful and unique projects. With step-by-step instructions and helpful tips, you will be able to create amazing crafts that will be sure to impress. So grab your toilet paper rolls and get ready to roll into creativity!

Creative Toilet Paper Roll Crafts for Kids: How to Make Fun and Easy Projects

Toilet paper rolls are a great way to get creative with your kids. With a few simple supplies, you can make fun and easy projects that will keep your kids entertained for hours. Here are some creative toilet paper roll crafts for kids that you can make together.

First, you can make a toilet paper roll binoculars. All you need is two toilet paper rolls, some tape, and some markers or paint. Cut the rolls in half and tape them together. Then, decorate them with markers or paint. Once they are dry, your kids can use them to explore the world around them.

Next, you can make a toilet paper roll puppet. All you need is a toilet paper roll, some markers or paint, and some construction paper. Cut the construction paper into a face shape and glue it to the toilet paper roll. Then, decorate the face with markers or paint. Once it is dry, your kids can use it to put on a show.

Finally, you can make a toilet paper roll race car. All you need is a toilet paper roll, some markers or paint, and some wheels. Cut the toilet paper roll in half and decorate it with markers or paint. Then, attach the wheels to the bottom of the roll. Once it is dry, your kids can race their cars around the house.

These are just a few of the creative toilet paper roll crafts for kids that you can make together. With a few simple supplies, you can make fun and easy projects that will keep your kids entertained for hours. So, grab some toilet paper rolls and get creative!

Upcycling Toilet Paper Rolls: Creative Ideas for Crafting Home Decor and Gifts

Upcycling toilet paper rolls is a great way to create unique and creative home decor and gifts. With a few simple supplies, you can transform these everyday items into something special. Here are some ideas to get you started.

For home decor, you can use toilet paper rolls to make wall art. Cut the rolls into thin strips and paint them in a variety of colors. Then, arrange the strips in a pattern on a canvas or board and hang it up. You can also use the rolls to make a wreath. Cut the rolls into rings and glue them together in a circular shape. Then, decorate the wreath with ribbons, buttons, or other embellishments.

To make gifts, you can use toilet paper rolls to make jewelry. Cut the rolls into thin strips and paint them in a variety of colors. Then, use the strips to make earrings, necklaces, and bracelets. You can also use the rolls to make a photo frame. Cut the rolls into thin strips and paint them in a variety of colors. Then, glue the strips together in a frame shape and add a photo.

Upcycling toilet paper rolls is a great way to get creative and make something special. With a few simple supplies, you can transform these everyday items into something unique and beautiful. So, get crafting and have fun!

Conclusion

Rolling into Creativity is a great way to get creative with toilet paper rolls. From making a mini-guitar to a mini-greenhouse, the possibilities are endless. With a few simple supplies and a little bit of imagination, you can create amazing crafts that will impress your friends and family. So grab some toilet paper rolls and get rolling into creativity!

The Most Common Epoxy Flooring Problems: Epoxy Floor

Epoxy flooring is a great way to not only beautify but also protect surfaces. Sadly, many property owners lack a maintenance culture. Not treating your epoxy flooring right can impact its appearance and texture. One of the most important things when considering epoxy coating services is to hire professional installers with proven skills and experience.

Epoxy flooring products can be tricky. Improper installation can result in many problems including epoxy floor blistering. Common signs of epoxy floor blistering include cracks, pinholes, and bubbles. This can be caused by many factors including exposure to the weather. When your curing resin is exposed to too much heat or cold, it could cause blisters.

Other common causes of epoxy floor blistering include

  • Improper mix ratio: An improperly mixed epoxy can create air bubbles in the mix. Your technician should mix the resin and hardener in the right mix ratio. The mix ratio varies from one product to another. The more reason why it is recommended that you hire only a professional installer.

  • Porous Surface: Applying epoxy on a porous surface gives room for air to find its way under your curing epoxy. While the air attempts to escape, the resin above traps it, resulting in epoxy floor blistering. As the epoxy hardens, the bubbles, craters, or pinholes become more obvious.

  • Rushed applications: Epoxy coating services require a professional touch. Not an ill-qualified technician who only wants to complete the task hastily so they can move on to another job. Rushed applications might leave your floor blistered. Each resin coat should be left to dry. Hasty job applications will most likely create air bubbles.

Epoxy floor blistering gives your newly finished floor a not-so-pleasant look. Pinholes make your floor vulnerable to moisture attacks, ultimately impacting the integrity of the concrete

Solutions

You can avoid epoxy floor blistering by taking simple steps. Experts in epoxy coating services know exactly what to do with blisters or pinhole problems. One easy step is to buff the surface and prep it for a fresh new coating.

The first step is to secure the services of an expert technician. These professionals will perform the following service:

  • Make sure the concrete floors aren’t too smooth or porous

  • Use the right mix ratio

  • Take their time to complete the task

  • Work smartly on the job and quickly so the mix doesn’t cure before the application

At the end of the day, you will be glad about the result. You can easily tell the difference between professional epoxy coating services and a quack.

Keep in mind, epoxy is a tricky material. Many unqualified technicians who fell for the trick end up leaving your surface with all kinds of epoxy flooring problems including blistering. So always go with a professional technician. No matter the problem, professionals know exactly what to do.

Remember, some problems may be costlier to repair than replace. In this case, a professional may decide to remove the old epoxy and replace it with a completely new coating.

All You Need To Know About Wallpaper Removal

Wallpapers are one of the easiest and most effective ways to give your wall a makeover, with the added advantage of being economical. However, it comes with the cost of regular replacement. Regardless of how you would like to change up your wall, one inevitable step would be taking down your wallpaper, which could be particularly taxing. If you plan to remove your wallpaper, here are a few tips to help you get the job done stress-freely and obtain the perfect look.

Knowing your specifications

Instead of getting into the process in a hurry, ensure you get all the details down accurately. Firstly, the specifications regarding your wall. Starting from the basic aspect of dimensions and measurements, make an effort to gather information on the levels of moisture, texture, and the material it is made of. Based on these details, you can then decide upon the removal methods.

Choosing the best possible method

There are several ways in which you can strip off your wallpaper. This decision has to be made depending upon the information gathered previously, along with the factors of convenience and availability of services. All of these processes can be done either with the help of professionals or simply taken up as a home project.

  1. Simple peeling

In the case of wallpapers that are already coming off on the edges or so, you can simply peel it off as much as possible until you expose the layer with paper and glue. However, it might not be possible to completely get it off this way, so you might need to take up other removal methods following this. Despite this, manually scraping off as much as possible would help lessen the burden of other processes.

  1. Scoring

In general terms, scoring is just making small holes in the wallpaper to effectively allow the solvent to reach the undersurface. This process is especially useful and important in the case of vinyl wallpapers and those which are installed by professional teams. Both these cases do not allow for simple ripping and require the help of wallpaper scorer teams.

You do not necessarily need the help of professionals, especially now that several tools that can simplify the process enough to let you take this up as a DIY project. Though you might be able to achieve a certain extent of your task goal with just a fork, there are other tools to help with more complicated scenarios.

  1. Soaking

Several chemical solvents and homemade solutions can help ease the adhesion on your wallpapers, making it easier to take off the wallpaper. Depending upon your conditions and materials involved, this may differ with each situation.

The required materials could range from something as simple as hot water to some complicated chemical compound. Experimenting with different raw materials can help you come up with possible solutions that actually work.

  1. Steaming

For adhesions that would not budge even with different kinds of solvents and chemicals, an additional component of steam would mostly solve the problem. There are several easy gadgets that you can purchase at your local industrial stores for less than a hundred dollars.  What the steamer essentially does is that it does the process of soaking up, just in a more pin-pointed way, making it much more effective.

Conclusion

With these details, you can weigh these options rationally and decide upon the methods to remove the wallpapers. With knowledge about your wallpaper, you can also apply specific measures to help with easy removals, like soaking or using special solvents. Info about the type of adhesive is also crucial.


Portland Backflow Testing and Repair

<2016/04/Backflow-Testing.jpg" rel="attachment wp-att-785">Backflow Testing

There is certain condition in Oregon that each homeowner should have or install the backflow equipment. The other requirement is checking that backflow equipment in every year in order to make sure that the device works well without any issue or at least essential issues. In this case, you can rely on Portland backflow repair because they will help you to check the backflow device and if it is necessary they will also repair in case there are certain issues down there. The mostly happened issues are the dirty device. Since the device is occupied by water and the water is supposed to fill the sprinkler tank, the water supply for drink in the city could get dirty if it is contaminated by the water for sprinkler. So, this is also one of the ways in order to make sure that everything is going like what it should be. Other than that, it is preventing the accidentally contaminated drinking water supply due to the dirty water.

The accidentally contaminated water supply can occur due to several things such as some homes which are using herbicides or other chemical substances in order to manage their plants. And it turns out that the chemical substances can lead to something bad like a disaster if once it gets into the system of clean water. This is when Portland backflow repair is needed. Checking the water supply and the backflow will avoid you from this kind of disaster. It keeps you and your family protected as well as keeping the clean water supply remains clean.

If something goes wrong like the dysfunction of equipment or maybe worse, Portland backflow repair is more likely to repair and if it is necessary it will be replaced with the new and healthy one. Actually each part of backflow is pretty expensive. If you want to fully replace the equipment, it probably will take several hundred dollars from your pocket. And do not worry because the damage will not happen if you regularly control or check the backflow in your home.

Each season in the year always brings significant changes in the backflow. Winter and spring are the seasons that need extra attention and certain treatment before they are started. All you need to do is just giving the company a call. The homeowners will not be charged as long as the call is in the work hour. The team will give you such as estimated charge of repair cost and if there is a deal the team will go straight to your house. So, if you do not like the estimated budget, you can cancel the service though.

In case you need something related with testing and checking the backflow in your home, you can visit the official website of Portland backflow repair. There will be the “Contact Us” tab and you can get any contact you need on the page. It is better to prevent rather than buying a new one. Checking backflow will also bring tons of goodness to your community.

Tips On How To Accentuate Your Bathroom By Adding Mirrors The Right Way

Bathroom mirrors can give your bathroom so much vibrancy and style. Adding mirrors to your bathroom is not just to fulfill the aesthetic purpose, but it comes with a practical one too. However, there are some tips that you need to keep in mind to ensure that the mirrors are placed in the right proportion and that they go well with the bathroom interior.


White framed mirror has always been a classic choice when it comes to adding mirrors to bathrooms to accentuate the whole look. Read below to find out what to keep in mind while looking at mirror designs to add glamor to your bathroom for added space and make it feel more spa-like.

Go For The Latest On-Trend Mirror Designs

Although bathrooms remain shut, they do not have to practically look dull and clinical. Rather than going for the old square and circular mirrors, you could always go for curved interpretations, which would completely change the aesthetic of your washroom. According to experts, curves and colors are making their way back into home interiors, and it is time to truly indulge in them and go for delightful pieces that would make your home and your bathroom stand out.


If you love minimalism, then go for modern perfect circles. Perfect circular mirrors look brilliant with both traditional and contemporary bathrooms, and also specific color schemed ones. Go for colored frames and give your bathroom an adventurous look. A bold scheme should be accompanied by great lighting to turn it into a conversational topic among friends.

Make Sure There Is A Mirror Above The Vanity

Depending on the layout of your bathroom, choose where the vanity can be placed uniquely, and accordingly, go for the right mirror design. Mirror vanities are considered to be the focal point of any bathroom. Experts recommend going for the largest mirror length possible so as to reflect as much light as possible. Remember, the airier and brighter the bathroom, the better.


Another idea would be to place your vanity just opposite the bathroom door or against a full-height wall where it would stand as a statement.

Is Your Bathroom Mirror Well-Lit?

Bathrooms should always be well-lit, especially your bathroom mirror. When you start with your bathroom remodel, talk to your interior expert about the kind of lighting that should be placed above the bathroom mirror. Never neglect the importance of having good lighting in your bathroom. You could also add small lights surrounding the mirror, which will be flattering for the face and will also look brilliant as a decorative element.

Try Hanging Your Bathroom Mirror Opposite The Window

When you add mirrors to any room, the space will look bigger naturally. Mirrors allow natural light to bounce inside and around the shower room; hence, you can always attach your mirror near the window, which would reflect the outside light and view, making your bathroom look bigger and even more spacious.

Make Sure The Mirror Proportions Are Accurate

Always seek expert help when trying to fit your mirror because accurate proportions are essential in making your bathroom stand out. If the proportions are not right, you might end up with a way too small mirror, which will not accentuate the space. Therefore, when shopping for bathroom mirrors, ensure it matches the width of the vanity, or it can be a few inches small on both sides maximum. Be careful of the height of your mirror if you wish to make your ceiling look higher.


Wrapping up, choosing the right shape and style of mirror is essential to ensure that it fits the color scheme and the whole look of your bathroom. Use bathroom mirrors to your advantage and see what wonders they can do.