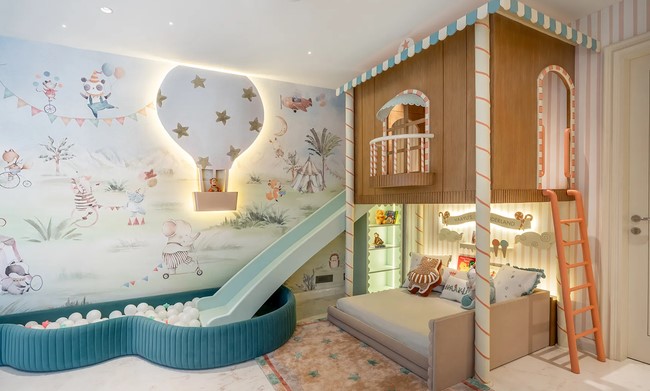
A couple of years ago, I stepped into a newly renovated nursery in suburban Chicago that felt more like a sterile clinical waiting room than an inspiring space for early learning. The parents had invested heavily in sustainable hardwood floors and zero-VOC paint, but left the perimeter walls blank out of fear of damaging the finish or causing visual clutter. Within three hours, using high-grade nursery wall decals, we transformed those cold walls into an interactive safari biome featuring height-chart giraffes and tactile alphabet accents. The immediate shift in how warm, engaging, and alive the room felt was remarkable.
Over my decade working in structural restoration and interior styling, I have learned that wall graphics are far more than simple stickers—they are versatile, cost-effective tools for environmental psychology and early childhood development. When applied correctly, they turn static drywall into a dynamic learning canvas without the permanence or expense of hand-painted murals.
The Science of Visual Ergonomics: Why Nursery Wall Decals Matter
Early childhood spaces require a delicate balance between sensory stimulation and restful calm. Overstimulating a room with aggressive paint colors can overload a toddler’s nervous system, while overly plain rooms lack the visual cues necessary to spark curiosity and cognitive growth.
Think of high-quality nursery wall decals like modular visual anchors in an interactive storybook. Instead of committing to an expensive, permanent painted mural that your child will outgrow in two years, decals allow you to layer thematic, educational elements that evolve alongside their cognitive milestones.
When strategically placed, these graphics support several early developmental areas:
-
Depth Perception & Visual Tracking: High-contrast geometric or animal decals give infants clear focal targets to track while lying in a crib or during tummy time.
-
Spatial Literacy: World map decals, solar system layouts, and grid-based alphabet graphics introduce early concepts of scale, geography, and categorization.
-
Interactive Engagement: Wall-mounted growth charts and interactive height trackers turn physical development into a fun, hands-on daily routine.
Material Science 101: Vinyl vs. Fabric Nursery Wall Decals
Not all wall graphics are engineered equally. In my early days on job sites, I made the mistake of specifying cheap promotional vinyl for a client’s nursery, only to watch it curl away after three weeks due to seasonal humidity shifts. Understanding substrate materials ensures your investment stays firmly on the wall without releasing harsh chemicals.
Poly-Woven Fabric Decals (The Gold Standard)
Made from finely woven polyester threads, fabric decals offer a premium matte texture that eliminates reflection from room lighting. They are naturally tear-resistant, repositionable dozens of times, and do not stretch or warp during application. Most importantly, high-end fabric graphics utilize water-based inks and solvent-free acrylic adhesives that are completely odorless.
Calendered Polyvinyl Chloride (PVC) Decals
Standard vinyl decals are budget-friendly and widely available. However, lower-grade PVC formulas rely on plasticizers to maintain flexibility, which can lead to shrinkage over time. If you opt for vinyl nursery wall decals, verify that they are labeled as monomeric-free, low-VOC, and backed with removable acrylic adhesive rather than permanent solvent adhesives.
-
Fabric Decals: Ultra-durable, zero glare, 100% repositionable, wrinkle-resistant, eco-friendly.
-
Vinyl Decals: Crisp color reproduction, moisture-resistant, budget-conscious, best suited for smooth, non-textured surfaces.
Strategic Design: Curating Educational Zones
To maximize both aesthetic harmony and educational value, divide the room into functional activity zones. Avoid clustering all graphics onto a single wall; instead, distribute them according to how your child interacts with the space.
The Eye-Level Rule for Early Learners
A common mistake homeowners make is hanging wall graphics at adult eye level (around 55 to 60 inches from the floor). For a toddler, this means constantly straining their neck upward.
-
Infant Zone (0–12 Months): Position high-contrast shapes 18 to 24 inches above floor level or beside the changing area where infants spend awake time.
-
Toddler Zone (1–3 Years): Anchor educational graphics—such as alphabet lines or animal biomes—between 24 and 36 inches from the floor.
-
Preschooler Zone (3–5 Years): Place complex maps, solar systems, and interactive growth charts from 36 to 48 inches high to match their expanding line of sight.
Professional Installation Protocol: How to Apply Decals Flawlessly
Installing nursery wall decals appears simple, but achieving a smooth, bubble-free application that lasts for years requires careful surface preparation.
Step 1: Deep Clean the Substrate
Wipe down the target wall using a solution of 70% isopropyl alcohol and 30% water. Avoid standard household sprays, as they leave behind slick silicone residues that destroy adhesive bonds. Allow the wall to dry completely for two hours.
Step 2: Establish Your Baseline
Use a laser level or spirit level paired with painter’s tape to mark a straight horizontal reference line. Avoid aligning decals with door frames or baseboards, as architectural trims in homes are rarely perfectly level.
Step 3: Hinge Technique Application
Position the decal with painter’s tape along its top edge to create a temporary “hinge.” Peel the backing paper downward in small increments while smoothing the decal onto the wall from the center outward using a felt-edge squeegee.
Step 4: Edge Burnishing
Once applied, run your thumb or a soft micro-fiber cloth firmly along all die-cut edges. Applying firm pressure activates the pressure-sensitive acrylic adhesive, ensuring a tight seal against ambient humidity.
Expert Advice: Pro Tips and Hidden Pitfalls
Pro Tip: Respect the 21-Day Paint Curing WindowIf you have recently repainted the nursery, wait at least 21 to 30 days before applying any nursery wall decals. Even if paint feels dry to the touch within hours, it undergoes a chemical process called off-gassing. Trapped moisture and outgassing solvents will break down decal adhesives, causing graphics to bubble, peel, or pull off paint upon removal.
Hidden Warning: Beware of Modern “Scuff-Resistant” PaintsMany modern interior paints feature stain-repellent or fluoropolymer-based technologies (often marketed as “washable matte” or “scuff-defense”). These paints are designed to repel dirt, but they also repel wall adhesives. If your walls have stain-resistant coatings, choose poly-woven fabric decals with high-tack removable adhesives or perform a small tape test in an inconspicuous corner first.
Transforming a nursery into an enriching educational haven does not require expensive structural renovations or messy paint jobs. By selecting high-quality, low-VOC nursery wall decals, respecting visual ergonomics, and following proper surface preparation, you create an adaptable space that inspires curiosity every single day.
What design themes or educational concepts are you planning for your nursery project? Have you run into challenges with tricky wall textures or paint finishes? Share your experiences and questions in the comments below!
