I’ve spent a decade climbing ladders and digging out water-logged foundations, and if there is one thing I’ve learned, it’s this: Water is a patient thief. It doesn’t destroy your home all at once. It waits for a single clog, a heavy storm, and a neglected gutter system to start rotting your fascia boards or cracking your expensive foundation.
Last autumn, I visited a client who had spent $15,000 on basement waterproofing, only to find a puddle in the corner of their gym a month later. The culprit? Not a failed sump pump, but a handful of maple seeds and a stray tennis ball jammed perfectly into the underground drainage entrance. All that damage could have been prevented by a component that costs less than a fancy steak dinner: a high-quality Downspout Filter Cap.
Why Your Gutters are Only Half the Battle
Most homeowners think that cleaning their gutters twice a year is enough to keep their home safe. While that’s a great start, it’s actually the vertical journey of the water that causes the most “invisible” damage.
Think of your gutter system like the plumbing in your house. Your gutters are the sink, but your downspouts are the drainpipes. If you don’t have a strainer in your sink, the pipes deep inside the walls eventually get choked with grease and hair. In the world of home exterior maintenance, the Downspout Filter Cap is that essential strainer.
The Anatomy of a Drainage Failure
When debris—leaves, twigs, asphalt shingle granules, and even bird nests—travels down the spout, it usually gets stuck at the “elbow” or the point where the downspout connects to the underground tile. Once a clog forms here, water backs up.
This leads to:
-
Foundation Hydrostatic Pressure: Water pooling at the base of your home creates immense pressure against your basement walls.
-
Siding Discoloration: Overflowing water splashes back onto your siding, causing algae growth and rot.
-
Landscape Erosion: A “waterfall” effect from clogged gutters destroys your expensive mulching and flower beds.
The Strategic Role of the Downspout Filter Cap
A Downspout Filter Cap (often referred to in the trade as a “strainer” or “drainage cage”) is a device installed at the top or the exit point of the downspout to intercept debris while allowing water to flow freely.
Different Types for Different Needs
In my 10+ years of experience, I’ve seen three main variations that actually work:
-
Top-Inlet Wire Cages: These look like lightbulb guards and sit right at the top hole of the downspout. They are great for keeping out large items like tennis balls or big maple leaves.
-
Wedge-Style Filters: These have a sloped design. As water flows over them, the debris is pushed to the side, preventing the “matting” effect that happens with flat filters.
-
Low-Level Debris Traps: These are installed at eye level on the downspout. They have a clean-out door, making it incredibly easy for you to remove gunk without ever touching a ladder.
Technical Specifications: What to Look For
When you’re browsing the aisles of a hardware store or searching online, don’t just grab the cheapest plastic mesh. If you want to protect your assets, you need to look at the technical specs.
Material Durability
-
UV-Stabilized Polypropylene: If you go with plastic, it must be UV-rated. Otherwise, the sun will turn it brittle within two seasons, and it will shatter during the first hail storm.
-
Stainless Steel or Aluminum Mesh: These are the gold standard. They resist rust and can withstand the weight of heavy, wet debris without collapsing into the downspout.
Flow Rate Capacity
A common mistake beginners make is choosing a Downspout Filter Cap with holes that are too small. If the mesh is as fine as a window screen, surface tension and small particles will create a “skin” over the filter, causing water to overshoot the gutter entirely. Look for a balance—holes large enough to let shingle granules pass (which are harmless in small amounts) but small enough to catch twigs and leaf stems.
Step-by-Step: Installing Your Downspout Filter Cap Like a Pro
You don’t need a contractor to do this. If you’re comfortable on a ladder, this is a 20-minute DIY project that saves thousands in the long run.
Tools You’ll Need:
-
Sturdy extension ladder
-
Work gloves (gutter muck is surprisingly sharp)
-
Small garden trowel
-
The Downspout Filter Caps
The Process:
-
Clear the Runway: Before installing the cap, you must ensure the downspout is already clear. Run a garden hose down the spout. If water doesn’t come out the bottom at full speed, you have a pre-existing clog.
-
The “Snug Fit” Test: Insert the filter into the downspout opening. It should be tight enough that a heavy wind or a curious squirrel won’t knock it loose.
-
Check the Seal: Ensure there are no gaps around the edges. Debris is like water—it will find the path of least resistance.
Pro Tip: The “Hidden” Maintenance Schedule
Most people install these and forget them. Don’t do that. A filter that is doing its job will get dirty. That’s the point!
Pro Advice: Check your filters after the first “Big Blow” of autumn. In my experience, 80% of the season’s debris falls during the first two major windstorms. If you clear the caps then, you’re usually set for the rest of the winter.
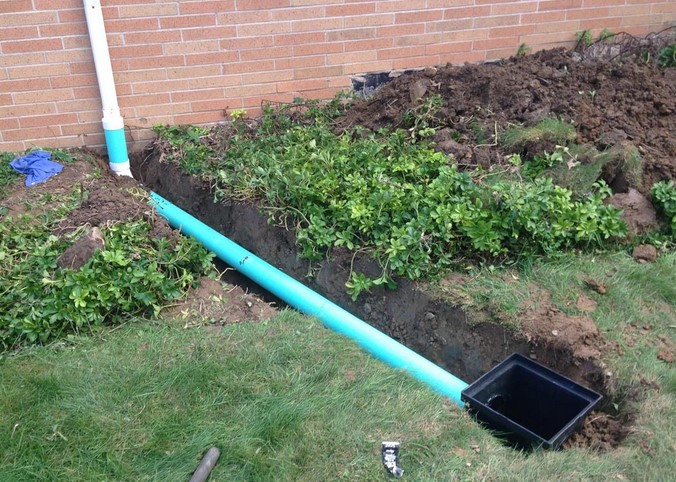
Protecting Your Underground Assets
This is where the Downspout Filter Cap becomes a financial lifesaver. Many modern homes use “underground bubblers” or PVC pipes to carry water away from the house to the street.
Repairing a collapsed or clogged underground pipe can cost between $2,000 and $5,000 because it involves excavation and landscaping repair. By stopping the debris at the gutter level, you are effectively “insurance-proofing” your underground infrastructure.
Common Myths About Downspout Filters
Myth 1: “I have gutter guards, so I don’t need filter caps.”
Reality: Even the best gutter guards allow small debris and shingle grit through. Over time, this silt can settle in the elbows of your downspouts and harden like concrete. A secondary filter cap at the bottom or top is a “fail-safe” for your system.
Myth 2: “They cause more clogs than they prevent.”
Reality: A filter cap concentrates the clog in an accessible location. Would you rather have a clog on top of your gutter where you can see it, or 10 feet underground inside a pipe?
Summary Checklist for Homeowners
To ensure your home remains a dry sanctuary, follow this quick guide:
-
Identify your downspout size (standard is 2×3 or 3×4 inches).
-
Select a stainless steel or UV-rated Downspout Filter Cap.
-
Install during a dry day to ensure a proper fit.
-
Monitor during heavy rainfall to ensure no “overshooting” is occurring.
Conclusion: Small Investment, Massive Return
In the world of home improvement, we often get distracted by the “sexy” projects like kitchen remodels or new decks. But as an expert who has seen the devastating effects of water damage, I can tell you that the most important parts of your home are the ones that keep it dry.
Installing a Downspout Filter Cap is a fundamental move for any proactive homeowner. It’s simple, technical, and incredibly effective at mitigating drainage obstructions before they become a nightmare.
What’s the current state of your drainage system? Have you checked your downspouts since the last storm? Head outside and take a look—your foundation will thank you. If you found this guide helpful, share it with a neighbor who might be neglecting their gutters!
