 Aged to Perfection: Techniques for Aging Paper with Vintage Charm is a comprehensive guide to creating beautiful, aged paper with a vintage charm. This book provides step-by-step instructions for a variety of techniques, from simple aging methods to more complex techniques such as distressing, staining, and embossing. With detailed illustrations and helpful tips, this book is perfect for anyone looking to add a unique, vintage touch to their paper projects. Whether you’re a beginner or an experienced paper crafter, Aged to Perfection will help you create stunning, aged paper with a timeless look.
How to Create a Timeless Aged Look with Distressing Techniques
Distressing techniques are a great way to create a timeless aged look for furniture and other home décor items. With a few simple steps, you can transform a piece of furniture into a unique and stylish piece that will last for years to come.
The first step in creating a timeless aged look is to choose the right piece of furniture. Look for pieces that are made of solid wood, as these will be the easiest to distress. Avoid pieces that are made of particle board or other composite materials, as these will not take to distressing as well.
Once you have chosen the right piece of furniture, you will need to prepare it for distressing. Start by sanding the piece with a medium-grit sandpaper. This will help to remove any existing finish and create a smooth surface for distressing.
Next, you will need to apply a base coat of paint. Choose a color that is slightly darker than the color you want the finished piece to be. This will help to create a more aged look. Once the base coat is dry, you can begin to distress the piece.
To distress the piece, use a variety of tools such as a wire brush, sandpaper, and a hammer. Start by lightly sanding the edges and corners of the piece. This will help to create a worn and weathered look. You can also use a wire brush to create a distressed texture.
Finally, you can use a hammer to create dents and dings in the piece. This will help to create a more aged look. Once you have finished distressing the piece, you can apply a top coat of paint. This will help to seal in the distressed look and protect the piece from further wear and tear.
By following these steps, you can easily create a timeless aged look with distressing techniques. With a little bit of patience and creativity, you can transform any piece of furniture into a unique and stylish piece that will last for years to come.
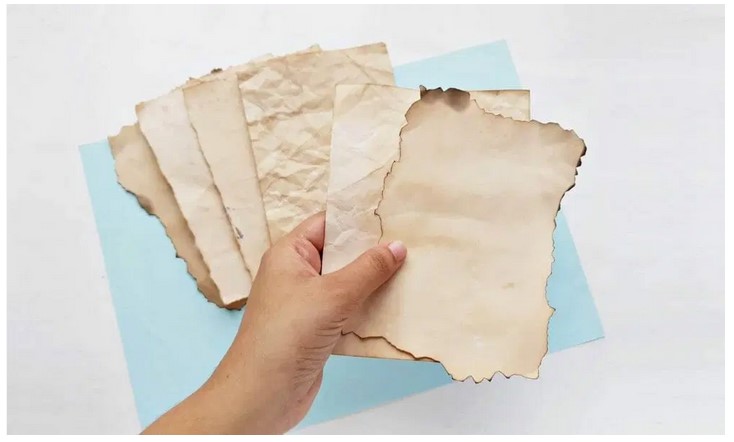
Tips for Adding Vintage Charm to Your Paper Projects with Aging Techniques
1. Use Tea or Coffee: Tea and coffee are great for adding an aged look to your paper projects. Simply brew a cup of tea or coffee and use a paintbrush to lightly brush the liquid onto the paper. Allow the paper to dry before continuing with your project.
2. Use Distress Inks: Distress inks are a great way to add a vintage look to your paper projects. Simply apply the ink to the paper with a sponge or brush and allow it to dry. You can also use a heat gun to speed up the drying process.
3. Use a Sanding Block: A sanding block is a great way to add texture and an aged look to your paper projects. Simply sand the paper with the block in a circular motion. You can also use a sandpaper to achieve a similar effect.
4. Use a Crackle Medium: Crackle medium is a great way to add an aged look to your paper projects. Simply apply the medium to the paper and allow it to dry. Once dry, you can then paint over the medium to create a cracked effect.
5. Use a Vintage Stencil: Vintage stencils are a great way to add a unique look to your paper projects. Simply apply the stencil to the paper and use a sponge or brush to apply ink or paint. Allow the ink or paint to dry before continuing with your project.
6. Use a Vintage Stamp: Vintage stamps are a great way to add a unique look to your paper projects. Simply apply the stamp to the paper and use a sponge or brush to apply ink or paint. Allow the ink or paint to dry before continuing with your project.
7. Use a Vintage Embossing Folder: Vintage embossing folders are a great way to add texture and an aged look to your paper projects. Simply place the paper in the folder and run it through an embossing machine. You can also use a heat gun to speed up the drying process.
8. Use a Vintage Die Cut: Vintage die cuts are a great way to add a unique look to your paper projects. Simply place the die cut on the paper and use a sponge or brush to apply ink or paint. Allow the ink or paint to dry before continuing with your project.
Conclusion
Aged to Perfection: Techniques for Aging Paper with Vintage Charm is an invaluable resource for anyone looking to add a unique, vintage charm to their paper projects. With easy-to-follow instructions and helpful tips, this book provides a comprehensive guide to creating beautiful, aged paper that will add a unique touch to any project. Whether you’re a beginner or an experienced crafter, this book is sure to provide you with the tools and techniques you need to create stunning, vintage-inspired paper.
