Running a commercial bar storage is exciting, but managing space can be a real challenge. Many bars struggle with limited storage, especially when they need to stock bottles, glassware, tools, and supplies all in one place. A cluttered bar not only looks messy but also slows down service. The good news is that with a few smart fixes, even a small bar can be organized and efficient.
Understand Your Space First
Before making any changes, take a good look at your bar area. Notice where space is being wasted or where things pile up. Sometimes, items are not placed in the right spot, which creates unnecessary clutter.
Divide your storage into zones like liquor bottles, mixers, glassware, and tools. This makes it easier to see what you have and where improvements are needed.
Use Vertical Space
One of the smartest ways to save space is by using vertical storage. Instead of spreading items across counters, go upwards.
Install wall-mounted shelves or racks to store bottles and glasses. Hanging racks for wine glasses are also very helpful. This not only saves space but also keeps items within easy reach.
Invest in Multi-Functional Furniture
In a tight bar, every piece of furniture should serve more than one purpose. For example, use storage cabinets that can also work as prep stations.
You can also choose bar counters with built-in shelves or drawers. This reduces the need for extra storage units and keeps everything organized in one place.
Organize Bottles Smartly
Liquor bottles can take up a lot of space if not arranged properly. Instead of keeping them randomly, organize them based on use.
Place frequently used bottles at the front and less-used ones at the back. You can also use tiered shelves so that all bottles are visible without taking too much space.
This setup helps bartenders work faster and reduces the time spent searching for items.
Use Clear Containers and Labels
Small items like garnishes, straws, napkins, and bar tools can easily create clutter. Using clear containers helps you see what’s inside without opening each one.
Label everything properly so staff can quickly find what they need. This simple step improves efficiency and keeps the bar looking neat.
Keep Only What You Need
It’s easy to collect extra items over time, but not everything is necessary. Regularly check your inventory and remove items that are rarely used.
Keeping only essential items frees up space and makes storage more manageable. It also reduces confusion during busy hours.
Add Mobile Storage Units
If your bar space is very limited, consider using mobile storage like rolling carts. These can be moved around easily and used when needed.
For example, a cart can hold extra bottles or tools during peak hours and be stored away when not in use. This flexibility is very useful in tight spaces.
Maintain a Clean and Clutter-Free Setup
No matter how good your storage system is, it won’t work if it’s not maintained. Make it a habit to clean and organize the bar daily.
Put items back in their place after use and avoid letting things pile up. A clean bar not only looks professional but also improves workflow.
Train Your Staff
Even the best storage system needs proper use. Train your staff to follow the organization setup.
Teach them where each item belongs and why it’s important to keep things in order. When everyone follows the same system, the bar runs more smoothly.
Conclusion
Limited space doesn’t have to limit your bar’s performance. With smart planning and simple changes, you can make the most of your storage area. Using vertical space, organizing items properly, and keeping things minimal can transform even the smallest bar into an efficient workspace.
A well-organized bar not only looks better but also helps your team work faster and serve customers more effectively. Small improvements can lead to big results when it comes to managing tight commercial bar storage.
In the world of architecture and interior design, the growing trend of using sustainable and eco-friendly materials is transforming the way homes and commercial spaces are constructed and decorated. One such innovative approach is the use of architectural salvage materials. These reclaimed pieces from old buildings, bridges, and historical structures offer a wealth of character, charm, and history, while also providing a unique opportunity for environmentally-conscious design. In this article, we will explore the advantages of incorporating architectural salvage materials into your projects, how to select the right materials, and creative ways to use them in your home or business.
1. The Benefits of Using Architectural Salvage Materials
Architectural salvage materials provide several benefits that can enhance the appeal and sustainability of your design. From environmental advantages to aesthetic value, reclaimed materials are becoming an increasingly popular choice for both designers and homeowners.
Sustainability and Environmental Impact
One of the most compelling reasons to use architectural salvage materials is their positive environmental impact. By repurposing old materials, you’re contributing to the reduction of waste that would otherwise end up in landfills. The extraction and production of new building materials often involve significant energy consumption and resource depletion, whereas salvaged materials have already been processed and used, giving them a second life.
Using reclaimed wood, metal, stone, and other materials helps preserve natural resources, reduces energy use, and cuts down on the carbon footprint of a project. Many people who prioritize sustainability in their designs find that architectural salvage materials align perfectly with their values.
Unique Aesthetic Appeal
One of the primary reasons to choose architectural salvage materials is their unique aesthetic value. These materials often possess distinct patinas, textures, and colors that can’t be replicated with new, mass-produced materials. Whether it’s weathered wood, aged brick, or vintage wrought iron, reclaimed materials bring a sense of character and history that can add depth and interest to any design.
Each piece tells a story, whether it’s an old door that once graced a grand mansion or antique windows salvaged from a historical building. These materials allow you to add a layer of individuality and authenticity to your designs that new, commercially available materials simply can’t match.
Cost-Effectiveness
While some architectural salvage materials can be pricey due to their historical significance or rarity, many reclaimed materials can be far more affordable than new equivalents, especially when purchased from salvage yards, auctions, or direct-from-source vendors. Many older buildings or factories deconstruct their structures to make room for new developments, and the materials they discard can often be purchased for a fraction of the cost of new building products.
With some creative thinking, homeowners and designers can often source high-quality materials at a lower cost, making architectural salvage materials an excellent way to stay within budget without compromising on style.
2. How to Choose the Right Architectural Salvage Materials
Choosing the right architectural salvage materials is essential to ensuring that your project not only looks stunning but also functions properly and lasts for years to come. Here are some key considerations to keep in mind when sourcing and selecting reclaimed materials.
Condition and Quality
When selecting architectural salvage materials, it’s crucial to assess their condition carefully. While many materials will have signs of age and wear, they should still be structurally sound and usable. For example, salvaged wood may have knots, cracks, or nail holes, but it should still be sturdy enough to be reused in furniture, flooring, or accent walls. Similarly, metal fixtures or architectural elements should be checked for rust or structural weaknesses before being repurposed.
If you’re unsure about the quality of a material, seek expert advice from a contractor or a supplier specializing in architectural salvage. Many salvage yards can also provide guidance on how to restore materials to their former glory.
Compatibility with Existing Design Elements
When integrating architectural salvage materials into a design, it’s important to ensure they complement the existing style of the space. Reclaimed materials can be used to enhance various design themes, from rustic farmhouse aesthetics to industrial chic or even contemporary minimalist designs. The key is to balance the old with the new in a way that feels cohesive and thoughtfully curated.
For example, if you’re designing a modern kitchen, consider using salvaged wood as an accent material in cabinetry or countertops to create warmth and contrast against sleek, polished finishes. In an industrial-style loft, reclaimed metal beams and vintage light fixtures can help enhance the raw, unfinished feel of the space.
Sourcing and Budgeting
Architectural salvage materials can often be found in a variety of places, from dedicated salvage yards to online marketplaces and estate sales. Many cities also have architectural salvage stores that specialize in sourcing and selling reclaimed materials from demolished buildings or deconstructed homes.
While purchasing reclaimed materials can be cost-effective, keep in mind that sourcing the right pieces can take time and effort. It’s worth doing some research and visiting multiple sources to find the exact materials that suit your design and budget. If you’re working with a tight budget, consider starting with smaller elements, such as reclaimed doors, light fixtures, or hardware, and then gradually incorporate larger items like flooring or structural materials as you find them.
3. Creative Ways to Use Architectural Salvage Materials
Once you’ve selected the architectural salvage materials for your project, the next step is to creatively incorporate them into your design. Here are a few ideas to help spark your imagination and get you thinking about how to use reclaimed materials in unexpected and innovative ways.
Salvaged Wood for Flooring and Wall Treatments
Reclaimed wood is one of the most popular architectural salvage materials due to its versatility, durability, and aesthetic appeal. It can be used in a variety of ways, from flooring to accent walls, ceilings, and even furniture. The rich textures and character marks found in salvaged wood make it an excellent choice for creating statement pieces in any room.
For example, old barn wood can be repurposed to create a rustic floor in a country-style home, while reclaimed oak or walnut might be used for sleek, modern paneling in a living room or hallway. If you’re interested in creating a dramatic effect, consider using salvaged wood to design a feature wall with varying shades and patterns.
Vintage Windows and Doors as Design Features
Salvaged windows and doors can be used as striking design features in various ways. For example, vintage windows with original glass can be repurposed into partitions, letting light filter through while maintaining privacy. Old wooden doors can be transformed into functional items like barn doors or room dividers, or even used as decorative elements in a home office or hallway.
If you’re looking for a way to add a rustic touch to a modern bathroom, consider using a salvaged door as a vanity, or cut it down to create a unique mirror frame. The possibilities are limited only by your imagination and the materials you have on hand.
Incorporating Reclaimed Metals and Stone
Salvaged metals, such as wrought iron, steel, and copper, can add industrial or vintage flair to your design. These materials can be used for custom railings, light fixtures, or furniture legs. Reclaimed brick or stone, on the other hand, can be used to create a feature wall, fireplace surround, or outdoor patio, adding texture and historical character to the space.
For example, reclaimed bricks from a 19th-century building could be used to create a rustic fireplace in a modern living room, or old metal grates could be turned into custom light fixtures that bring a touch of history and artistry to a dining room or entryway.
Architectural salvage materials are a fantastic way to bring a sense of history, character, and sustainability into your designs. From wood to metal, stone to glass, these reclaimed materials offer unique textures and narratives that can elevate any space, whether residential or commercial. By carefully selecting and incorporating architectural salvage materials, you not only create a distinctive design but also contribute to reducing waste and promoting eco-friendly building practices. So, if you’re looking for a way to make your next project stand out, consider using architectural salvage materials to create a truly one-of-a-kind space that is as stylish as it is sustainable.
Renovating a room can breathe new life into a home, turning a dull, outdated space into a contemporary haven. Modern room renovations not only enhance the functionality and aesthetics of your living space but also reflect your personal style and the latest design trends. With the right ideas and strategies, you can transform any room into a vibrant, inviting area that caters to both your needs and preferences. In this article, we’ll explore a range of innovative ideas for modern room renovations, covering everything from layout changes to the incorporation of smart technology.
Reimagining Layouts for Open and Functional Spaces
Embracing Open Concept Living
One of the most significant trends in modern room renovations is the shift toward open concept layouts. This design approach removes walls and barriers between rooms to create a more fluid, interconnected space. By knocking down or relocating partition walls, you can open up the flow between the kitchen, living room, and dining areas. This layout not only makes a room feel larger and more spacious but also enhances interaction among family members and guests. Open concept designs are particularly popular in living areas and kitchens, where fluid communication and a sense of togetherness are often desired.
Open floor plans allow for the integration of multifunctional furniture, such as modular sofas or extendable dining tables, which can be rearranged based on the occasion. Additionally, removing walls makes it easier to bring natural light into the space, creating a bright, airy atmosphere. This layout can be particularly beneficial in smaller homes, as it eliminates the cramped feeling that comes with too many enclosed spaces.
Creating Zones Within a Room
Although open concept living emphasizes spaciousness, it’s essential to create functional zones within the room. A modern renovation can incorporate distinct areas dedicated to specific activities without using physical barriers. For example, a living room can feature a reading nook, entertainment zone, and workspace within the same space, each marked by different furniture arrangements or rug placements. The key is to create separation through design elements rather than walls, preserving the open feel while still providing clearly defined spaces.
For instance, you might use a large, comfortable sectional sofa to divide a living room from a dining area, or place a statement bookshelf to create a visual barrier without enclosing the space. These subtle divisions allow for greater flexibility in the use of the space, enabling each area to serve a unique function while maintaining a cohesive and modern aesthetic.
Incorporating Smart Technology
Smart Home Integration
In today’s world, technology plays a crucial role in modernizing any home. Modern room renovations provide the perfect opportunity to incorporate smart home features that improve convenience, energy efficiency, and security. For example, automated lighting systems can adjust the intensity and color of lights based on time of day or personal preferences, helping to create the perfect ambiance for any occasion. Voice-controlled assistants like Amazon Alexa or Google Assistant can be integrated to control lights, temperature, and entertainment systems from the comfort of your couch.
Smart thermostats, such as Nest or Ecobee, allow you to adjust room temperatures remotely, saving energy while ensuring comfort. Furthermore, installing smart locks or security cameras adds an extra layer of safety to your home. These technologies not only make life easier but also contribute to the overall modern appeal of a room, making it more functional and tech-savvy.
Audio and Visual Enhancements
A modern room renovation can also incorporate cutting-edge audio and visual technology. For living rooms or entertainment areas, built-in speakers or sound systems can be integrated into walls or ceilings to create a sleek, clutter-free look. Instead of bulky speakers or entertainment units, choose wireless or hidden options that maintain the clean aesthetic of the room while providing exceptional sound quality.
For a truly immersive experience, consider installing a projector and screen system for a home theater experience. Advances in projectors have made them more compact, allowing them to fit seamlessly into the room. Additionally, smart TVs with integrated streaming capabilities are a must-have in any modern living room. These devices combine functionality and sleek design, elevating the room’s visual appeal without compromising on performance.
Sustainable and Eco-Friendly Materials
Incorporating Natural Elements
Sustainability is becoming increasingly important in modern design, and modern room renovations offer the perfect opportunity to integrate eco-friendly materials. One trend that has gained momentum is the use of natural materials such as wood, stone, and bamboo. These materials add warmth and texture to a space, creating a welcoming atmosphere. Whether it’s reclaimed wood flooring, stone countertops, or bamboo cabinetry, these materials not only enhance the aesthetic of the room but also reduce the environmental impact of the renovation.
Another sustainable choice is the use of energy-efficient materials such as low-VOC paints, which help improve air quality, or double-glazed windows that reduce heat loss and save energy. Even small touches like adding plants to a room can help create a healthier indoor environment while contributing to the overall eco-friendly design.
Green Furniture and Décor
In addition to using sustainable building materials, consider incorporating eco-conscious furniture and décor into your renovation plans. Opt for furniture made from responsibly sourced or upcycled materials, such as recycled metal or fabric, or pieces crafted by local artisans using sustainable practices. Not only does this help reduce your carbon footprint, but it also supports ethical manufacturing processes.
For a modern look, minimalist furniture designs are ideal for creating a sleek, streamlined room. Simple yet functional furniture pieces that don’t overwhelm the space are central to modern design. Furthermore, choosing décor items like natural fiber rugs, recycled glass light fixtures, and biodegradable wall coverings can further enhance the sustainable aspects of your renovation.
In conclusion, modern room renovations offer an exciting opportunity to enhance both the function and aesthetics of your living spaces. From embracing open concept layouts to incorporating smart technology and sustainable materials, there are countless ways to update your home with modern features that improve both comfort and style. By carefully selecting design elements that suit your needs and lifestyle, you can create a space that not only looks great but also serves your day-to-day requirements efficiently. Whether you’re renovating a single room or undertaking a more extensive home makeover, the ideas discussed here will help guide your efforts and ensure that your modern renovation project is a success.
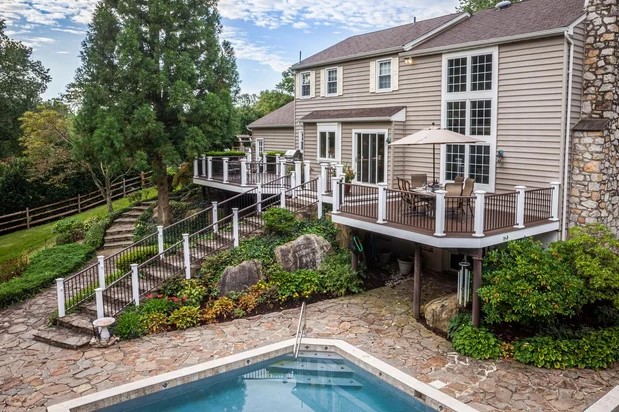
A backyard pool is often the centerpiece of summer fun, relaxation, and family gatherings. However, owning a pool also comes with its fair share of maintenance challenges. One of the most frustrating and potentially costly issues you may encounter is discovering a leak. A leaking pool can lead to increased water bills, damage to your property, and even structural issues if left unaddressed. In this article, we’ll explore how to identify a pool leak, the steps you can take to confirm it, and the importance of hiring a professional pool leak detection company to resolve the issue.
How to Tell If Your Pool Has a Leak
The first step in addressing a pool leak is recognizing the signs. While some leaks are obvious, others can be subtle and easily overlooked. Here are some common indicators that your pool may be losing water:
Unexplained Water Loss
It’s normal for pools to lose a small amount of water due to evaporation, especially during hot weather. However, if you notice that your pool’s water level is dropping more than 1/4 to 1/2 inches per day, it could be a sign of a leak.
Increased Water Bills
A sudden spike in your water bill without a corresponding increase in usage is a red flag. If you’re frequently topping off your pool, the extra water consumption will show up on your bill.
Wet Spots Around the Pool
Puddles or soggy areas in your yard, particularly near the pool equipment or along the pool’s perimeter, may indicate a leak. These wet spots can be caused by water escaping from the pool’s plumbing or structure.
Cracks or Shifts in the Pool Deck
A leak can undermine the ground beneath your pool deck, causing it to crack or shift. If you notice any changes in the deck’s stability, it’s worth investigating further.
Air Bubbles in the Pool Pump
If you see air bubbles coming out of the return jets or notice that your pump is struggling to maintain pressure, it could be a sign of a suction-side leak in the plumbing system.
Chemical Imbalances
A leak can dilute your pool’s chemicals, making it harder to maintain proper water balance. If you’re constantly adding chemicals but still struggling to keep the water balanced, a leak could be the culprit.
Confirming the Leak
Once you suspect a leak, the next step is to confirm it. While some leaks are easy to spot, others require a bit more detective work. Here are a few DIY methods to help you determine if your pool is leaking:
The Bucket Test This simple test can help you differentiate between evaporation and a leak. Fill a bucket with pool water and place it on the pool steps or ledge, ensuring the water level inside the bucket matches the pool’s water level. Mark the water levels on both the bucket and the pool. After 24 hours, compare the two. If the pool’s water level has dropped significantly more than the bucket’s, you likely have a leak.
Inspect the Pool Structure
Carefully examine the pool’s interior for cracks, gaps, or damage to the liner, tiles, or plaster. Pay special attention to areas around skimmers, lights, and return jets, as these are common leak locations.
Check the Equipment Pad
Look for signs of water around the pump, filter, and heater. Leaks in the plumbing or equipment can often be identified by puddles or dampness in this area.
Turn Off the Pump
If you suspect a plumbing leak, turn off the pump and observe the water level. If the water stops dropping when the pump is off, the leak is likely in the pressure-side plumbing. If the water continues to drop, the leak may be in the pool structure or suction-side plumbing.
While these methods can help you confirm a leak, pinpointing the exact location often requires specialized tools and expertise. This is where a professional pool leak detection company comes in.
Hiring a Pool Leak Detection Company
When it comes to finding and repairing a pool leak, hiring a professional is often the best course of action. Pool leak detection companies have the experience, tools, and knowledge to accurately locate and fix leaks, saving you time, money, and frustration in the long run.
Why Hire a Professional?
Advanced Technology
Pool leak detection companies use state-of-the-art equipment to locate leaks with precision. Tools such as electronic listening devices, pressure testing equipment, and underwater cameras allow them to identify leaks without unnecessary digging or damage to your pool.
Comprehensive Inspection
Professionals can perform a thorough inspection of your pool, including the structure, plumbing, and equipment. They can identify leaks that may not be visible to the untrained eye, such as those in underground pipes or behind pool walls.
Expertise and Experience
Pool leak detection specialists have the training and experience to handle a wide range of leak scenarios. They can quickly diagnose the problem and recommend the most effective repair method, whether it’s patching a crack, replacing a damaged pipe, or resealing a fitting.
Cost-Effective Solutions
While hiring a professional may seem like an added expense, it can save you money in the long run. Attempting to fix a leak yourself can lead to costly mistakes or incomplete repairs, which may worsen the problem over time.
What to Look for in a Pool Leak Detection Company
When choosing a pool leak detection company, it’s important to do your research to ensure you’re hiring a reputable and reliable provider. Here are some factors to consider:
Licensing and Certification
Make sure the company is licensed and certified to perform pool leak detection and repairs. This ensures they meet industry standards and have the necessary expertise.
Experience
Look for a company with a proven track record and extensive experience in pool leak detection. Reading customer reviews and asking for references can help you gauge their reputation.
Range of Services
Choose a company that offers a comprehensive range of services, from leak detection to repair and maintenance. This ensures they can address all aspects of the problem.
Transparent Pricing
A reputable company should provide a clear and detailed estimate before starting any work. Be wary of providers who give vague or overly low quotes, as this could indicate hidden fees or subpar service.
Warranty
Ask if the company offers a warranty on their work. A warranty provides peace of mind and ensures they stand behind the quality of their repairs.
The Leak Detection Process
Once you’ve hired a professional, here’s what you can expect during the leak detection process:
Initial Assessment
The technician will begin by asking you about the symptoms you’ve noticed and conducting a visual inspection of the pool and equipment.
Pressure Testing
If a plumbing leak is suspected, the technician may perform a pressure test to identify leaks in the pipes.
Dye Testing
For structural leaks, a dye test can be used to pinpoint the exact location. The technician will add a special dye to the water near suspected areas and observe where it is drawn out.
Electronic Detection
Advanced tools such as electronic listening devices and cameras may be used to locate leaks in hard-to-reach areas.
Repair Recommendations
Once the leak is located, the technician will explain the issue and recommend the best course of action for repairs.
Preventing Future Leaks
After your leak is repaired, take steps to prevent future issues. Regularly inspect your pool for signs of damage, maintain proper water chemistry, and address minor problems before they escalate. Scheduling annual inspections with a pool professional can also help catch potential leaks early.
Conclusion
Discovering a leak in your pool can be stressful, but with the right approach, it’s a problem that can be effectively resolved. By recognizing the signs of a leak, confirming the issue, and enlisting the help of a professional pool leak detection company, you can protect your investment and get back to enjoying your pool. Remember, timely action is key to minimizing damage and ensuring your pool remains a source of joy for years to come.
Rubbish removal may not always be a hot topic of discussion, but in a fast-growing area like Penrith, it’s an issue that needs urgent attention. With a mix of urban development, thriving businesses, and scenic natural surroundings, Penrith has a lot to protect—and waste mismanagement poses a real threat to the environment, economy, and quality of life for residents. Illegal dumping, overflowing bins, and insufficient recycling efforts are just some of the challenges facing the region.
In this article, we’ll explore why Penrith needs to prioritize proper rubbish removal, the consequences of neglecting it, and how both residents and businesses can contribute to creating a cleaner, healthier community.
1. The Environmental Impact of Poor Waste Management
Penrith is home to stunning natural landscapes, including the Nepean River and nearby Blue Mountains, but poor waste management threatens these precious environments. Illegal dumping of rubbish in bushland and along waterways is not only an eyesore but also a major environmental hazard. Plastics and other non-biodegradable waste can harm local wildlife and pollute the soil and water.
Additionally, organic waste sent to landfills generates methane, a greenhouse gas that contributes to climate change. Without a focus on proper rubbish removal and recycling, Penrith risks seeing its environment degrade over time. Sustainable waste practices, such as sorting rubbish and prioritizing recycling, can help reduce the community’s impact on the natural world and ensure that Penrith remains a beautiful place to live and visit.
2. The Economic Costs of Inefficient Rubbish Removal
Improper waste management comes with a hefty price tag for Penrith. Illegal dumping is one of the most expensive issues, costing the Penrith City Council significant amounts of money every year in clean-up efforts. These costs are often passed on to residents through council rates, meaning the entire community pays for the actions of a few.
On the other hand, investing in proper rubbish removal and recycling systems can lead to cost savings in the long term. By reducing the volume of waste sent to landfills, Penrith can lower waste disposal fees and allocate those resources to other important community projects. A proactive approach to rubbish removal also encourages businesses to adopt waste reduction strategies, which can further boost the local economy.
3. The Community Impact of Rubbish Mismanagement
Poor rubbish removal doesn’t just harm the environment and economy—it also directly affects the quality of life for Penrith residents. Overflowing bins, litter-strewn streets, and illegal dumping sites make neighbourhoods feel neglected and uninviting. These issues can lower property values, discourage tourism, and damage Penrith’s reputation as a clean and welcoming area.
Rubbish mismanagement also creates public health risks. Uncollected waste attracts pests like rodents, flies, and mosquitoes, which can spread diseases. Clean streets, parks, and public spaces are essential for fostering a sense of pride in the community and ensuring that Penrith is a safe and enjoyable place for families to live.
4. The Path Forward: How Penrith Can Improve
Addressing rubbish removal in Penrith requires collaboration between individuals, businesses, and local authorities.
For residents, small lifestyle changes can make a big difference. Sorting recyclables from general waste, using compost bins for organic scraps, and disposing of rubbish responsibly are essential first steps. Education campaigns can also help raise awareness about proper rubbish removal practices and the importance of protecting the environment.
Businesses in Penrith can contribute by adopting sustainable waste management strategies, such as reducing packaging, recycling materials, and partnering with rubbish removal services that prioritize eco-friendly disposal. By taking action, companies can set a positive example while minimizing their environmental footprint.
The Penrith City Council must continue to play a key role in this effort by providing accessible waste management services, such as regular rubbish collection, recycling programs, and green waste pick-ups. Stricter penalties for illegal dumping and incentives for sustainable practices can also encourage residents and businesses to take waste removal more seriously.
Conclusion
Rubbish removal in Penrith is more than just a logistical concern—it’s about safeguarding the environment, supporting the local economy, and fostering a sense of pride in the community. Without proactive waste management, Penrith risks environmental degradation, higher costs, and a reduced quality of life for its residents.
Fortunately, the solution is within reach. By prioritizing proper rubbish disposal, promoting recycling, and working together as a community, Penrith can take significant steps toward becoming a cleaner, greener, and more vibrant place to live.
Whether you’re a resident, business owner, or policymaker, it’s time to take rubbish removal in Penrith more seriously. Let’s work together to keep our city beautiful, healthy, and sustainable for generations to come.
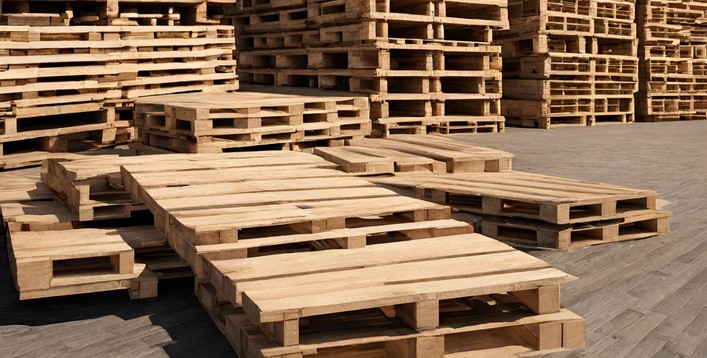
If you’re looking to incorporate a sustainable and cost-effective material into your next DIY project, buying used pallets can be an excellent choice. Whether you’re building furniture, creating wall art, or starting a garden project, used pallets offer versatility and are often available at a fraction of the cost of new materials. In this article, we’ll provide tips on where to buy used pallets, how to select the right ones for your projects, and some innovative ideas for how to use them in creative and functional ways.
1. Why Buy Used Pallets?
Used pallets are a popular option for many crafters, builders, and designers due to their affordability, availability, and eco-friendly nature. Pallets are often discarded by businesses after they’ve been used for transporting goods, making them an abundant resource for DIY projects. Instead of purchasing new lumber, buying used pallets allows you to repurpose existing materials, reducing waste and helping to preserve resources.
Additionally, used pallets have a unique, rustic look that lends itself well to many modern and vintage design trends. Whether you’re creating rustic furniture, garden planters, or decorative items, used pallets can bring a raw, industrial aesthetic to your home or business. In this section, we’ll explore some practical reasons for choosing used pallets for your projects.
Subheading: Economic and Environmental Benefits
The primary advantage of buying used pallets is the cost savings. New pallets can be expensive, especially if you need several for a project, whereas used pallets are often free or very inexpensive. By purchasing pallets that are no longer needed by businesses, you’re helping to reduce waste and contribute to a more sustainable way of living.
Furthermore, used pallets often have character and charm that new pallets lack. With natural wear and tear, old pallets bring a sense of history and authenticity to your creations. The aged appearance of used pallets can enhance the aesthetic of your projects, whether you’re creating furniture, wall art, or even a garden fence.
2. Where to Buy Used Pallets
Now that you understand the benefits of buying used pallets, the next step is knowing where to find them. While used pallets are often available for free, it’s important to know where to look and how to ensure you’re getting pallets that are in good condition for your projects.
Subheading: 1. Local Businesses and Warehouses
Many businesses receive their products on pallets and then dispose of them after use. This makes local warehouses, factories, and distribution centers excellent places to start your search for used pallets. Inquire with managers or workers at these locations and ask if they have pallets they no longer need. Often, these businesses are willing to give away or sell their used pallets for little to no cost to avoid paying disposal fees.
Be sure to ask about the quality of the pallets before you take them. Some used pallets may be damaged or broken, making them unsuitable for certain projects. Ensure that the pallets you acquire are sturdy and in good condition before you start your work.
Subheading: 2. Online Marketplaces and Classified Ads
In the digital age, finding used pallets has become even easier. Online platforms such as Craigslist, Facebook Marketplace, or OfferUp are popular places to find used pallets. Many people offer free pallets, especially those who are moving or clearing out storage. You can search for listings in your local area and contact sellers directly to arrange pickup or delivery.
It’s important to inspect the pallets before purchasing or picking them up. Look for signs of wear, such as cracks or splintering, and make sure they are strong enough to hold the weight you plan to place on them.
Subheading: 3. Pallet Recycling Centers
Pallet recycling centers are another excellent resource for finding used pallets. These centers often collect pallets from businesses and refurbish them for resale. Depending on the center, you may be able to find a variety of pallet sizes and conditions to suit your needs. Some centers offer pallets at a low price, while others might give them away for free.
Before heading to a pallet recycling center, it’s a good idea to call ahead and inquire about availability. Some centers may require you to pay a small fee for the pallets, while others might give them away to encourage recycling.
Subheading: 4. Local Construction or Demolition Sites
Another potential source of used pallets is construction or demolition sites. Contractors often discard pallets after they’ve been used to transport materials. With permission from the site manager or contractor, you may be able to collect these pallets for free. However, make sure to check the condition of the pallets before taking them. They should be free of nails, sharp edges, or any other hazards that could make them unsafe to use.
3. Creative Ideas for Using Used Pallets
Once you’ve successfully acquired your used pallets, it’s time to get creative and put them to good use. There are virtually endless possibilities for DIY projects involving pallets, from home decor to garden projects. Here are a few ideas to inspire your next project.
Subheading: 1. Pallet Furniture
One of the most popular ways to use used pallets is to create furniture. You can easily transform pallets into coffee tables, sofas, chairs, or even bed frames. The rustic look of the pallets adds character and charm to your home, while the simplicity of the design makes them versatile and easy to customize. Add cushions, paint, or stain the pallets for a polished finish, or leave them raw for a more natural, industrial look.
Coffee Tables: Stack a few pallets together and add a glass top for an elegant, rustic coffee table. You can also leave the wood exposed for a more minimalist style.
Sofas: For a cozy and unique couch, stack pallets to form the base and back, then add cushions or foam padding on top.
Storage Units: Pallets can also be used to create storage units, such as bookshelves, TV stands, or even shoe racks.
Subheading: 2. Garden Projects
Used pallets are perfect for creating garden planters, vertical gardens, and compost bins. You can easily repurpose a pallet into a vertical garden by adding soil and planting flowers, herbs, or vegetables. Simply lean the pallet against a wall or fence and fill the slats with your favorite plants. A pallet compost bin can also be made by simply arranging the pallets in a square shape and securing them together.
Planter Boxes: Use the slats of the pallets to create a raised garden bed or planter box, perfect for flowers or vegetables.
Garden Fencing: Stack pallets to create a rustic garden fence or use them as a base for climbing plants.
Subheading: 3. Wall Art and Decorations
Pallets can be used to create beautiful, rustic wall art and home decor. You can take apart the pallets and use the individual slats to create custom picture frames, signs, or shelves. Alternatively, leave the pallet intact and decorate it with stencils, paint, or reclaimed materials for a unique focal point in any room. For a trendy, industrial look, you can even create a pallet-style headboard for your bed or a statement wall in your living room.
When you buy used pallets, you’re not just acquiring a material for your next project; you’re embracing sustainability, creativity, and cost-effectiveness. With so many ways to use pallets, from furniture to garden projects and wall art, the possibilities are endless. Whether you’re an experienced DIY enthusiast or a beginner, buying used pallets can help bring your ideas to life while staying within your budget. So, start your search for used pallets today, and let your creativity flourish in ways you never imagined.
Roomba Alternative: Budget-Friendly Robotic Vacuums are a range of automated cleaning devices designed to offer the same convenience and efficiency as a Roomba, but at a more affordable price point. These robotic vacuums come equipped with various features such as smart navigation, automatic charging, and different cleaning modes, making them a practical and cost-effective solution for maintaining cleanliness in homes and offices. Despite their lower price, these alternatives do not compromise on performance and can effectively handle various types of debris on multiple floor surfaces.
Exploring Roomba Alternatives: Top Budget-Friendly Robotic Vacuums on the Market
Roomba, a brand synonymous with robotic vacuums, has been a game-changer in the world of home cleaning. However, the high price tag associated with Roomba models can be a deterrent for many potential buyers. Fortunately, the market is now teeming with budget-friendly Roomba alternatives that offer similar features and performance.
One such alternative is the Eufy RoboVac 11S. This slim, quiet, and efficient robotic vacuum is designed to clean under low-hanging furniture with ease. It boasts a strong suction power of 1300Pa, which is more than capable of picking up dust, dirt, and pet hair from hard floors and carpets. The RoboVac 11S also features a triple-filter system, ensuring a thorough clean every time. Despite its impressive features, the Eufy RoboVac 11S comes at a fraction of the cost of a Roomba, making it an excellent choice for budget-conscious consumers.
Next in line is the Ecovacs Deebot N79S. This robotic vacuum stands out for its smart home compatibility, allowing users to control it using Alexa or Google Assistant. It also comes with a mobile app, providing the convenience of scheduling cleaning sessions from anywhere. The Deebot N79S offers a variety of cleaning modes, including auto, spot, and edge, to cater to different cleaning needs. Its 110-minute battery life is another notable feature, ensuring uninterrupted cleaning for extended periods.
The ILIFE V3s Pro is another worthy contender in the realm of budget-friendly robotic vacuums. This model is specifically designed for pet owners, with a focus on picking up pet hair and debris. It features a low-profile design, enabling it to clean under beds and sofas effortlessly. The V3s Pro also offers a self-charging feature, returning to its docking station when the battery is low. This ensures that the vacuum is always ready for the next cleaning session.
The Goovi 1600PA robotic vacuum is another cost-effective alternative to Roomba. It boasts a powerful suction of 1600Pa, making it ideal for deep cleaning. This model also features large wheels, allowing it to transition smoothly from hard floors to carpets. The Goovi 1600PA offers a 2-hour runtime, which is impressive for a vacuum in its price range.
Lastly, the Coredy R500+ deserves a mention for its versatility. This robotic vacuum doubles as a mop, providing a 2-in-1 cleaning solution. It features a 1400Pa suction power and comes with a variety of cleaning modes. The R500+ also offers a high-capacity battery, providing up to 120 minutes of continuous cleaning.
In conclusion, while Roomba may be a pioneer in the robotic vacuum industry, it is no longer the only option for consumers. Brands like Eufy, Ecovacs, ILIFE, Goovi, and Coredy offer budget-friendly alternatives that do not compromise on performance or features. These models provide a cost-effective solution for those seeking the convenience of a robotic vacuum without the hefty price tag. With the right research and consideration of individual cleaning needs, finding a suitable Roomba alternative is well within reach.In conclusion, Roomba alternatives offer budget-friendly robotic vacuums that provide similar features and cleaning capabilities. These alternatives, such as Eufy, Ecovacs, and ILIFE, are cost-effective options for consumers seeking automated cleaning solutions without breaking the bank. Despite being less expensive, they do not compromise on essential features like automatic docking, scheduling, and different cleaning modes. Therefore, they present a viable option for those looking for affordable yet efficient robotic vacuums.
Deck Pricing: What to Expect for Your Project is a comprehensive guide that provides an in-depth understanding of the costs associated with building a deck. It covers a range of topics including the factors that influence the cost of deck construction, such as materials, size, design, and labor. This guide aims to equip homeowners with the necessary knowledge to plan their budget effectively, ensuring a smooth and successful deck construction project.
Understanding Deck Pricing: A Comprehensive Guide for Your Project
Deck pricing is a critical aspect to consider when planning for a deck project. It is essential to understand the various factors that influence the cost of building a deck to ensure that you stay within your budget while achieving your desired outcome. This article provides a comprehensive guide to understanding deck pricing, helping you make informed decisions for your project.
The first factor that significantly influences deck pricing is the size of the deck. As a rule of thumb, the larger the deck, the higher the cost. This is because a larger deck requires more materials and more labor to construct. Therefore, if you’re working on a tight budget, you might want to consider reducing the size of your deck.
The choice of materials is another crucial factor that affects the cost of a deck. There are various materials to choose from, including wood, composite, and PVC. Each material has its own set of advantages and disadvantages, and their costs vary significantly. For instance, while wood is relatively inexpensive and offers a classic look, it requires regular maintenance to prevent decay and insect damage. On the other hand, composite and PVC are more durable and require less maintenance, but they are more expensive.
The complexity of the design also plays a significant role in determining the cost of a deck. A simple, rectangular deck is relatively inexpensive to build. However, if you want a deck with multiple levels, intricate patterns, or custom features such as built-in seating or a fire pit, you should expect to pay more. These features require additional materials and labor, which increases the overall cost.
Labor costs are another essential factor to consider. If you plan to hire a professional contractor to build your deck, you need to factor in their fees. The cost of labor can vary widely depending on the contractor’s experience, the complexity of the project, and your location. It’s advisable to get quotes from several contractors to ensure you’re getting a fair price.
Lastly, don’t forget to factor in the cost of permits and inspections. Depending on your location, you may need a permit to build a deck, and you may also need to have it inspected to ensure it meets local building codes. These costs can add up, so it’s important to include them in your budget.
In conclusion, deck pricing is influenced by several factors, including the size of the deck, the choice of materials, the complexity of the design, labor costs, and the cost of permits and inspections. By understanding these factors, you can make informed decisions and plan your budget effectively. Remember, while it’s important to keep costs down, it’s equally important to invest in quality materials and workmanship to ensure your deck is durable and adds value to your home. Therefore, it’s advisable to strike a balance between cost and quality when planning your deck project.In conclusion, the cost of deck pricing for your project can vary significantly based on several factors such as the size of the deck, the materials used, the complexity of the design, and labor costs. It’s crucial to plan your budget carefully, considering all potential costs, to ensure the project is financially feasible. Always remember that while higher-quality materials may increase the initial cost, they can also add to the longevity and value of the deck, potentially saving money in the long run.
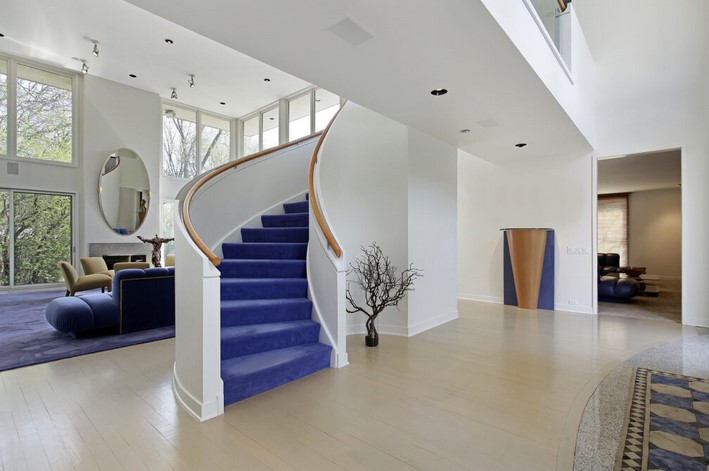
Choosing the right finish for durability when selecting the best paint for stairs is a crucial decision. The paint used on stairs needs to withstand high traffic, resist damage and wear, and maintain its appearance over time. This introduction will guide you through the various types of paint finishes available, their pros and cons, and how to choose the one that best suits your stairs’ material and usage. From oil-based to latex paints, glossy to matte finishes, each type offers different levels of durability, ease of application, and aesthetic appeal. Understanding these factors will help you make an informed choice and ensure the longevity and beauty of your painted stairs.
Top 10 Paints for Stairs: A Comprehensive Guide to Choosing the Right Finish for Durability
Choosing the right paint for your stairs is a crucial decision that can significantly impact the durability and aesthetic appeal of your staircase. With a myriad of options available in the market, it can be challenging to select the best paint that offers both durability and a pleasing finish. This article aims to provide a comprehensive guide to the top 10 paints for stairs, helping you make an informed decision.
Firstly, Benjamin Moore’s Floor and Patio Latex Enamel is a top contender. This paint is known for its durability and resistance to wear and tear, making it an excellent choice for high-traffic areas like stairs. It also offers a low-sheen finish that can hide minor imperfections, ensuring your stairs always look their best.
Secondly, Sherwin-Williams’ Porch and Floor Enamel is another excellent option. This paint is designed to withstand heavy foot traffic and resist scuffing, making it perfect for stairs. It also provides a beautiful satin finish that adds a touch of elegance to any staircase.
Thirdly, Valspar’s Porch, Floor and Patio Latex Paint is a versatile option that offers excellent durability. This paint is resistant to fading, peeling, and cracking, ensuring your stairs maintain their appearance for years to come. It also provides a glossy finish that can add a touch of sophistication to your staircase.
Fourthly, Behr’s Premium Porch and Patio Floor Paint is a high-performance option that offers excellent durability. This paint is resistant to mildew, making it an excellent choice for damp areas. It also provides a low-lustre enamel finish that can enhance the aesthetic appeal of your stairs.
Fifthly, Rust-Oleum’s Porch and Floor Coating is a durable option that offers excellent resistance to abrasion and fading. This paint is also easy to apply and dries quickly, making it a convenient choice for busy homeowners. It provides a satin finish that can add a touch of class to your staircase.
Sixthly, PPG’s Floor and Porch Enamel is a high-quality option that offers excellent durability. This paint is resistant to soaps and detergents, making it easy to clean. It also provides a glossy finish that can add a touch of glamour to your staircase.
Seventhly, Glidden’s Porch and Floor Paint is a durable option that offers excellent resistance to scuffing and staining. This paint is also easy to apply and provides a satin finish that can enhance the aesthetic appeal of your stairs.
Eighthly, Dutch Boy’s Porch and Floor Paint is a high-performance option that offers excellent durability. This paint is resistant to fading and peeling, ensuring your stairs maintain their appearance for years to come. It also provides a glossy finish that can add a touch of sophistication to your staircase.
Ninthly, Kilz’s Porch and Patio Floor Paint is a durable option that offers excellent resistance to mildew and wear. This paint is also easy to apply and provides a low-lustre finish that can enhance the aesthetic appeal of your stairs.
Lastly, Diamond Brite’s Oil Base Enamel is a high-quality option that offers excellent durability. This paint is resistant to abrasion and staining, ensuring your stairs maintain their appearance for years to come. It also provides a glossy finish that can add a touch of elegance to your staircase.
In conclusion, choosing the right paint for your stairs is crucial for ensuring durability and aesthetic appeal. By considering the top 10 paints for stairs mentioned in this guide, you can make an informed decision that meets your specific needs and preferences.In conclusion, the best paint for stairs should be durable, resistant to wear and tear, and have a finish that complements the overall aesthetic of the space. High-quality latex paint with a semi-gloss or gloss finish is often recommended due to its durability, easy cleaning, and resistance to scuffing. However, the choice ultimately depends on the specific needs and preferences of the user.
This guide provides a comprehensive step-by-step process on how to create your own fire pit. It covers everything from choosing the right location, gathering necessary materials, to the actual construction process. Whether you’re looking to add a cozy element to your backyard gatherings or simply want a DIY project, this guide will help you build a safe and functional fire pit from scratch.
Step-by-Step Process: How to Make Your Own Fire Pit: A DIY Guide
Creating your own fire pit can be a rewarding project that enhances your outdoor living space. This DIY guide will walk you through the step-by-step process of making your own fire pit, ensuring you have a safe and attractive addition to your backyard.
To begin, you’ll need to select the right location for your fire pit. It should be at least 10 feet away from any structures or combustible materials. The area should be flat and clear of any overhanging branches or shrubs. Once you’ve chosen the perfect spot, mark the center of your fire pit with a stake.
Next, determine the size of your fire pit. A typical fire pit is between 36 and 44 inches in diameter. Using your center stake as a guide, draw a circle in the ground to represent the outer edge of your fire pit. Then, draw a smaller circle inside the first one, about 12 inches in from the outer edge. This inner circle will be the actual fire pit, while the space between the two circles will be the fire pit wall.
Now, it’s time to start digging. Excavate the area inside the inner circle to a depth of about 6 inches. This will be the base of your fire pit. Then, dig a trench between the two circles, about 12 inches deep. This will be the foundation for your fire pit wall.
Once the digging is complete, fill the base of your fire pit and the trench for the wall with a layer of gravel. This will provide a stable base for your fire pit and help with drainage. Tamp down the gravel to make it level and compact.
The next step is to start building your fire pit wall. Using concrete blocks or bricks, start laying them around the edge of the trench. Make sure the blocks are level and tightly packed together. Continue building the wall, layer by layer, until it’s about one foot high.
After the wall is built, it’s time to create the inner fire pit. Place a layer of fire bricks along the bottom of the pit, making sure they fit snugly together. These bricks are designed to withstand high temperatures and will protect the concrete blocks from the heat of the fire.
Finally, fill any gaps between the fire bricks and the concrete blocks with sand. This will help insulate the fire pit and keep the heat contained. Once the sand is in place, your fire pit is ready to use.
Remember, safety should always be your top priority when using your fire pit. Never leave a fire unattended, and always have a source of water nearby in case of emergencies. With proper care and maintenance, your DIY fire pit can provide years of enjoyment.
In conclusion, building your own fire pit is a manageable project that can greatly enhance your outdoor living space. By following these steps, you can create a safe and attractive fire pit that will serve as a focal point for outdoor gatherings for years to come. Whether you’re roasting marshmallows with the kids or enjoying a quiet evening by the fire, your DIY fire pit will be a source of warmth and enjoyment.In conclusion, creating your own fire pit involves a series of steps that include choosing a suitable location, gathering necessary materials such as stones, gravel, and sand, and following safety guidelines. The process involves digging a hole, arranging stones, filling it with sand and gravel, and ensuring it is stable and safe. With careful planning and execution, you can create a functional and aesthetically pleasing fire pit in your own backyard.
Interior Brick Veneer is a versatile and aesthetic design element that can add a unique character to your home. It is a thin layer of bricks or brick-like materials applied to the interior walls of a house to mimic the appearance of solid brick walls. This design feature not only enhances the visual appeal of your home but also provides additional insulation. With a variety of colors, textures, and styles available, interior brick veneer can be tailored to suit any home decor, from rustic to modern. It is a cost-effective and practical solution for homeowners who want to incorporate the timeless charm of brick into their interior design without the expense and structural concerns of traditional brickwork.
Exploring Interior Brick Veneer: How to Add Character to Your Home
Interior brick veneer is a versatile and stylish design element that can add character to any home. It is a thin layer of brick that is used as a decorative surface on the interior walls of a home. This design element is gaining popularity among homeowners and interior designers for its ability to create a unique, rustic, and warm atmosphere.
The beauty of interior brick veneer lies in its versatility. It can be used in a variety of settings, from traditional to contemporary, and can be applied to any room in the house. Whether it’s a feature wall in the living room, a backsplash in the kitchen, or an accent wall in the bedroom, brick veneer can transform a space and give it a distinctive character.
One of the main advantages of interior brick veneer is its durability. Unlike wallpaper or paint, brick veneer does not peel, fade, or get easily damaged. It is resistant to heat and moisture, making it an ideal choice for areas such as the kitchen or bathroom. Moreover, it requires minimal maintenance and can be easily cleaned with a damp cloth.
Another advantage of interior brick veneer is its cost-effectiveness. While it may initially seem more expensive than other wall treatments, it is a long-term investment that pays off in the long run. It adds value to the home and can be a selling point if you ever decide to put your house on the market.
Installing interior brick veneer is a relatively straightforward process. It can be applied directly to drywall, wood, or any other flat surface. The bricks are usually adhered with a special type of adhesive, and the gaps between the bricks are filled with mortar to give it a realistic, full-brick appearance. However, it is recommended to hire a professional to ensure a proper and secure installation.
When it comes to the aesthetic appeal of interior brick veneer, the possibilities are endless. It comes in a variety of colors, textures, and finishes, allowing you to customize the look to suit your personal style and home decor. You can choose a traditional red brick for a classic look, a white-washed brick for a modern and airy feel, or a dark brick for a dramatic and moody ambiance.
In addition to its aesthetic appeal, interior brick veneer also has practical benefits. It provides excellent insulation, helping to keep your home warm in the winter and cool in the summer. It also has sound-absorbing properties, making it a great choice for rooms where noise reduction is desired.
In conclusion, interior brick veneer is a stylish, durable, and cost-effective design element that can add character to your home. Whether you’re renovating an old house or building a new one, consider incorporating brick veneer into your interior design. It’s a timeless material that can enhance the beauty and value of your home, while also providing practical benefits. With its versatility and charm, interior brick veneer is a design trend that is here to stay.In conclusion, interior brick veneer is a versatile and aesthetically pleasing option for homeowners looking to add character to their homes. It offers the rustic charm and durability of traditional brick, while being lighter, more affordable, and easier to install. It can be used in various rooms and styles, making it a flexible choice for interior design. Therefore, interior brick veneer is a valuable addition to any home.
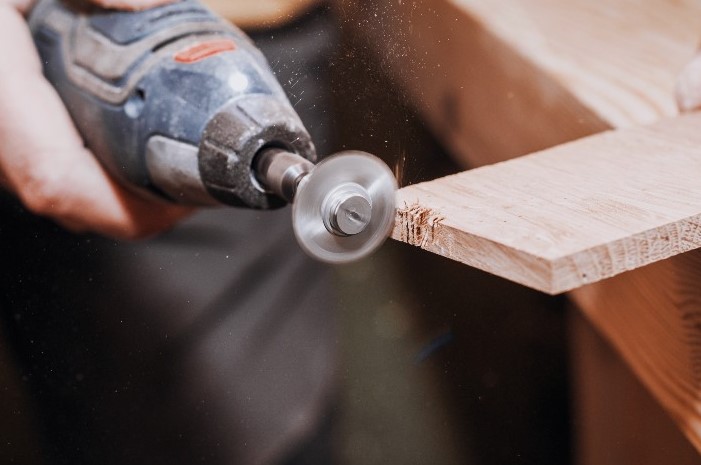
Dremel tools are versatile handheld rotary devices known for their high speed and compact size, making them ideal for a wide range of creative projects and practical applications. They are commonly used in crafts, home improvement, woodworking, metalworking, and more. With various attachments and accessories, Dremel tools can be used for carving, engraving, cutting, grinding, sanding, polishing, and drilling. They are a favorite among DIY enthusiasts, hobbyists, and professionals for their flexibility and precision. This introduction will explore the various uses of Dremel tools, highlighting their role in creative projects like crafting and sculpting, as well as practical applications such as home repair and maintenance.
Exploring Dremel Uses: Creative Projects and Practical Applications
The Dremel tool, a versatile and compact rotary device, is a must-have for any DIY enthusiast or professional craftsman. Its wide range of uses, from creative projects to practical applications, makes it an invaluable addition to any toolbox.
Dremel tools are renowned for their flexibility and adaptability. They come with a variety of attachments and accessories, allowing users to perform a multitude of tasks with a single tool. This versatility is one of the reasons why Dremel tools are so popular among hobbyists and professionals alike.
One of the most common uses of a Dremel tool is in creative projects. Artists and crafters often use Dremel tools for detailed work that requires precision and control. For instance, a Dremel tool can be used for engraving or etching designs into glass, wood, or metal. The high-speed rotation of the Dremel tool, combined with the right attachment, allows for intricate detailing that would be difficult to achieve with other tools.
In addition to engraving and etching, Dremel tools are also commonly used in woodworking and jewelry making. In woodworking, a Dremel tool can be used for tasks such as sanding, cutting, and carving. The tool’s ability to perform these tasks quickly and accurately makes it a favorite among woodworkers. Similarly, in jewelry making, a Dremel tool can be used for drilling holes, polishing surfaces, and shaping materials. The tool’s precision and control make it ideal for working with delicate materials and intricate designs.
Beyond creative projects, Dremel tools also have a wide range of practical applications. They are often used in home improvement and repair projects due to their ability to perform a variety of tasks. For example, a Dremel tool can be used for cutting through materials such as drywall, tile, and even metal. This makes it a handy tool for tasks such as installing new fixtures or making repairs around the house.
In addition to cutting, Dremel tools can also be used for grinding and sharpening. This makes them useful for tasks such as sharpening knives, scissors, and other tools. The high-speed rotation of the Dremel tool, combined with a grinding or sharpening attachment, allows for quick and efficient sharpening.
Furthermore, Dremel tools are also commonly used in automotive work. They can be used for tasks such as cleaning and polishing metal parts, grinding down rough edges, and even cutting through rusted bolts. The tool’s compact size and versatility make it a valuable tool for any automotive repair or restoration project.
In conclusion, the Dremel tool is a versatile and valuable tool that can be used in a wide range of creative projects and practical applications. Whether you’re an artist looking to add intricate details to your work, a homeowner needing to make repairs around the house, or a professional craftsman, a Dremel tool can help you accomplish your tasks with precision and efficiency. Its wide range of uses, combined with its adaptability and precision, make the Dremel tool a must-have for any toolbox.Dremel tools are highly versatile and useful for both creative projects and practical applications. They can be used for a wide range of tasks such as carving, engraving, cutting, polishing, sanding, and more. This makes them ideal for creative projects like crafting, sculpting, and DIY home decor. On the other hand, their practical applications include home improvement tasks, repairs, and even professional jobs like carpentry and jewelry making. Therefore, the conclusion is that Dremel tools are a valuable asset for both hobbyists and professionals due to their wide range of uses in creative and practical tasks.
A Floating Fireplace Mantel is a contemporary take on a traditional architectural element, offering a sleek and minimalist aesthetic to any living space. This innovative design appears to defy gravity, as it is mounted directly onto the wall without visible supports, creating an illusion of floating. It serves as a functional shelf and a focal point, where homeowners can display art, photos, or holiday decorations. The Floating Fireplace Mantel is a versatile feature that can be customized to fit various interior styles, from rustic to modern, making it a popular choice for those seeking to add a unique and stylish touch to their fireplace.
Innovative Design: The Floating Fireplace Mantel – A Modern Twist on a Classic Feature
The floating fireplace mantel is an innovative design that offers a modern twist on a classic feature. This unique design element is gaining popularity in contemporary homes, thanks to its sleek, minimalist aesthetic and functional versatility. The floating mantel, as the name suggests, appears to hover above the fireplace, creating a striking visual effect that adds a touch of sophistication and elegance to any living space.
Traditionally, fireplace mantels have been used as a decorative framework for the fireplace, often adorned with family photos, artwork, or seasonal decorations. However, the floating fireplace mantel reimagines this classic feature, transforming it into a stylish and practical addition to the modern home. The design is characterized by its clean lines and lack of visible supports, which gives it a sense of weightlessness and simplicity. This minimalist approach allows the beauty of the fireplace itself to take center stage, while the mantel serves as a subtle yet impactful accent.
The floating fireplace mantel is not just about aesthetics; it also offers practical benefits. For instance, it provides a functional shelf space that can be used for displaying decorative items or storing essential items. Moreover, the absence of visible supports means that the mantel can be installed at any height, offering flexibility in terms of design and functionality. This makes it an ideal choice for homeowners who want to customize their fireplace to suit their specific needs and preferences.
One of the key advantages of the floating fireplace mantel is its versatility. It can be crafted from a variety of materials, including wood, stone, and metal, allowing homeowners to choose a design that complements their existing décor. Whether you prefer the rustic charm of a wooden mantel or the sleek sophistication of a metal one, the floating design ensures that your mantel will be a standout feature in your home.
Furthermore, the floating fireplace mantel is a testament to the evolution of interior design. It reflects the shift towards minimalist and contemporary design trends, where the focus is on creating spaces that are not only visually appealing but also functional and easy to maintain. The floating mantel embodies this philosophy, offering a design solution that is both stylish and practical.
In conclusion, the floating fireplace mantel is a modern twist on a classic feature that offers numerous benefits. Its sleek, minimalist design adds a touch of sophistication to any living space, while its functional versatility makes it a practical addition to the modern home. Whether you’re renovating your existing fireplace or designing a new one, consider the floating fireplace mantel for a stylish and contemporary look. With its unique design and practical benefits, it’s no wonder that this innovative feature is becoming a popular choice among homeowners.In conclusion, a floating fireplace mantel offers a modern twist on a classic feature, providing a sleek, minimalist aesthetic that complements contemporary interior design. It maintains the functionality of a traditional mantel while offering a visually lighter and more versatile option. This innovative design can enhance the ambiance of a room, making it a popular choice for homeowners seeking a blend of style and practicality.
DIY Baby Crib: Build a Safe and Stylish Bed for Your Little One is a comprehensive guide that provides step-by-step instructions on how to construct a secure and aesthetically pleasing crib for your newborn. This guide is designed for parents who wish to add a personal touch to their baby’s nursery, while ensuring the utmost safety and comfort for their child. It covers everything from choosing the right materials, to assembling the crib, and even decorating it. With this guide, you can create a unique and cozy sleeping space for your little one, while also gaining the satisfaction of building it yourself.
Step-by-Step Guide: Building a Safe and Stylish DIY Baby Crib for Your Little One
Building a DIY baby crib for your little one can be a rewarding project that not only saves you money but also allows you to create a unique piece of furniture that can be cherished for years to come. This step-by-step guide will help you construct a safe and stylish crib that meets all safety standards and complements your nursery decor.
Before you begin, it’s essential to gather all the necessary materials and tools. You’ll need quality hardwood, screws, dowels, a saw, a drill, sandpaper, and non-toxic paint or stain. It’s also crucial to have a detailed plan or blueprint of the crib design. There are many free plans available online, or you can purchase one from a woodworking store.
Once you have your materials and plan, the first step is to cut the wood according to the dimensions specified in your blueprint. This is where precision is key, as any inaccuracies can lead to safety issues down the line. After cutting the wood, sand each piece thoroughly to ensure a smooth finish and to prevent any potential splinters.
Next, assemble the crib frame. Start with the four posts and attach the side rails to them using screws and dowels. Ensure that the rails are secure and that there are no sharp edges or protruding screws. Once the frame is assembled, you can install the mattress support. This should be adjustable so that you can lower it as your baby grows and becomes more mobile.
After the frame and mattress support are in place, you can move on to the crib slats. These should be no more than 2 3/8 inches apart to prevent your baby’s head from getting stuck. Attach the slats to the rails using screws, making sure they are secure and evenly spaced.
Once the crib is fully assembled, give it a thorough inspection. Check for any loose screws or rough edges and make sure the mattress support is sturdy and secure. It’s also a good idea to give the crib a shake to ensure it’s stable and doesn’t wobble.
The final step is to finish the crib. Apply a non-toxic paint or stain and let it dry completely before placing a mattress in the crib. When choosing a mattress, make sure it fits snugly within the crib with no more than two fingers width of space between the mattress and the crib sides.
Building a DIY baby crib is a project that requires careful planning and meticulous execution. However, the result is a safe and stylish bed for your little one that you can take pride in having made yourself. Remember, safety should always be your top priority, so take your time, follow the instructions closely, and don’t hesitate to seek professional advice if you’re unsure about any step in the process. With patience and attention to detail, you can create a beautiful and functional piece of furniture for your baby’s nursery.In conclusion, building a DIY baby crib can be a rewarding project that allows parents to provide a safe and stylish bed for their little one. It offers the opportunity to customize the crib according to personal preferences and nursery decor. However, it’s crucial to ensure that the crib meets safety standards to protect the baby’s well-being.
Wood Fence Prices: What to Expect When Budgeting is a comprehensive guide that provides detailed information about the costs associated with installing a wood fence. It covers various factors that can influence the overall price, such as the type of wood used, the size and design of the fence, labor costs, and additional features like gates or treatments. This guide aims to help homeowners and property managers anticipate the potential expenses and effectively plan their budget for a wood fence installation project.
Understanding Wood Fence Prices: What to Expect When Budgeting
When planning to install a wood fence around your property, understanding the costs involved is crucial. Wood fence prices can vary significantly based on several factors, including the type of wood, the size of the fence, labor costs, and additional features. This article aims to provide a comprehensive understanding of what to expect when budgeting for a wood fence.
The type of wood chosen for the fence significantly impacts the overall cost. Commonly used woods for fencing include pine, cedar, and redwood. Pine is typically the least expensive option, while cedar and redwood are more costly due to their natural resistance to decay, insects, and weather conditions. Therefore, if you’re working with a tight budget, pine may be your best bet. However, if longevity and minimal maintenance are your priorities, investing in cedar or redwood could be more cost-effective in the long run.
The size of the fence is another critical factor in determining the cost. The price is usually calculated per linear foot, meaning the longer the fence, the higher the cost. The height of the fence also plays a role in the overall price. A taller fence requires more material and labor, thus increasing the cost. Therefore, it’s essential to accurately measure the area you want to enclose before getting a quote.
Labor costs can also significantly impact the overall price of a wood fence. While it’s possible to install a fence yourself, hiring a professional can ensure the job is done correctly and efficiently. The cost of labor can vary based on the complexity of the project, the terrain of your property, and the rates of the contractor you choose. It’s advisable to get quotes from several contractors to ensure you’re getting a fair price.
Additional features can also add to the cost of a wood fence. For instance, adding a gate will increase the price, as will choosing a custom design or decorative elements. If privacy is a concern, you may opt for a board-on-board design, where the fence boards are overlapped to prevent gaps. While this design offers more privacy, it also requires more material, thus increasing the cost.
Lastly, it’s important to factor in the cost of maintenance when budgeting for a wood fence. Wood fences require regular maintenance, including painting or staining every few years to protect the wood from weather damage. The cost of these maintenance tasks should be considered as part of the overall budget.
In conclusion, several factors can influence the cost of a wood fence, including the type of wood, the size of the fence, labor costs, and additional features. By understanding these factors, you can make an informed decision about the best type of wood fence for your budget and needs. Remember, while the initial cost is important, considering the longevity and maintenance costs can help ensure you’re making a cost-effective decision in the long run.In conclusion, when budgeting for wood fence prices, expect to consider factors such as the type and quality of wood, the size and design of the fence, labor costs if hiring professionals, and additional costs for gates or special features. Prices can vary widely, so it’s important to get several quotes and consider all potential expenses. Regular maintenance costs should also be factored into the overall budget.