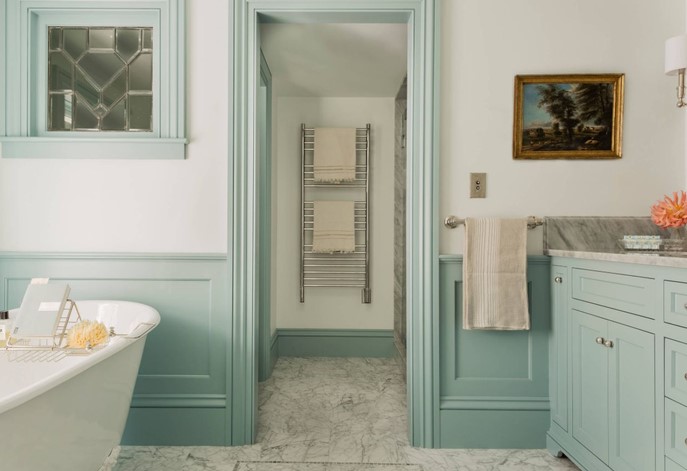
You step into your home’s guest bathroom. The lighting is fine and the fixtures are clean, but the lower half of the walls tells a story of endless wear and tear—scuff marks from foot traffic, water splashes near the pedestal sink, and peeling paint caused by daily steam. You want to give the space a high-end luxury makeover, but the thought of tearing down drywall or laying thousands of dollars worth of floor-to-ceiling tile feels overwhelming and completely out of budget.
If this design frustration sounds familiar, you are far from alone. Over my ten years of hands-on experience remodeling residential interiors and restoring historic homes, I have seen homeowners face this exact dilemma constantly: how do you add character, protection, and architectural prestige to a sterile bathroom without a massive overhaul?
The solution lies in classic millwork adapted for modern living. Exploring strategic bathroom wainscoting ideas allows you to shield your walls from moisture while infusing the room with rich texture, balanced proportions, and timeless architectural charm.
The Ergonomic and Architectural Purpose of Partial-Height Paneling
Wainscoting originally evolved in 16th-century Europe as a practical necessity—it was used to insulate stone walls against damp cold while shielding the lower wall sections from physical damage. In modern residential design, it serves as a powerful visual anchor.
Bathrooms are notoriously hard-surfaced rooms dominated by reflective ceramic, porcelain, and glass. Without millwork or soft textures, sound bounces aggressively around the space, and cold drywall dominates the visual height.
Think of wainscoting like a tailored suit jacket for your walls. The upper half of your wall acts as the dress shirt—where you can experiment with bold paint colors, textured wallpapers, or dramatic lighting—while the lower wainscoting acts as the structured trousers, grounding the space with clean, solid lines.
+-------------------------------------------------------------------+
|                  WALL PROTECTION & DESIGN MATRIX                  |
+------------------------------------+------------------------------+
| Standard Painted Drywall           | Integrated Bathroom Wainscoting|
+------------------------------------+------------------------------+
| • High risk of water splash damage | • Durable physical barrier   |
| • Flat, acoustically reflective    | • Absorbs sound reverberation|
| • Shows scuffs & paint peeling     | • Easy-to-clean wipeable trim|
| • Zero architectural depth         | • High visual ROI & texture  |
+------------------------------------+------------------------------+
Exploring Style Variations: Selecting Your Architectural Profile
When diving into bathroom wainscoting ideas, choosing the right panel style determines the overall personality of your room—shifting it anywhere from rustic farmhouse to crisp modern Scandinavian.
1. Beadboard Paneling (The Coastal Classic)
Beadboard features vertical wooden planks separated by small, rounded ridges (beads). It is exceptionally popular in coastal, cottage, and powder room setups. Vertical beadboard lines draw the eye upward, making low ceilings feel noticeably taller.
2. Board and Batten (The Craftsman Favorite)
Composed of wide vertical boards spaced apart with flat timber strips (battens) covering the seams. Board and batten offers clean geometric lines and deep shadow effects, making it a staple for modern farmhouse and contemporary interiors.
3. Raised and Recessed Picture-Frame Panels (The Traditional Luxury)
The ultimate classic look for elegant powder rooms and formal master suites. Beveled picture-frame moldings are mounted inside a rectangular frame, creating deep shadow lines that mirror high-end European estates.
Material Formulations for High-Humidity Zones
Because bathrooms experience sudden spikes in relative humidity (RH) and frequent temperature fluctuations, material selection is critical to prevent warping and rot.
Solid Wood vs. Medium-Density Fiberboard (MDF) vs. Cellular PVC
-
Solid Hardwood (Oak, Poplar): Offers authentic natural grain, but requires thorough sealing on all six sides before installation to prevent moisture movement.
-
Moisture-Resistant (MR) MDF: Standard interior MDF swells like a sponge when exposed to steam. If using MDF, insist on Green MR-MDF, which uses moisture-repellent resins.
-
Cellular PVC / Polyurethane (The Gold Standard): 100% waterproof synthetic paneling. Cellular PVC will never warp, rot, swell, or breed mold, making it the absolute best choice for wet zones near tubs and showers.
+-------------------------------------------------------------------+
|                    MATERIAL RESILIENCE GUIDE                      |
+----------------------+----------------------+---------------------+
| Material Type        | Moisture Resistance  | Best Application    |
+----------------------+----------------------+---------------------+
| Cellular PVC         | Exceptional (100%)   | Full Baths / Wet Zones|
| Moisture-Resistant MDF| Moderate - High     | Dry Powder Rooms    |
| Solid Hardwood       | High (If Sealed)     | Accent Walls        |
| Standard MDF         | Extremely Low (Avoid)| None (Swells/Warps) |
+----------------------+----------------------+---------------------+
Proportion and Scale: The Golden Ratio Rule
A common mistake DIYers make with bathroom wainscoting ideas is cutting their panel height directly in half—splitting a 8-foot wall at exactly 4 feet. In architectural design, splitting a wall 50/50 creates visual confusion for the human eye.
Instead, adhere to the Rule of Thirds. For a standard 8-foot ceiling, set your top cap rail height at roughly 32 to 36 inches (one-third of the wall height). This keeps the paneling slightly below or aligned with your vanity countertop height, creating a continuous, harmonious horizontal line around the room.
If you have high 9-foot or 10-foot ceilings, consider dramatic high-waisted paneling that extends two-thirds up the wall (around 6 feet), topping it off with a functional picture ledge or peg rail.
Step-by-Step Installation: Executing Precision Millwork
Installing paneling is a highly rewarding project that requires careful layout planning and proper sealing techniques.
Step 1: Prep and Level the Perimeter
Remove your existing baseboards. Check the level of your floor finish—floors in older homes are rarely perfectly flat. Draw a level reference chalk line around the room at your target cap rail height using a laser level, adjusting for floor dips.
Step 2: Mount Panels and Fasten to Studs
Apply heavy-duty construction adhesive (like Liquid Nails or polyurethane adhesive) to the back of your panels before pressing them against the wall. Fasten trim pieces through the drywall directly into wooden wall studs using 18-gauge brad nails.
Step 3: Caulk, Seal, and Paint
Never skip caulking! Apply an acrylic latex painter’s caulk along every joint, seam, and top-rail junction to seal out stray steam. Finish with two coats of high-quality, semi-gloss or satin interior enamel paint. Semi-gloss finishes provide an easy-to-clean, moisture-resistant barrier that wipes clean effortlessly.
Expert Advice: Hidden Traps & Technical Nuances
Over a decade in the field teaches you the critical subtleties that make or break a millwork installation:
-
Watch Out for Electrical Box Depth: Adding 1/2-inch or 3/4-inch wainscoting paneling pushes your wall plane outward. You must install plastic electrical box extenders so your light switches and outlet faceplates sit flush against the new trim, maintaining electrical code compliance.
-
Beware of Baseboard Profile Transitions: Ensure your bottom baseboard molding is thicker than your vertical battens or beadboard sheets. If your vertical panels stick out past your baseboard cap, you will create awkward, sharp edges that trap dust and look unfinished.
-
Always Seal the Back and Bottom Cut Edges: If you are using wood or MR-MDF, prime and paint the raw back faces and bottom cut edges before installing them against the wall. Damp air trapped behind the wall will cause unsealed timber to cup and bow outward over time.
Elevate Your Space with Timeless Character
Exploring thoughtful bathroom wainscoting ideas is one of the most effective ways to transform a flat, uninspired room into an architecturally rich sanctuary. By combining durable moisture-resistant materials with balanced proportions and crisp paint finishes, you protect your investment while elevating daily utility.
Take a hard look at your bathroom walls today: are they bland, unprotected drywall, or do they showcase timeless architectural character?
Which wainscoting style would best match your home’s aesthetic—classic beadboard, modern board and batten, or formal raised panels? Drop your ideas or installation questions in the comments below—I would love to help you plan your wall makeover!
