 Granite is among the most durable natural stones and most rigid materials in the world. However, regardless of its strength, granite can still chip, whether accidentally or not. It is essential to repair chips immediately to avoid further damage, which will be more costly in the long run. With the proper tools, you can fix your chipped granite surface without relying on a professional.
Here is a quick guide on granite chip repair.
Step 1: Get Your Tools in Order
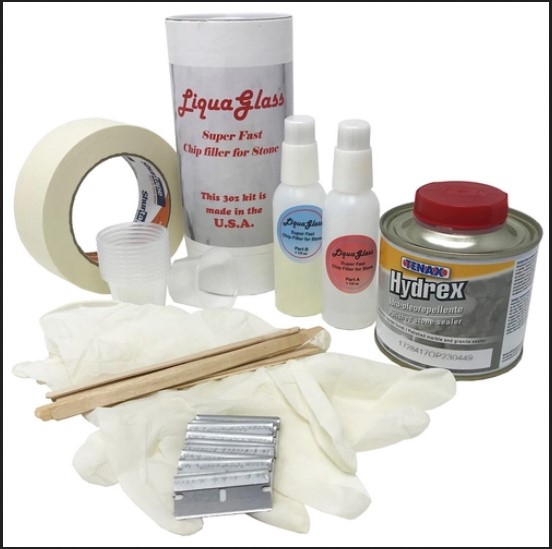
Gather all the necessary supplies that you will need to repair the granite surface. We recommend this granite and marble repair kit since it contains the tools needed to ensure the repair process is done effectively and efficiently. The items you will find in this kit include;
- Masking tape
- Chip filler
- Single edge razor blades
- Sealer
- Pair of latex gloves
- Mixing cups and sticks
Step 2: Clear the Area
Clear the chipped area of any loose debris, loose objects, decorations, or furniture that may interfere with the repair process.
Step 3: Clean the Surface
Wash and clean the chipped area using a dedicated granite cleaner or by simply using soap and water. Using a granite cleaner is highly advised since it has a small amount of sealer, which helps preserve the granite surfaces. Avoid abrasive cleaners that contain bleach.
Step 4: Fill the Chip with Gel Epoxy
Before adding epoxy, check to see if the chip caused the surrounding area to lighten in color. If so, use a dark permanent marker to darken the surrounding. If the stone is light-colored, you may not need to change its appearance.
Use tape near the chipped surface to guide how you will use the epoxy. Leave a tiny margin to blend the epoxy with the stone surface easily. Once you are sure the colors match, fill with the chip with the epoxy. If it rises slightly above the stone surface but is flush with your masking tape, then that is enough.
Step 5: Hardening Spray
If you have a hardening spray, spray it onto the damaged area and wipe any excess spray from the surface around the masking tape.
Step 6: Allow the Epoxy to Dry
Let the epoxy dry according to the manufacturer’s instructions before you cut it with a razor blade. Drying may take a while, depending on the depth of the chip and your home’s humidity. The hardening spray can help harden the epoxy and speed up the drying process.
Step 7: Remove Excess Epoxy and Polish Area
Once the epoxy has dried, remove the tape and clean out the surface. Cut out the extra epoxy using a razor blade. Then buff the area clean using steel wool or sandpaper.
As a finishing touch, apply the sealer over the blemish to polish the area. A high-grade sealer helps you avoid chipping in the future.
When to Call a Professional
If you notice large chips on your granite, reach out to a professional stone expert to help with the chip repair. Granite is a good home investment that should be taken care of properly. When repairing yourself, ensure you only use top-quality and expert-recommended supplies and equipment to guarantee the best outcome.
